Step 2: fasten hood support rails, Step 3: install filter channels – Greenheck Hooded Propeller Roof Fans Filtered Supply (455602) User Manual
Page 2
2
Hooded Propeller Roof Fans • Filtered Supply
®
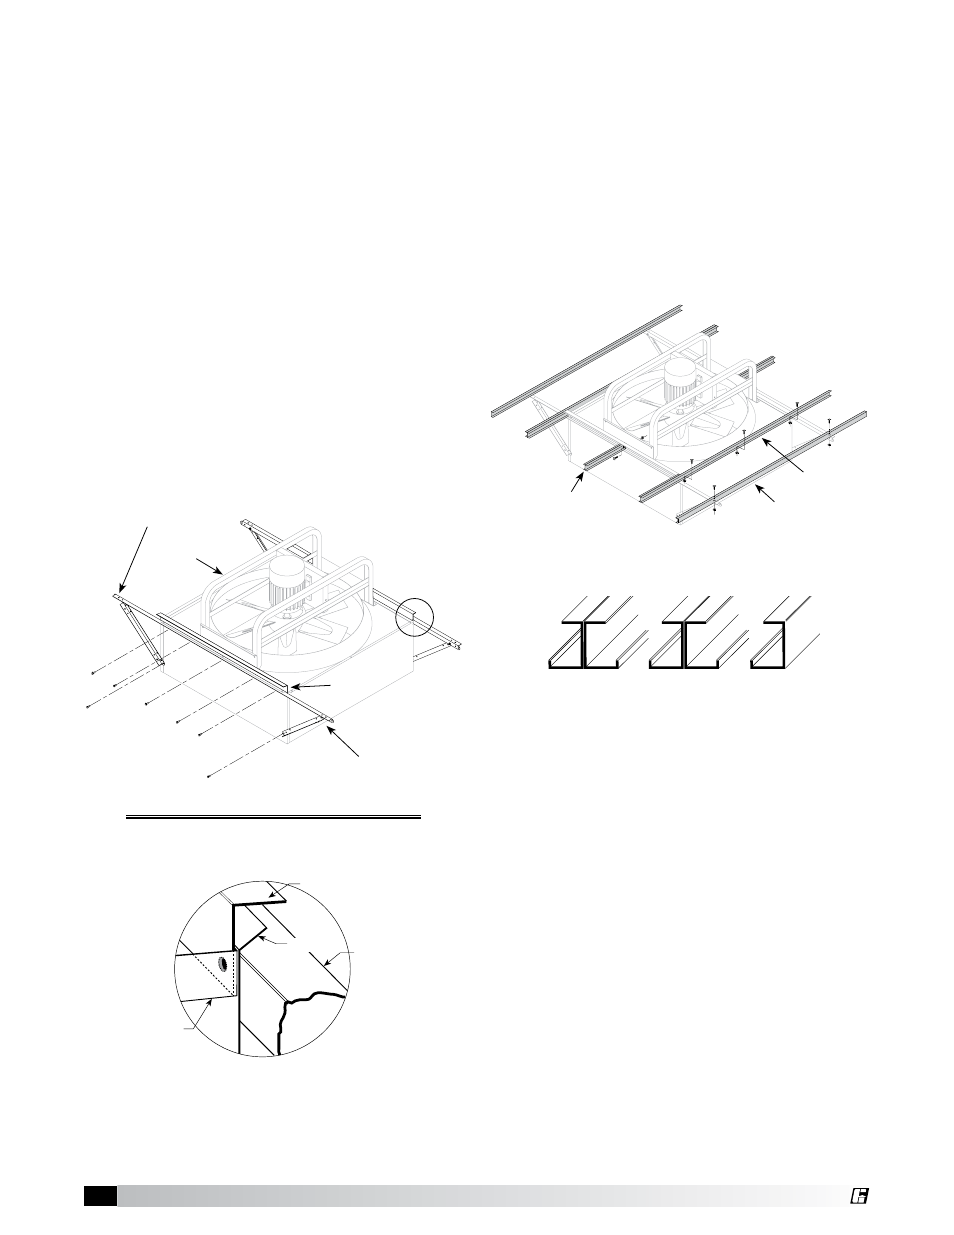
Step 2: Fasten Hood Support Rails
Hardware Required:
Hardware Package Part Number 816526
3/8” - 16 x 3/4” hex head spinlock bolts & nuts
Quantity:
Up to (8) fasteners per side for 72 inch fans; less
required for smaller sizes.
Instructions:
The bolts that fasten the fan panel to the base will
also be used to secure the hood support rails and
filter retaining angles. (see Detail 2).
A. Remove the 3/8” - 16 x 3/4” bolts from ONE
SIDE of the fan panel (up to six bolts for size
72).
B. Assemble the parts and wrench tighten the
hood support rails and filter retaining angles
perpendicular to fan drive frame as shown.
Mounting holes in fan base will line up with
holes in hood support rails and filter retaining
angles.
C. Repeat for opposite side.
Step 3: Install Filter Channels
Hardware Required:
Hardware Package Part Number 816528
5/16” - 18 x 3/4” weld studs and spinlock nuts
Quantity:
As required.
Instructions:
Finger tighten the channels in place as shown.
Bolt hole locations as shown are typical, but
larger units will have additional filter end channel
sections. The detail below will help identify the
correct channel and its proper orientation.
Outer Filter
Channel
Inner Filter
Channel
Filter End
Channel
Outer Filter
Channel
Inner Filter
Channel
Filter End
Channel
Channel End Profiles
Detail 2
Hood support rails
perpendicular to
fan drive frame
Fan Drive Frame
Exploded detail
below
Filter Retainer Angle
Hood Support
Angle Assembly
Fan Base
Filter Retainer
Angle
Hood Support
Angle
Fan
Panel