Assembly, Sealing, Lifting – Greenheck Vektor-M Series Roof Curb (475588) User Manual
Page 2: Mounting
Phone: (715) 359-6171 • Fax: (715) 355-2399 • E-mail: [email protected] • Website: www.greenheck.com
®
2
475588 • Roof Curb Assembly, Rev. 2, April 2013
Copyright © 2013 Greenheck Fan Corp.
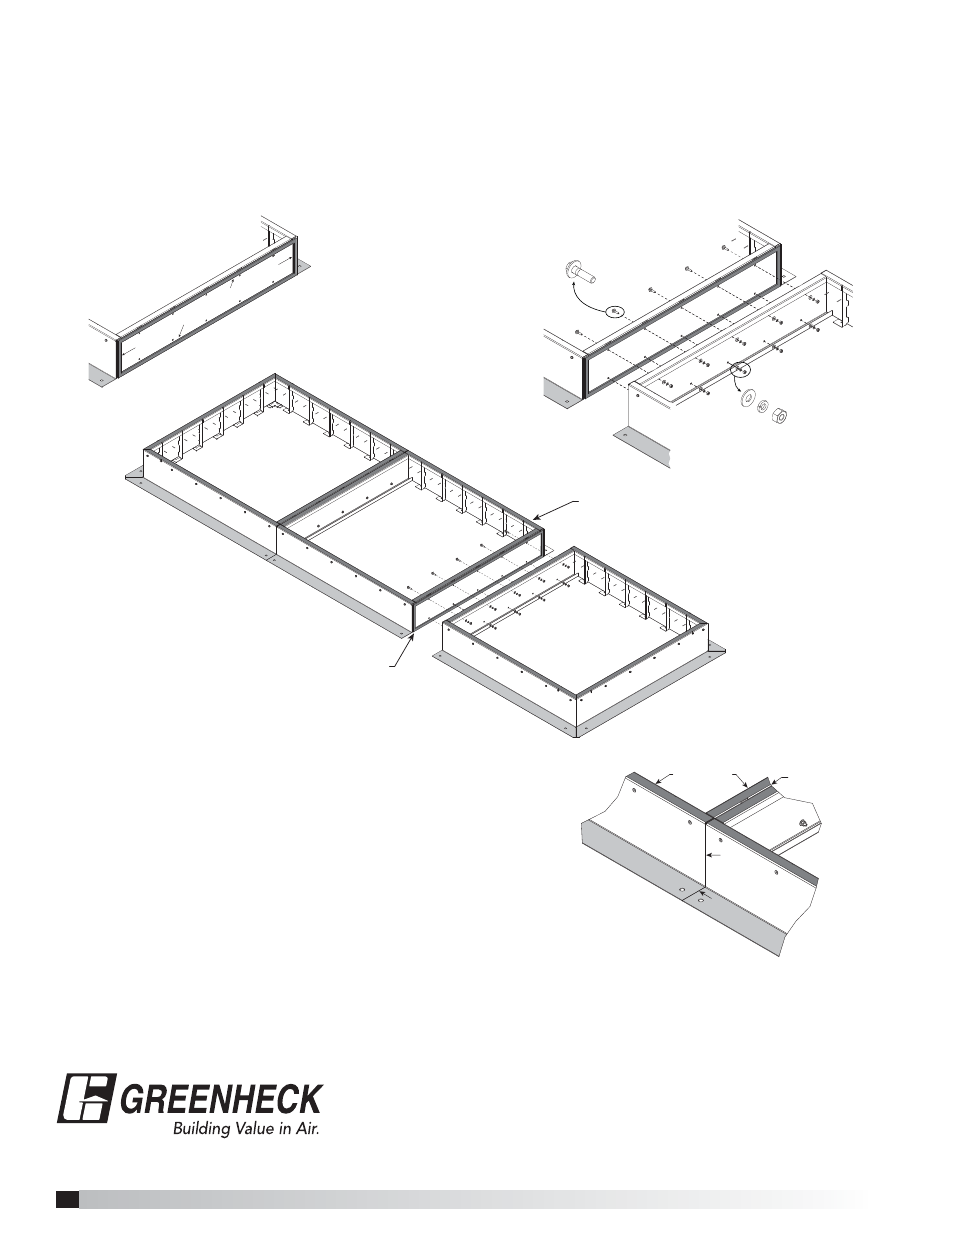
Assembly
Use one Roof Curb Assembly Kit with gasketing and hardware for each section to be joined. Attach self-adhering
foam gasketing (supplied) to one side of either joining section (see Drawing 1a). Gasketing should be placed to
form a continuous seal. Corner locations may need second strip to cover seam joints. Supplied hardware should
then be used to secure the two sections together as shown (see Drawing 1b). Hold nut with wrench while bolt is
tightened.
Drawing 1c shows two end panels and single center section. All sections and configurations are assembled in a
similar manor.
Sealing
After all sections have been assembled, caulk (supplied) all seam joints to
provide final sealing of roof curb sections. Drawing 2 shows seams to
be caulked. Follow caulk manufacturers recommendations for proper
application.
Lifting
Roof curb can be assembled at installation location on the roof deck
or at ground level and lifted into position. To lift from ground to roof
deck, use spreader bar and support both end and center sections
when lifting assembled curb.
Mounting
Attach curb to roof deck or support structure as specified by structural engineer.
All seams
to be caulked
Gasketing
All seams to
be caulked
Foam Gasketing
Drawing 1a
3/8-inch
Hex Head Cap Screws
3/8-inch Flat Washer
3/8-inch Locking Washer
3/8-inch Hex Nut
Drawing 1b
Drawing 2
Gasket to be placed along
inside edge prior to assembly
Gasket to be placed on
top edge after assembly
End Section
Center Section
End Section
Drawing 1c