5 arc voltage display – Kemppi MXP 37 Pipe Stee User Manual
Page 22
EN
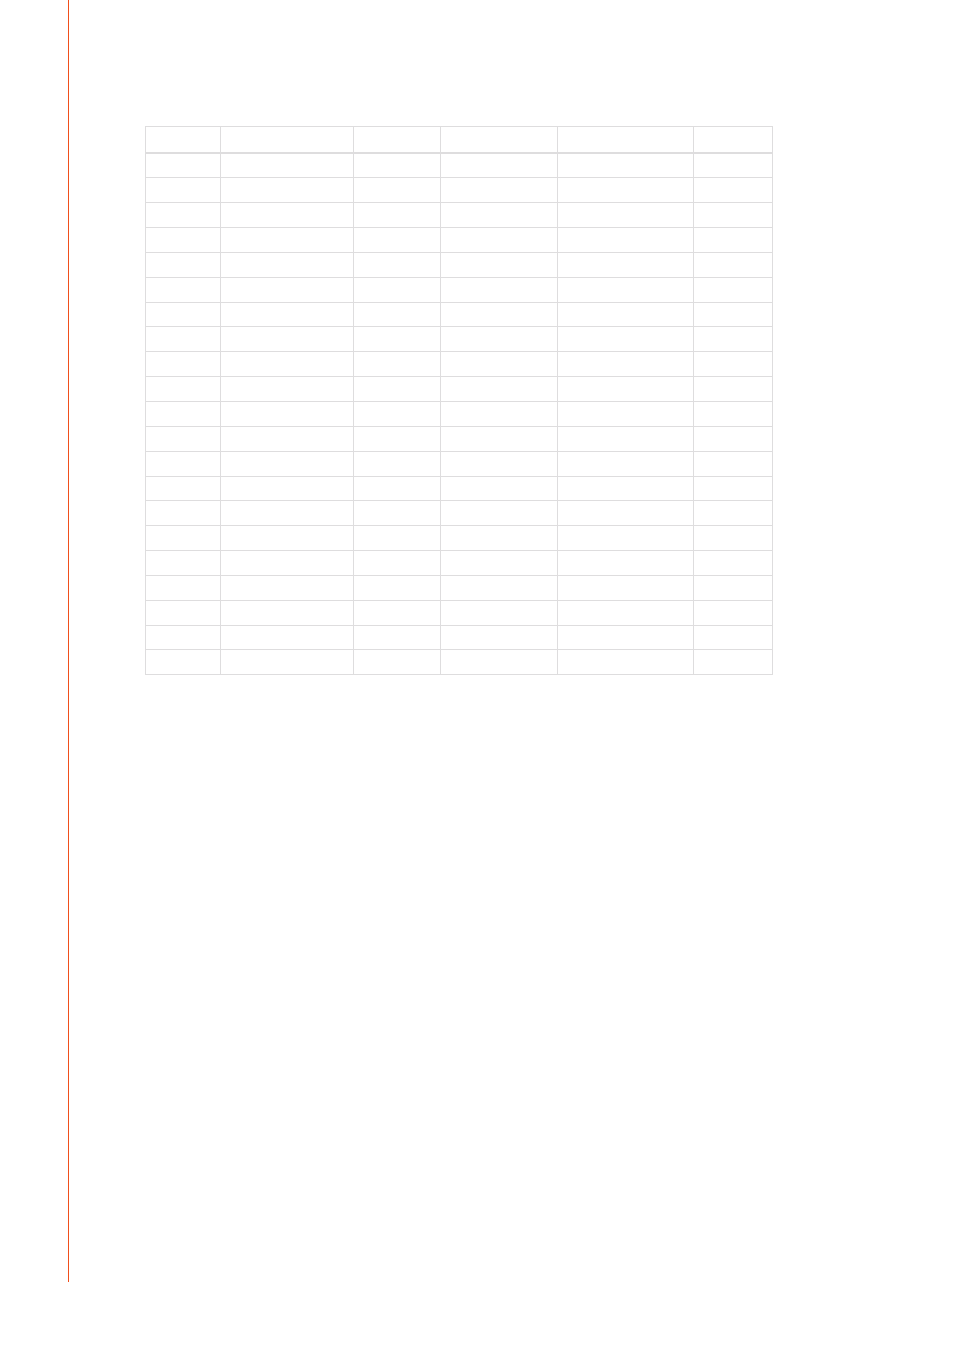
WORK PACK
Group
Material
Wire ø (mm) Shielding gas
Process
Number
Al
AlMg5
1.2
Ar
Pulse/Double Pulse
A02
Al
AlSi5
1.2
Ar
Pulse/Double Pulse
A12
Fe
Fe
1.0
Ar+15–25%CO₂
Pulse/Double Pulse
F03
Fe
Fe
1.2
Ar+15–25%CO₂
Pulse/Double Pulse
F04
Ss
CrNiMo 19 12
1.0
Ar+2%CO₂
Pulse/Double Pulse
S06
Ss
CrNiMo 19 12
1.2
Ar+2%CO₂
Pulse/Double Pulse
S04
Al
AlMg5
1.2
Ar
1-MIG
A02
Al
AlSi5
1.2
Ar
1-MIG
A12
Fe
Fe
0.9
Ar+15–25%CO₂
1-MIG
F02
Fe
Fe
1.0
Ar+15–25%CO₂
1-MIG
F03
Fe
Fe
1.2
Ar+15–25%CO₂
1-MIG
F04
Fe
Fe
0.9
CO₂
1-MIG
F22
Fe
Fe
1.0
CO₂
1-MIG
F23
Fe
Fe
1.2
CO₂
1-MIG
F24
Fe
Fe Metal
1.2
Ar+15–25%CO₂
1-MIG
M04
Fe
Fe Metal
1.2
CO₂
1-MIG
M24
Fe
Fe Rutil
1.2
Ar+15–25%CO₂
1-MIG
R04
Fe
Fe Rutil
1.2
CO₂
1-MIG
R14
Ss
CrNiMo 19 12
1.0
Ar+2%CO₂
1-MIG
S03
Ss
CrNiMo 19 12
1.2
Ar+2%CO₂
1-MIG
S04
Ss
FC-CrNiMo 19 12
1.2
Ar+15–25%CO₂
1-MIG
S84
More welding programs are available by purchasing MatchCurve and MatchCustom products.
3.5 Arc voltage display
FastMig X is capable of measuring and showing the voltage close to the welding arc. By taking
this feature into use you don't need to be concerned about the voltage losses in welding
cables anymore. With this feature you are only required to set the voltage for the arc before
welding and after welding you can see the voltage close to the arc.
In order to use the arc voltage feature, follow these steps:
1.
After setting up the welding equipment for the first time, connect the voltage sensing
cable to the welding piece and the measurement cable between the wire feeder and the
power source.
2.
If you are using a sub-feeder, enter the length of the sub-feeder to the SubFeederLength
parameter.
3.
Set the welding parameters according to your application. Note that the set voltage
when using 1-MIG, MIG and WiseThin+ welding processes means always the voltage in
the arc despite of ArcVoltage setting.
4.
Weld with 1-MIG, MIG or with Pulse MIG for at least 5 seconds. During that time the
welding machine calibrates itself for the welding cable length in question. Calibration
values are stored into the welding machine, therefore this calibration is required only
once after installing the welding machine package.
5.
If you want to see arc voltage in panels during and after welding, turn the ArcVoltage
setting to ON in X 37 setup panel. Dot after voltage value in XF 37 or XF 38 panel means
that showed value is arc voltage. In the weld data after welding in X 37 panel 'AVol'
means also the arc voltage.
6.
Voltage sensing cable can be removed after the calibration procedure, but it is
recommended to use it always.
NOTE!
Steps 1-3 should be repeated every time, when the length of the welding or grounding cable
is changed.
FastMig MXP 37 Pipe, MXP 38
20