7 control panel operation, 1 button description, 1 a/v toggle – Nevion VikinX Sublime series Rev.G User Manual
Page 29: 2 panel enable, 3 take on/off, 4 take, 5 output, 7control panel operation
VikinX Sublime Optical Routers
Rev. G
nevion.com | 29
7
Control Panel operation
This chapter is only applicable for routers with the optional local control panel.
All local control panels are completely configurable with the Nevion Configurator, which is
downloadable from the Support pages at
All local control panels are given a default configuration, whi
ch includes the buttons “A/V
Toggle”, “Panel Enable”, “Take on/off” and “Take”. In addition input and output buttons are
preconfigured.
7.1 Button description
7.1.1 A/V Toggle
The A/V Toggle button enables/disables audio and video on a specified address. The
address can either be read from the dip switches, or be fixed. The button toggles between
three states.
If the button is pressed for more than 1 second, it will go into a fourth state
where both audio and video are disabled.
In this state the button will be dimmed. If the button is pressed for more than 1 second
again, it will enable both audio and video if present.
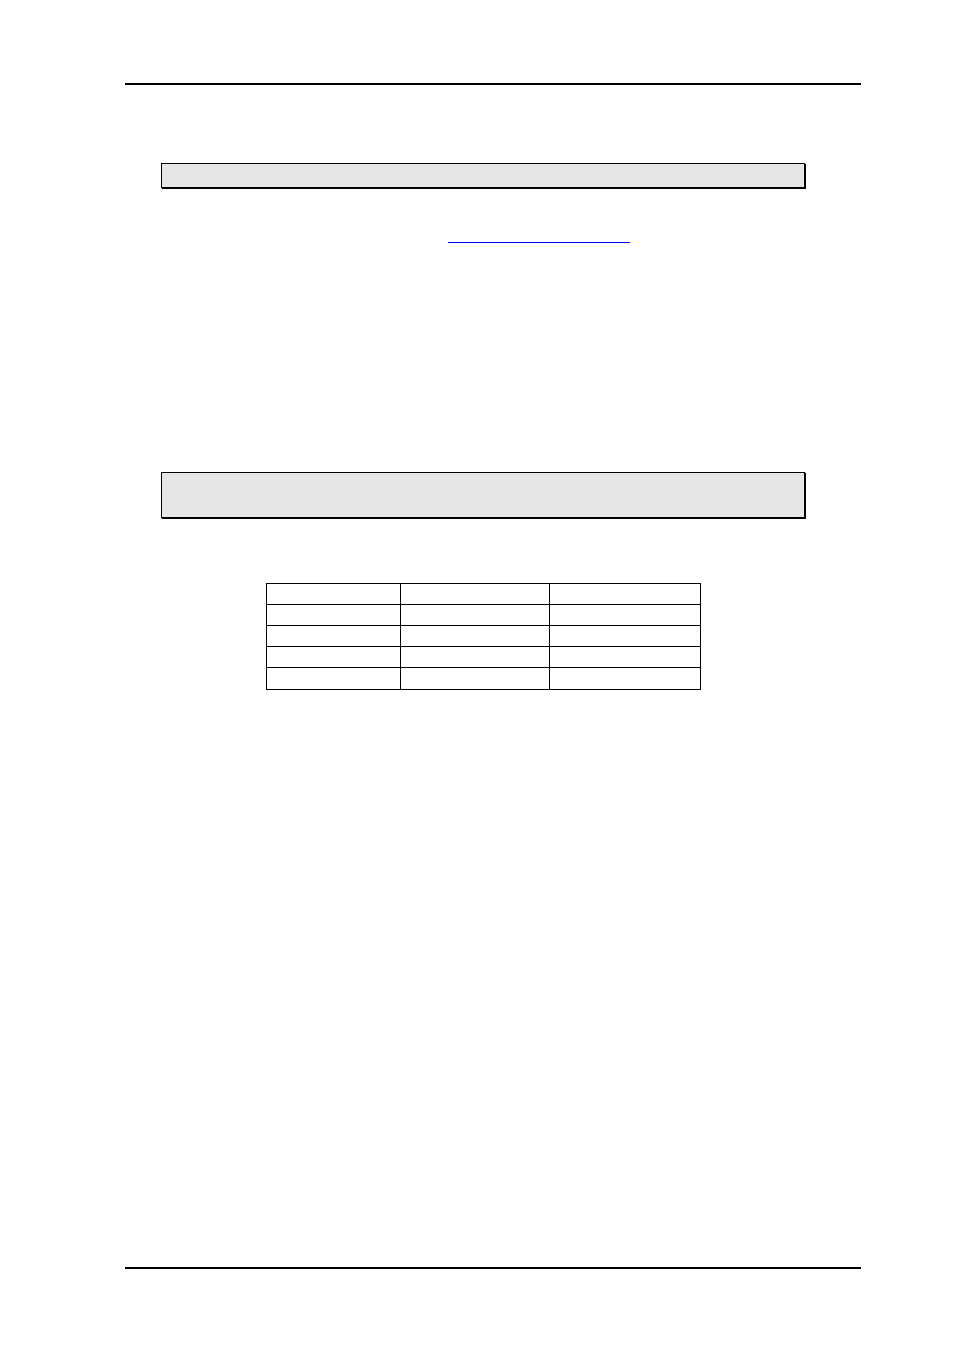
Button Color
Video Enabled
Audio Enabled
Yellow
Yes
Yes
Green
Yes
No
Red
No
Yes
Dimmed
No
No
If neither audio nor video is present, it will be marked as disabled and the toggle state will
not be used.
Toggle status changes will be stored in flash and used when the panel is powered up later.
7.1.2 Panel Enable
The panel always starts in disabled mode. In this state the button will be red and all the
other buttons will be disabled. When pressing the button the panel will be enabled and the
color will change to green. A status request will also be sent to get information on active
levels.
7.1.3 Take on/off
The Take on/off button enables or disables the Take button. If no take button is defined,
Take on/off is always off. On first start-up the take button is enabled. Later it will read the
last status from the flash memory.
7.1.4 Take
The Take buttons LED is normally of
f. If the Take on/off button is set to “on”, no commands
will be sent from the panel until the Take button is pressed. The last selected buttons and
the take button will blink, until the Take button is pressed and the command is sent from the
panel.
7.1.5 Output
An Output button is used for selecting an output. Selecting an output activates it, so that it is
switched to the next input that is selected.