V7 ethernet/ip option kit cm093 – Yaskawa CM093 User Manual
Page 3
Yaskawa Electric America, Inc. –
IG.V7.26, Page 3 of 11
Date: 05/24/2010 Rev: 10-05
V7 EtherNet/IP Option Kit
CM093
The V7 EtherNet/IP Option Kit includes 3 ferrites which must be mounted to the
Ethernet cable, incoming power leads, and motor leads. See Section 13, steps b
and c.
14. Configure the EtherNet/IP network
a. The default configuration option for the EtherNet/IP Option Kit is DHCP
(Dynamic Host Configuration Protocol). Thus there must be a DHCP
Server connected to the network in order to have the IP address of the
EtherNet/IP Option Kit set. For detailed information on how to set up the
Rockwell BOOTP/DHCP Server on a PC refer to the appropriate
Rockwell document or Yaskawa’s Application Note AN.AFD.10.
b. If the network configuration requires that devices have a static IP
address, the EtherNet/IP Option Kit’s configuration can be changed to
USER and the appropriate static IP address can be entered via the
EtherNet/IP Option Kit’s web pages as shown below.
Note that the EtherNet/IP Option Kit must first have been assigned an IP
address via DHCP server before its configuration can be changed.
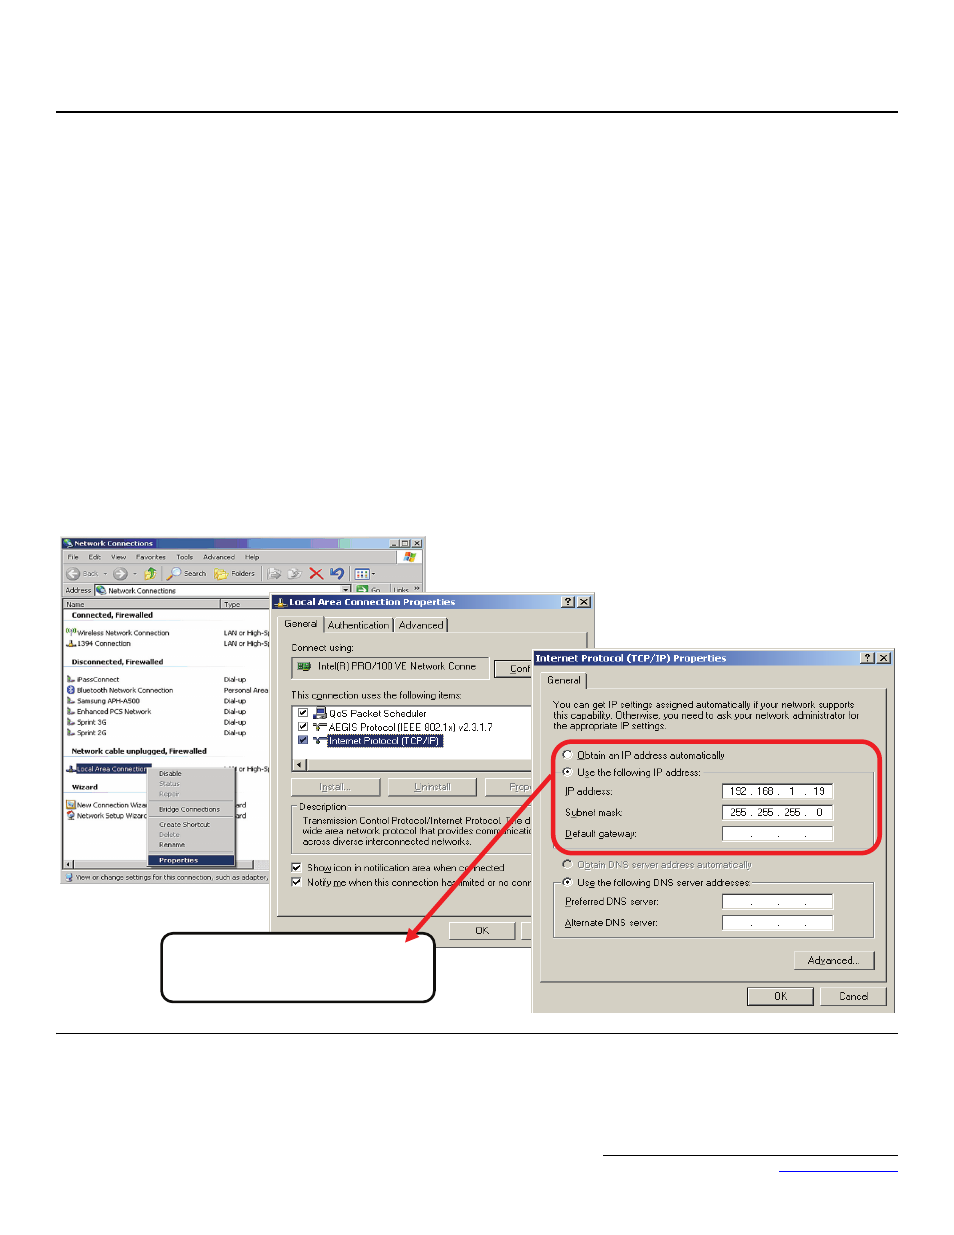
15. Configuring a PC with a static IP address
a. Select an existing connection or create a new network connection for
communication with the EtherNet/IP Option Kit.
1. Select Start
⇒ Settings ⇒ Network Connections from the task bar
in the Windows OS.
2. Select the network connection to be used.
b. Right click on the network connection and select Properties from the
drop-down menu.
c. Select Internet Protocol (TCP/IP) from the components displayed.
Note: If a TCP/IP selection is not available, it may be installed by
selecting Install. Administrator access to the PC and the OS
operating system installation CD-ROMs may also be required.
1. Select Properties.
Note: If the PC is on a building or office network, disconnect it from
that network before proceeding. Record the existing network
settings. If the network connection already has an IP address
assigned on the EtherNet/IP Local network, ignore the following
instructions and just click on Cancel.
2. Select the Use the following IP address radio button.
3. Enter the IP address of a vacant IP address on the EtherNet/IP Local
Network (192.168.1.19 in this example).
4. Enter the subnet mask for the EtherNet/IP Local Network
(255.255.255.0 in this example).
5. Check the system network schematic or with your network
administrator to ensure that the IP address does not already exist on
the network.
6. Once the IP address and Subnet mask are entered, select OK.
Note: It may be necessary to reboot the PC in order for the changes
to take effect.
16. Accessing the EtherNet/IP Option Card web pages
The browser interface to the EtherNet/IP Option Kit can be used for configuring
the card or for network and drive information and diagnostics. To access the web
pages:
a. Obtain the IP address of the desired drive and enter that IP address in the
browser address bar. Hit Enter. The IP address of the desired drive is
192.168.1.20 in this example.
b. The main web page should be displayed.
IP address: 192.168.1.19
Subnet mask: 255.255.255.0