Maintenance, Operation – Sealey AK9636D User Manual
Page 2
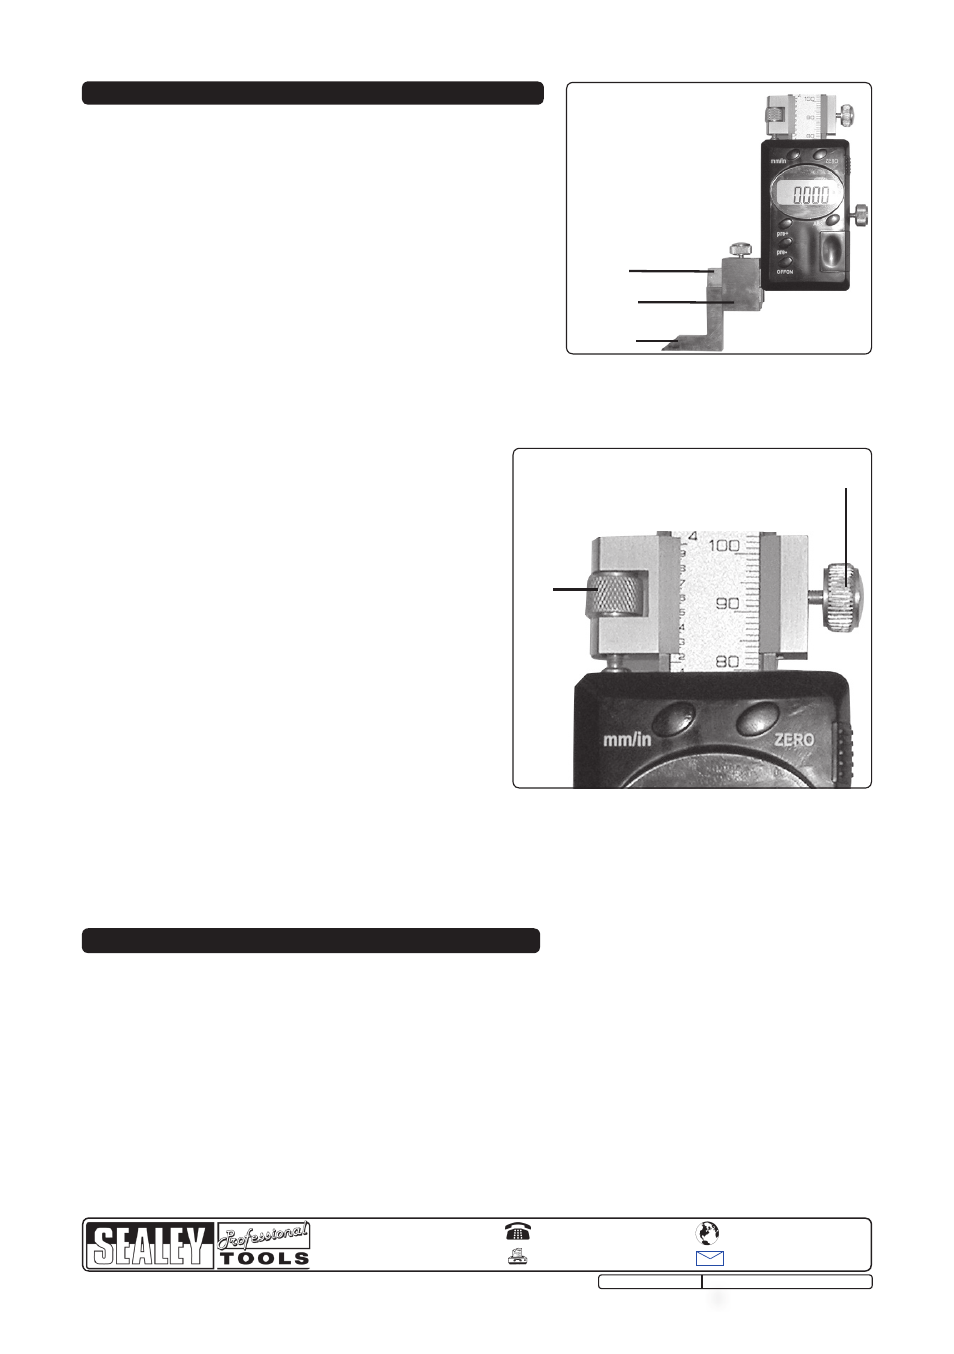
3.1 To Fit Scriber
3.1.1 Place the clamp upon the arm extending from the slider.
3.1.2 Slot the scriber into the clamp and tighten.
3.2 Turn the gauge on by pressing the power button (Fig 1.1).
3.3 Select the desired units of measurement (inch / mm) using the
selection button (Fig 1.2).
3.4 To set the gauge to absolute zero at any point, press the
Zero setting button (Fig 1.4).
3.5 To set the origin to a value other than zero, use the +/-
preset buttons (Fig 1.5.6).
3.5.1
To increase the value of the origin, press the zero setting
button and + preset button simultaneously. The word “set”
will flash in the display.
To increase the value by 0.01mm or 0.0005” press the + preset button once. To increase the value
further, keep the + preset button depressed until the desired value has been set. Press the zero
setting button once more to return to measuring mode.
3.5.2
To decrease the value of the origin, repeat step 3.5.1, this time using the - preset button.
Note! The preset origin will remain set even when the unit is
turned OFF. To turn OFF the preset origin enter the
setup mode again (3.5) and press + or - until the LCD
displays 0.00mm or 0.000” press the Zero button
again to return to measuring mode.
3.6 To accurately position the slider, use the fine
adjustment set (Fig 1/C).
3.6.1 Position the slider roughly i.e. within 5mm of the
point being measured.
3.6.2 Tighten fixing screw (Fig 3/B) in order to fix the
position of the fine adjustment set.
3.6.3 Now carefully position the slider using adjustment
screw A.
3.6.4 When the desired measurements have been made,
release the fixing screw (Fig 3/B) and retract the fine
adjustment set.
3.7 To fix the position of the slider itself e.g. for using the
scriber, tighten the fastening screw (Fig 1/E).
3.8 ABS Button
3.8.1 A second measurement that then also needs to be added to the first one can be obtained by pressing the
ABS switch after obtaining the first measurement display will show INC.
3.8.2 Then move the callipers to measure the second one.
After noting this, press the ABS/0 switch again and the display will show the total of both measurements.
You can repeat this process as many times as is required
Arm
Clamp
Scriber
Fig 2
NOTE: It is our policy to continually improve products and as such we reserve the right to alter data, specifications and component parts without prior
notice.
IMPORTANT: No liability is accepted for incorrect use of product. WARRANTY: Guarantee is 12 months from purchase date, proof of which will be
required for any claim.
INFORMATION: For a copy of our latest catalogue and promotions call us on 01284 757525 and leave your full name and address,
including your postcode.
4. MAINTENANCE
4.1 If the gauge is not to be used for an extended period of time, remove the battery for storage.
Note: The LCD will flash continuously if the battery is run down.
4.2 To remove/change the battery: Slide the battery compartment lid located on the front of the
main body (Fig 1/F). Remove/replace the battery (CR2032) (anode (+) facing outward) and slide the
cover back on.
4.3 Avoid subjecting the gauge to shock.
4.4 Do not place the gauge within a strong magnetic field, as this can damage the electronics.
4.5 Occasionally oil the scriber, arm and main base - this is to prevent corrosion. DO NOT allow oil or any
other liquids to come into contact with the slider, as this could damage the electronics.
4.6 The gauge contains no user serviceable parts. See your authorised dealer for advice/repairs.
01284 757500
01284 703534
Sole UK Distributor
Sealey Group,
Bury St. Edmunds, Suffolk.
www.sealey.co.uk
Web
3. OPERATION
B
A
Fig 3
AK9636D.V2 ISSUE No.1 - 20/02/09