Sealey TA060 User Manual
Ta060, Sound level meter, Instructions for
InstructIons for:
sound level meter
MoDEL no :
tA060
thank you for purchasing a sealey product. Manufactured to a high standard this product will, if used according to these instructions
and properly maintained, give you years of trouble free performance.
IMPORTANT: PleAse reAd tHese InstruCtIons CAreFullY. note tHe sAFe oPerAtIonAl reQuIrements, WArnInGs And CAutIons.
use tHe ProduCt CorreCtlY And WItH CAre For tHe PurPose For WHICH It Is Intended. FAIlure to do so mAY CAuse
dAmAGe And/or PersonAl InJurY And WIll InvAlIdAte tHe WArrAntY. PleAse KeeP InstruCtIons sAFe For Future use.
1. sAFetY InstruCtIons
2. IntroduCtIon & sPeCIFICAtIon
1.1. GenerAl sAFetY
WArnInG! damage to the human ear can begin at 85dB and above.
Always wear ear defenders when testing the sound level in a new
situation. do not assume that the sound level is safe until you have
actually measured it.
WArnInG! this equipment can be used in a wide variety of
situations where noise is a concern including the home, traffic
situations, industrial environments, building sites, airports e.t.c. In
each case, the user of the equipment must familiarise themselves with the
safety regulations that apply to the particular situation in which the
equipment will be used and do their own risk assessment in order to stay
safe and avoid personal injury.
familiarise yourself with the applications, limitations, and potential hazards
of the sound level meter.
Keep the sound level meter clean and in good condition.
Protect the sound level meter from electro-magnetic fields, static
electricity and high temperatures.
remain vigilant when using the sound level meter on, or near, machinery
where there are rotational parts such as belts, pulleys and fans.
Maintain correct balance and footing. Ensure the floor is not slippery and
wear non-slip shoes.
remove ill fitting clothing. remove ties, watches, rings, and other loose
jewellery, and contain and/ or tie back long hair.
do not get the sound level meter wet or use in damp or wet locations or
areas where there is condensation.
do not use the sound level meter for any purpose other than for which it
is designed.
do not allow untrained persons to operate the sound level meter.
do not operate the sound level meter when you are tired or under the
influence of alcohol, drugs or intoxicating medication.
WArnInG: The warnings, cautions and instructions discussed in this
instruction manual cannot cover all possible conditions and
situations that may occur. It must be understood that common sense
and caution are factors which cannot be built into this product, but
must be applied by the operator.
High quality meter suitable for measurement of environmental and
mechanical noise. conforms to IEc61672-1 class 2 for sound meters. features
max and min measurements, over and under range, A and c weighting, fast
and slow response, data hold, record, digital read-out and bar graph with
backlight. supplied in storage case. requires 9V battery (supplied).
model no: .................................................................................................tA060
Accuracy ................................................................................................... ±1.4dB
frequency range ..........................................................................31.5Hz - 8KHz
range .............................................................................................30 - 130dB
Original Language Version
tA060 Issue: 1 - 27/05/11
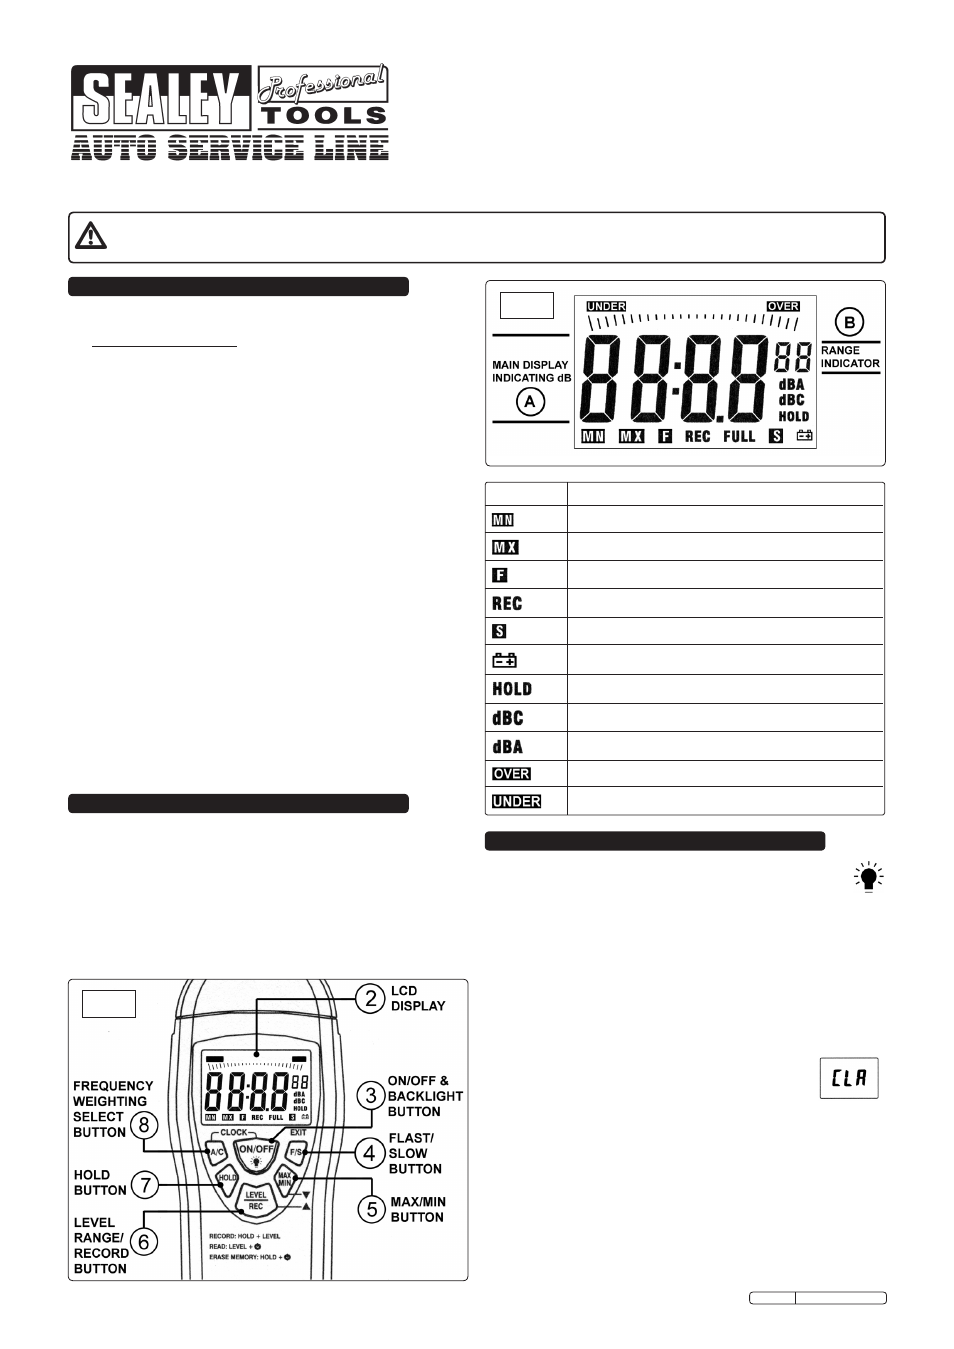
3. mAIn FunCtIons
sYmBol
FunCtIon
MIn - Minimum sound level capture
MAX - Maximum sound level capture
fAst - sampling rate
DAtA has been recorded
sLoW - sampling rate
Low battery indicator
Data hold function
c: Weighting, response to machine monitoring
A: Weighting, response to human hearing
over upper limit of range
under minimum limit of range
fig. 1
fig. 2
3.1
PoWer on/oFF And BACKlIGHt Button. (fig.1-3)
3.1.1 Press the button once to turn the meter on.
3.1.2 Press it once more to turn backlight on.
3.1.3 Press it once more to turn backlight off.
3.1.4 to turn the unit off hold the button down continuously whilst the
display counts down
P - - 3, P - - 2, P - - 1. When the screen is blank,
let go of the button.
3.2
FreQuenCY WeIGHtInG seleCt Button. (fig.1-8)
the button switches between two settings.
3.2.1 A: Weighting (the display shows
'dBA') this setting deals with
frequencies which affect human hearing.
3.2.2 B: Weighting (the display shows
'dBC') this setting deals with
frequencies measured from machines.
3.3
Hold Button. (fig.1-7)
3.3.1
data Hold Function.
3.3.2 Press button once to freeze the reading on the display
.
3.3.3 Press button again to return to live monitoring.
3.3.4
data Zero Function.
3.3.5 firstly hold down the 'HoLD' button then hold down the power button
as well. Keep both buttons held down until the display shows 'cLA'
which indicates that all readings stored in memory have been cleared.
3.4
level rAnGe & reCord FunCtIon (fig.1-6)
3.4.1
range select Button
3.4.2 the range level is represented on the display by the two small digits
which appear at the top right hand corner of the main four digit display.
(fig.2-B) cycle through the available levels by
repeatedly pressing the
LEVEL/rEc button.
01 represents the 'Lo' level. ................................................... 30 - 80dB
02 represents the 'Med' level.. ............................................ 50 - 100dB
03 represents the 'Hi' level.. ................................................ 80 - 130dB
04 represents the 'Auto' level selection............................... 30 - 130dB