Sealey THC100 User Manual
Fig.1
Thank you for purchasing a Sealey product. Manufactured to a high standard this product will, if used according to these instructions
and properly maintained, give you years of trouble free performance.
IMPORTANT: PLEASE READ THESE INSTRUCTIONS CAREFULLY. NOTE THE SAFE OPERATIONAL REQUIREMENTS, WARNINGS AND CAUTIONS.
USE THE PRODUCT CORRECTLY AND WITH CARE FOR THE PURPOSE FOR WHICH IT IS INTENDED. FAILURE TO DO SO MAY CAUSE
DAMAGE AND/OR PERSONAL INJURY AND WILL INVALIDATE THE WARRANTY. PLEASE KEEP INSTRUCTIONS SAFE FOR FUTURE USE.
1. SAFETY INSTRUCTIONS
1.1. General Safety
Familiarise yourself with the applications and limitations of the local environment measuring meter.
Keep the meter clean and in good condition.
Protect the meter from the following:
Electro-magnetic fields from engine components, arc welders and induction heaters closer than 125mm.
Static electricity.
Thermal shock caused by large and/or rapid ambient temperature change.
High temperatures.
DO NOT get the meter wet or use in damp or wet locations or areas where there is condensation.
DO NOT use the meter in areas where there is steam, dust or smoke. These conditons may result in erroneous readings.
DO NOT use the meter
for any purpose other than that for which it is designed.
2. INTRODUCTION/SPECIFICATION
2.1. Introduction
Large LCD digital screen displays both the internal and external temperature readings simultaneously. Also shows humidity and time. Features
integral stand or can be wall mounted. Ideal for the workshop, body shop, office or home. Temperature can be shown in either °C or °F.
Original Language Version
© Jack Sealey Limited 2013
INSTRUCTIONS FOR:
THERMOMETER/HYGROMETER/CLOCK
INSIDE/OUTSIDE
MODEL No:
THC100
Model No:.......................................................................................... THC100
Outside Temperature Probe Cable Length:.................................................3m
Size:..........................................................................104mm x 98mm x 22mm
Inside/Outside Temperature Range:.............-50°C to +70°C (-58°F to 158°F)
Temperature Accuracy:.........................................................................+/- 1°C
Relative Humidity Range:........................................................10% to 99%RH
Power:..................................................................1.5V battery (AAA supplied)
TCH100 Issue: 1 - 21/03/13
3. MAIN FUNCTIONS
3.1
LCD display of time, indoor temperature, outdoor temperature and relative humidity at a glance.
3.2
Alarm displayed when set.
3.3
12/24 hour format, °C/°F temperature units.
3.4
Temperature and relative humidtiy trend display.
3.5
Wall (keyhole slot) or desk mounting (stand).
3.6
Spare battery housing for continuity and convenience.
4. SPECIFICATIONS
5. BUTTON FUNCTIONS
5.1
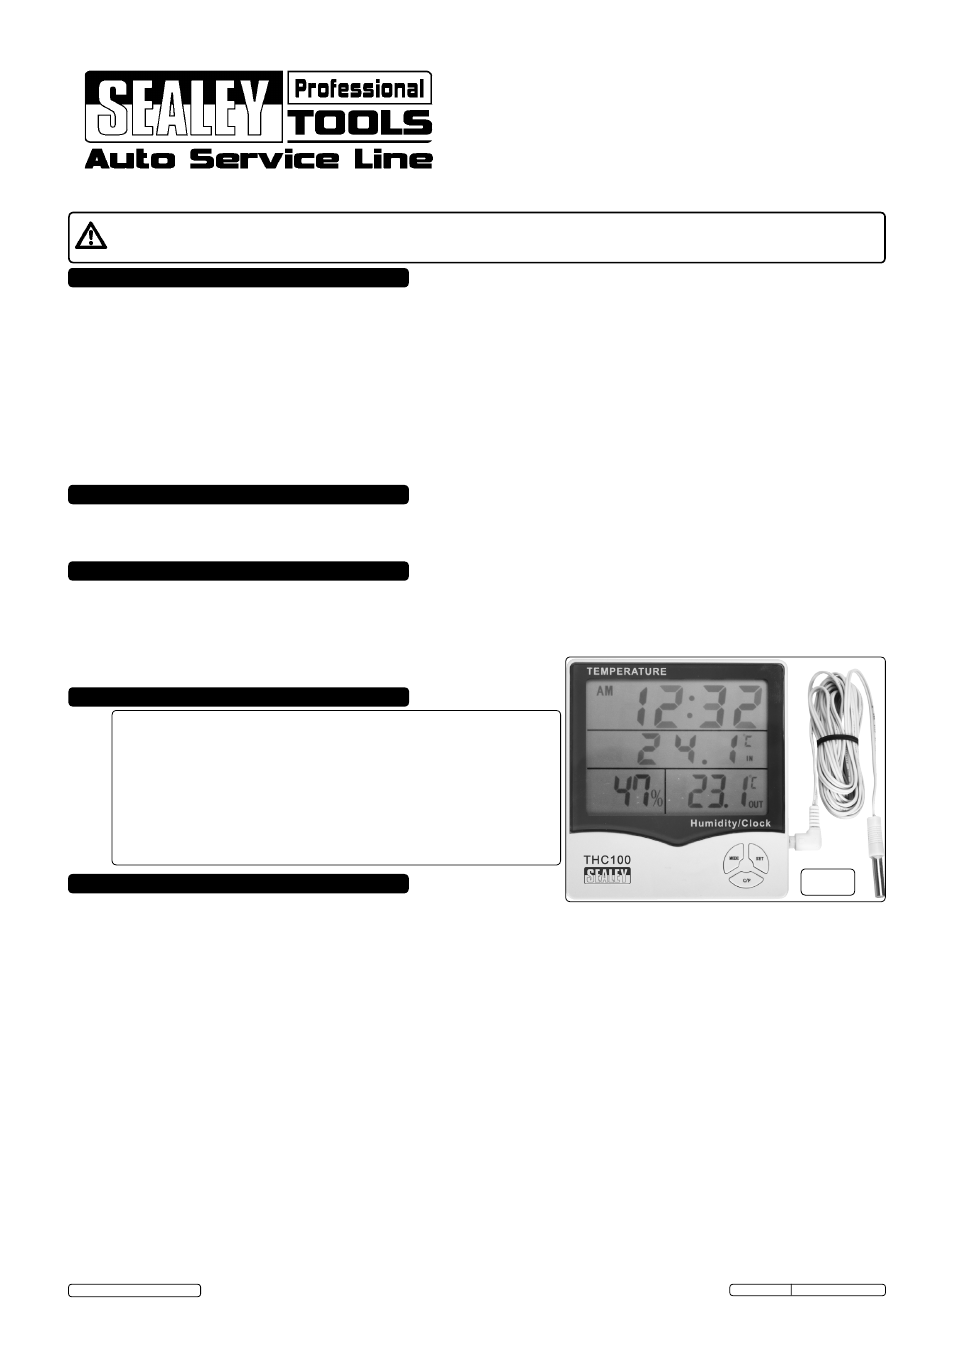
Initial display status (fig.1)
5.1.1 Remove battery cover at rear by sliding in the direction of arrow with your thumb.
5.1.2 Fit supplied AAA battery into lower battery compartment observing correct polarity. A beep sound indicates presence of battery.
5.1.3 The time is displayed as 12.00 AM on a 12hour format, the temperature and relative humidity % figure will also be displayed.
5.1.4 Replace the battery compartment cover by sliding along "tram lines" until it snaps into place.
5.1.5 Press the button marked
"C/F" to display temperature in either Centigrade or Fahrenheit.
5.2
Setting the time
5.2.1 Press the "MODE" button once and hold for 2 seconds until you hear a beep and the minutes flash. Press the "SET" button repeatedly
to obtain the correct time in minutes past the hour.
5.2.2 Press the "MODE" button once and the hour flashes. Press the "SET" button repeatedly to obtain the correct hour.
5.2.3 Press the "SET" button to obtain 12hour or 24hour (ie if AM or PM displayed 12hour, no display 24hour applies)
5.3
Setting the alarm time (assuming the time is now set as in section 5.2)
5.3.1 Press the "MODE" button and the time
":" LCD will stop flashing.
5.3.2 Press the "SET" button two or three times and the bell symbol will be displayed (fig.2).
5.3.3 With the bell symbol displayed press the "MODE" button and hold for 2 seconds. The minutes will flash. Press the "SET" button
repeatedly to obtain the correct time in minutes past the hour.
5.3.4 Press the "MODE" button once and the hour flashes. Press the "SET" button repeatedly to obtain the correct hour.
5.3.5 Press the "MODE" button once to confirm.
5.3.6 When the alarm sounds press any button to cease.
5.4
Rear face button functions (fig.3)
5.4.1 Press
"CLEAR" button to clear memory of minimum and maximum temperature and humidity values.
5.4.2 Press
"MAX/MIN" button to display memory of minimum and maximum temperature and humidity values of previous period.
5.4.3 Shrouded centre button
"C/F" does not function on this model, its function is covered on the front face, again marked "C/F". See
instruction 5.1.5.
MODE
C/F
SET
fig.1