Whelen HA239CD User Manual
Automotive: other, Diagram 1, Engineering company inc
Page 1
®
ENGINEERING COMPANY INC.
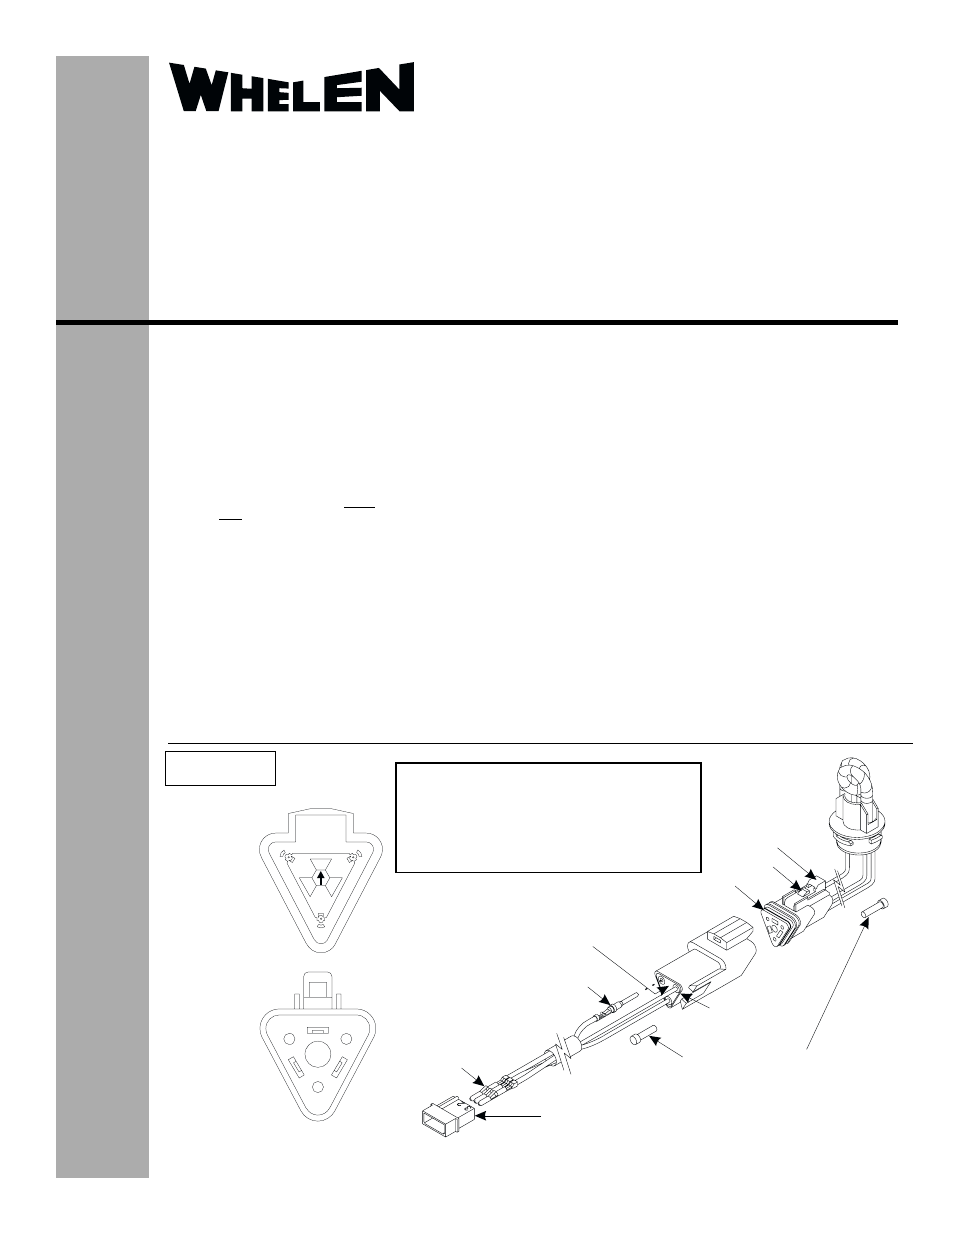
Pin Terminal
(with barrel)
Connector:
1 = RED (OR GREEN)
2 = BLACK
3 = WHITE
Plug
Receptacle
Hasp
Faceplate
Connector
Grommet
Water Block
NOTE:In the event of a situation where the
number of wires to be inserted into either
the receptacle or the plug is fewer than the
number of available openings, insert the
water block into the unused opening.
Hasp
Release
B
B
To
Power
Supply
Pin Terminal
(with barb)
Receptacle:
A = RED (OR GREEN)
B = BLACK
C = WHITE
Route 145, Winthrop Road,
Chester, Connecticut 06412
Phone: (860) 526-9504
Fax: (860) 526-4078
Internet: www.whelen.com
Sales e-mail: [email protected]
Canadian Sales e-mail: [email protected]
Customer Service e-mail: [email protected]
Automotive:
Other
Assembly/Disassembly
Deutsch Water-Proof Connectors
W441D (Receptacle)
W442D (Plug)
©1996 Whelen Engineering Company Inc.
Form No.13137H (030702)
2.
Locate the leads that have the “barrel”-style pins crimped onto the
wires.
3.
Grasp the wire approximately 1 inch behind the contact barrel.
4.
Hold the receptacle so that the rear grommet is facing you.
5.
Push the pin straight into the grommet until a “click” is felt. A gentle
tug will confirm that it is properly locked into place.
6.
Once all the pins are installed, insert the wedge into the receptacle.
Be sure that the arrow on the wedge is pointing towards the
exterior locking housing. If the wedge being used is rectangular, the
arrow alignment does not apply.
NOTE: Although the above text outlines the procedure for assembling
the receptacle, the same procedure is used for the Plug section. The plug
section utilizes a faceplate instead of a wedge. It can be removed with a
small screwdriver.
Contact Removal...
1.
Remove the wedge with either a pair of needle nose pliers (if
removing contacts from the receptacle section) or a small, regular
screwdriver (for the faceplate of the plug section).
2.
To remove the contacts, gently pull the desired wire back away
from the grommet. At the same time, release the locking finger by
moving it away from the contact with a screwdriver.
3.
Be sure to hold the rear seal in place, as removing the contact will
disrupt its position.
Important!!!
The Deutsch water-proof connector will not function properly
unless it is connected exactly as the manufacturer intended. A
Deutsch crimping tool (Whelen p/n 66T0516435119C) is required for
proper terminal crimping and should be used whenever possible. If
a non-Deutsch crimp tool is used, the cable wires must first be
pushed through the rubber connector grommet BEFORE the pin
terminal is crimped. This will reduce the possibility of damaging the
water-tight seal around the wires. Whelen Engineering does not
recognize the use of a non-Deutsch crimping tool, therefore any
resulting damage would void the warranty.
Wires coming from the lamp MUST be connected to the plug
housing; NOT the receptacle housing. Refer to Diagram 1 for an
overview of all related components.
If your current lighting system utilizes an AMP water-proof
connector, it will be necessary to remove the AMP assembly from
the supply cable. The wire ends must then be stripped so that the
correct “barrel”-style pins can be attatched using the Deutsch
crimping tool. The Deutsch receptacle can then be attatched to the
cable as outlined in the following “Assembly” section. Be sure to
insert the wires into the receptacle so that they will connect with the
correct plug wire. Example: The wire in receptacle section A is the
wire that is designated to be connected to the wire in plug section
A.
Assembly...
1.
Locate the cable that will be used between the power supply and
the receptacle section of the water-proof connector.
Diagram 1
A three-position Deutsch water-proof
connector is shown here for demonstration
purposes only! The above procedure is not
limited to the three position connector and
applies to both larger and smaller
connectors.
Receptacle
(W441D)
Plug
(W442D)