Whelen M2PEDB User Manual
Automotive: lightheads, Mounting, Wiring
Page 1
1
5
4
6
11
12
10
2
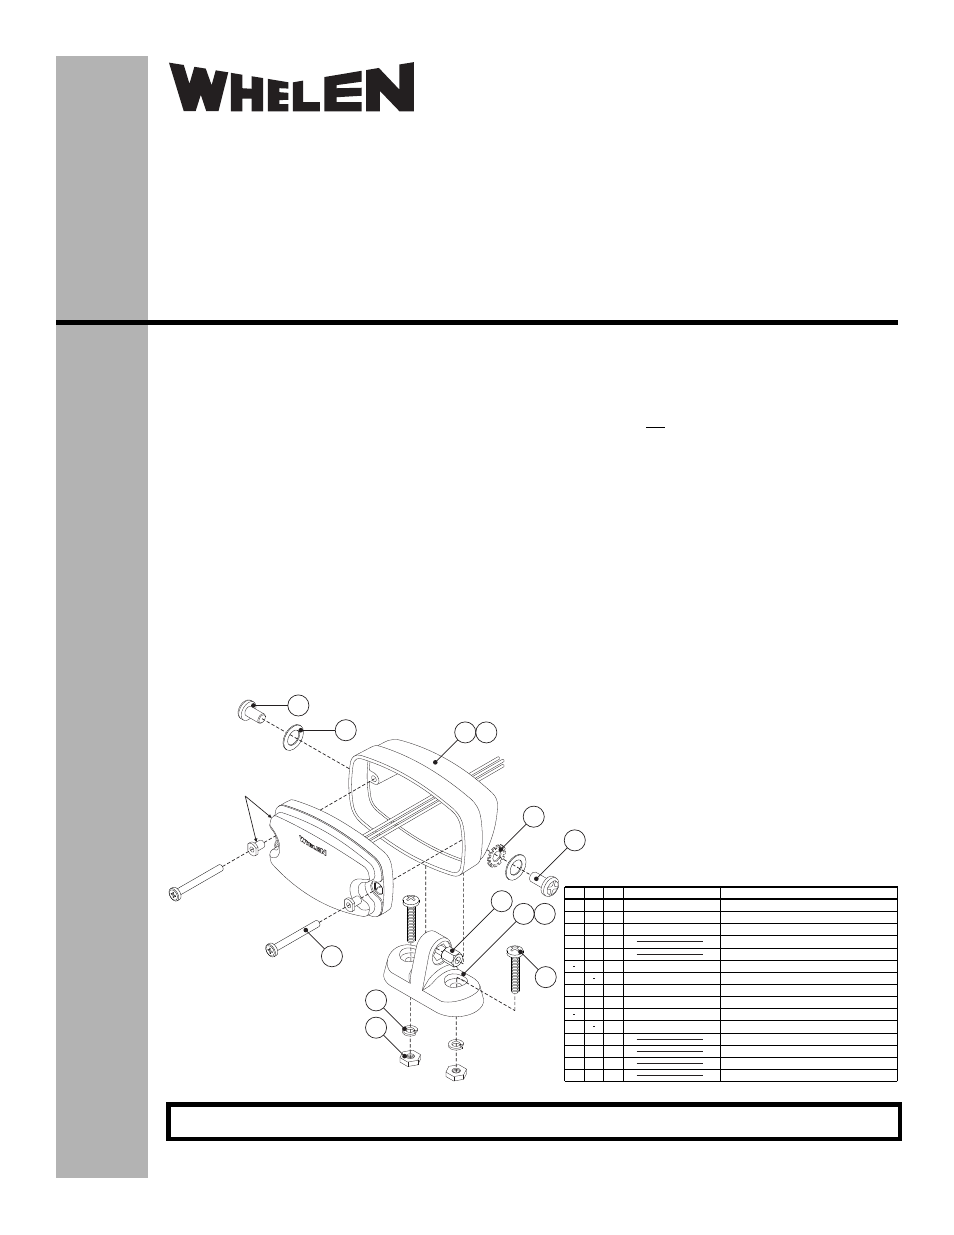
M2 series Lighthead
& Bushings
(shown for reference)
1
9
8
7
3
ITEM
PART NUMBER
DESCRIPTION
M2 PEDESTAL MOUNT KIT (BLACK)
M2 PEDESTAL MOUNT KIT (CHROME)
0 1 - 0 4 6 D 7 7 6 - 0 0
0 1 - 0 4 6 D 7 7 6 - 0 1
QTY
QTY
*
*
2
3
1
1
1
1
SCREW, 1/4 -20 x 7/16 PPHMS
WASHER, .250 ID X .625 OD X .040 FLAT
HOUSING (BLACK)
HOUSING (CHROME)
WASHER, EXTERNAL TOOTH LOCK
STANDOFF, 15/32 L X 3/8 W, 1/4-20
BASE, PEDESTAL MOUNT (BLACK)
BASE, PEDESTAL MOUNT (CHROME)
SCREW, 1/4-20 X 1 1/4 PPHMS
WASHER, SPLIT-LOCK 1/4”
NUT, HEX 1/4-20
SCREW, #8 X 3/4 PPHSMS
11 - 4 8 7 1 6 5 - 0 0 1
11 - 4 8 7 1 6 5 - 0 0 3
1 6 - 1 6 1 2 4 2 0 - 0 5
2 0 - 1 5 1 2 1 2 0 3 1 0
11 - 3 6 D 7 7 1 - 0 0 1
11 - 3 6 D 7 7 1 - 0 0 3
11
12
4
5
6
7
8
9
10
1
1
1
1
2
2
2
2
2
2
2
2
2
2
1
2
2
®
ENGINEERING COMPANY INC.
Automotive:
Lightheads
Installation Guide:
Pedestal Mount Kit
M2 series Lighthead
For warranty information regarding this product, visit www.whelen.com/warranty
©2012 Whelen Engineering Company Inc.
Form No.14608 (071612)
51 Winthrop Road
Chester, Connecticut 06412-0684
Phone: (860) 526-9504
Fax: (860) 526-4078
Internet: www.whelen.com
Sales e-mail: [email protected]
Canadian Sales e-mail: [email protected]
Customer Service e-mail: [email protected]
Mounting
1.
Position the Pedestal Mount Base (Item 7 or 8) onto
the proposed mounting surface.
NOTE! Mounting this product requires drilling through the
mounting surface. It is absolutely necessary to make sure
that no other vehicle components could be damaged by
this process.
2.
Using the base as a template, mark the location of the
two mounting holes using a scribe or similar tool.
3.
Remove the base and drill the two mounting holes
using a .281 drill bit. Deburr these holes before
continuing.
4.
Return the base to its mounting position and secure it
using the hardware provided (Items 9, 10 & 11).
5.
Locate the housing included with this kit (Item 3 or 4).
Route the wires from your M2 lighthead (sold
separately) through the housing as shown.
6.
Secure the lighthead to the housing using the
bushings included with your lighthead and the
screws included with the pedestal mount kit (item
12). Do not use the screws included with your
lighthead.
7.
Insert the hexagonal standoff (item 6) into the
base as shown. Position the lighthead/housing
assembly onto the base and install hardware
items 1, 2 & 5.
8.
Adjust the lighthead/housing assembly to the
desired angle and tighten the appropriate
hardware.
Wiring
Refer to the manual included with your lighthead for
important wiring and fusing information.