Fig. 6, Fig. 4, Fig. 3 – Whelen M6HDLMTK User Manual
Page 2: Fig. 5, Fig. 5 fig. 1 fig. 1 fig. 1, Fig. 2, Installation
Page 2
CAUTION! DO NOT LOOK DIRECTLY AT THESE LEDS WHILE THEY ARE ON.
MOMENTARY BLINDNESS AND/OR EYE DAMAGE COULD RESULT!
IMPORTANT WARNING!
FASTEX
GROMMET
Fig. 6
10-24 X 5/8"
PPHMS
HEADLIGHT
INSERT
HEADLIGHT
INSERT
ADAPTER
MOUNT
TO
VEHICLE
#8 X 1"
PPHSMS
8 - 32 X 1/2"
PPHMS
Apply LocTite® 242®
(4 places)
10-24 X 5/8"
PPHMS
Fig. 4
Fig. 4
HEADLIGHT
MOUNTING
BRACKET
Fig. 4
Replace with the
supplied screws
Unhook spring
Unhook spring
Fig. 3
Fig. 3
Fig. 3
HEADLIGHT
B U C K E T
Unhook spring
Fig. 5
Fig. 5
HEADLIGHT
I N S E R T
A D A P T E R
Fig. 5
Fig. 1
Fig. 1
Fig. 1
BEZEL
Fig. 2
Fig. 2
Fig. 2
TRIM RING
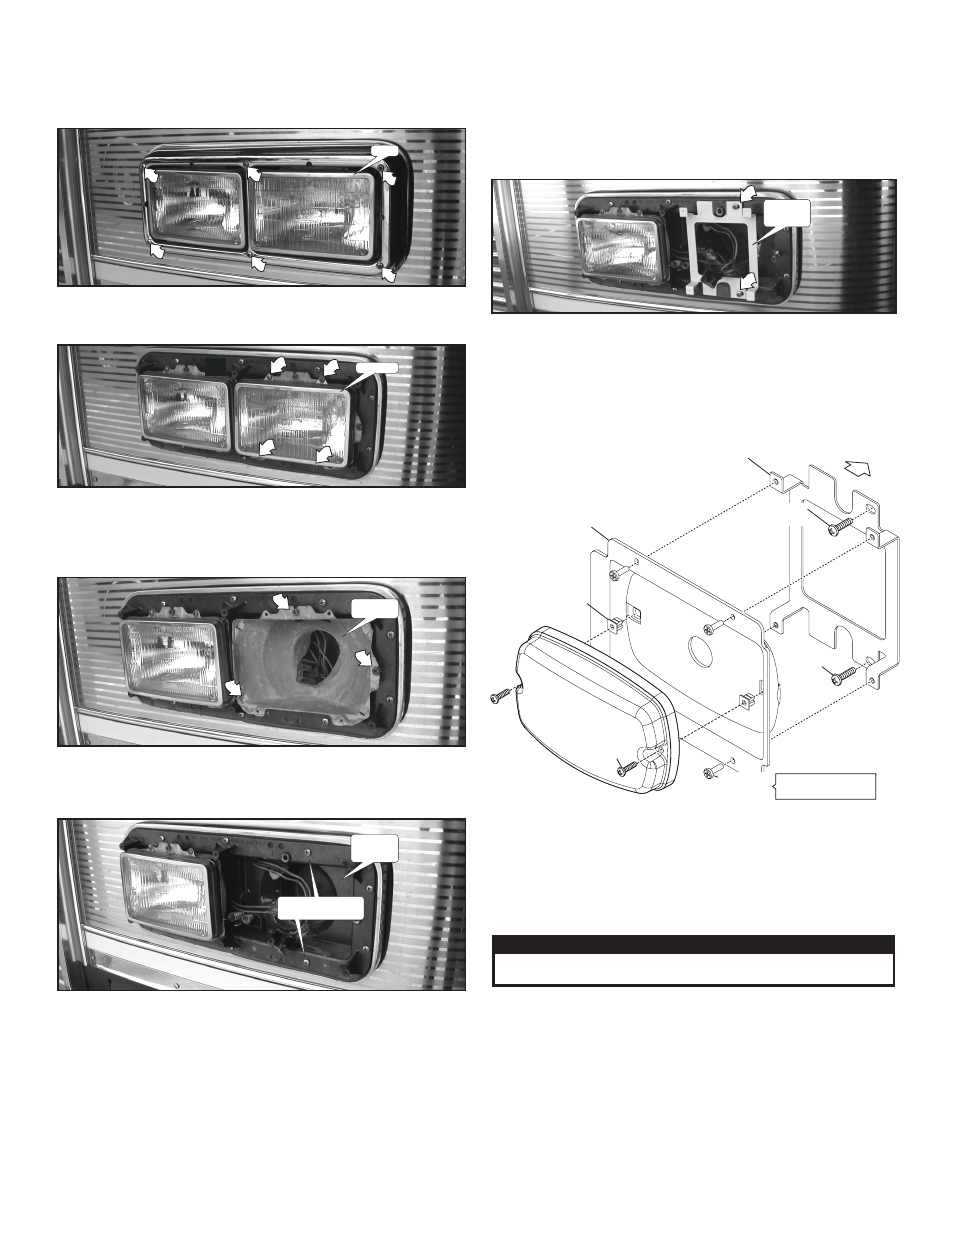
Installation:
1.
Remove the 6 screws that hold the headlight bezel on and remove
the bezel (Fig. 1).
2.
Remove the 4 screws holding the headlight trim ring on and remove
the trim ring (Fig. 2).
3.
Unplug and remove the headlight. Remove the 2 screws holding the
headlight bucket on, unhook the adjustment spring and remove the
headlight bucket (Fig. 3). Save the headlight bucket in case you want
to reinstall the headlight later.
4.
Install the headlight insert adapter (supplied) onto the vehicle
headlight mounting bracket replacing the 2 existing screws with the
supplied 10-24X 5/8” PPHMS (Figs. 4 & 5).
5.
Mount the headlight insert (supplied) onto the headlight insert
adapter (supplied). Apply a drop of LocTite® 242® to these 4 screws
before installing them (Fig. 6). NOTE: You will not use the rubber
mounting gasket that comes with the lighthead in this
application.
6.
Wire the lighthead than mount it to the headlight insert adapter. Refer
to the lighthead manual for wiring information.
7.
Replace the headlight bezel and installation is complete.
NOTE: The M6 lighthead and its mounting screws are not included
with this kit.
IMPORTANT: It is the responsibility of the installation technician to
make sure that the installation and operation of this product will not
interfere with or compromise the operation or efficiency of any
vehicle equipment! Before returning the vehicle to active service,
visually confirm the proper operation of this product, as well as all
vehicle components/equipment.