Fig. 2, Installation, Page 2 – Whelen HWLCC11 User Manual
Page 2
Page 2
5/16 X 1"
HEX HD
S H E E T
M E T A L
SCREWS
(QTY 4)
5/16 - 18
RIVNUT
(QTY 2)
5/16 - 18 X 1
HEX HD BOLT
(QTY 2)
5/16 EXTERNAL
TOOTH LOCK
WASHER (QTY 2)
5/16 - 18 X 1 HEX
HD SS BOLT
(QTY 4)
5/16 SPLIT
LOCK WASHER
(QTY 4)
5/16 FLAT
WASHER (QTY 4)
MAIN
MOUNTING.
BRACKET
HANGS ON
VEHICLE
FRAME
CLAMP
SUPPORT
MOUNTS
TO BOTTOM
OF FRAME
Fig. 2
NOTE: If there are strap retainer brackets
present on your siren speaker, they must
be removed for this installation.
Remove 4 screws and remove brackets.
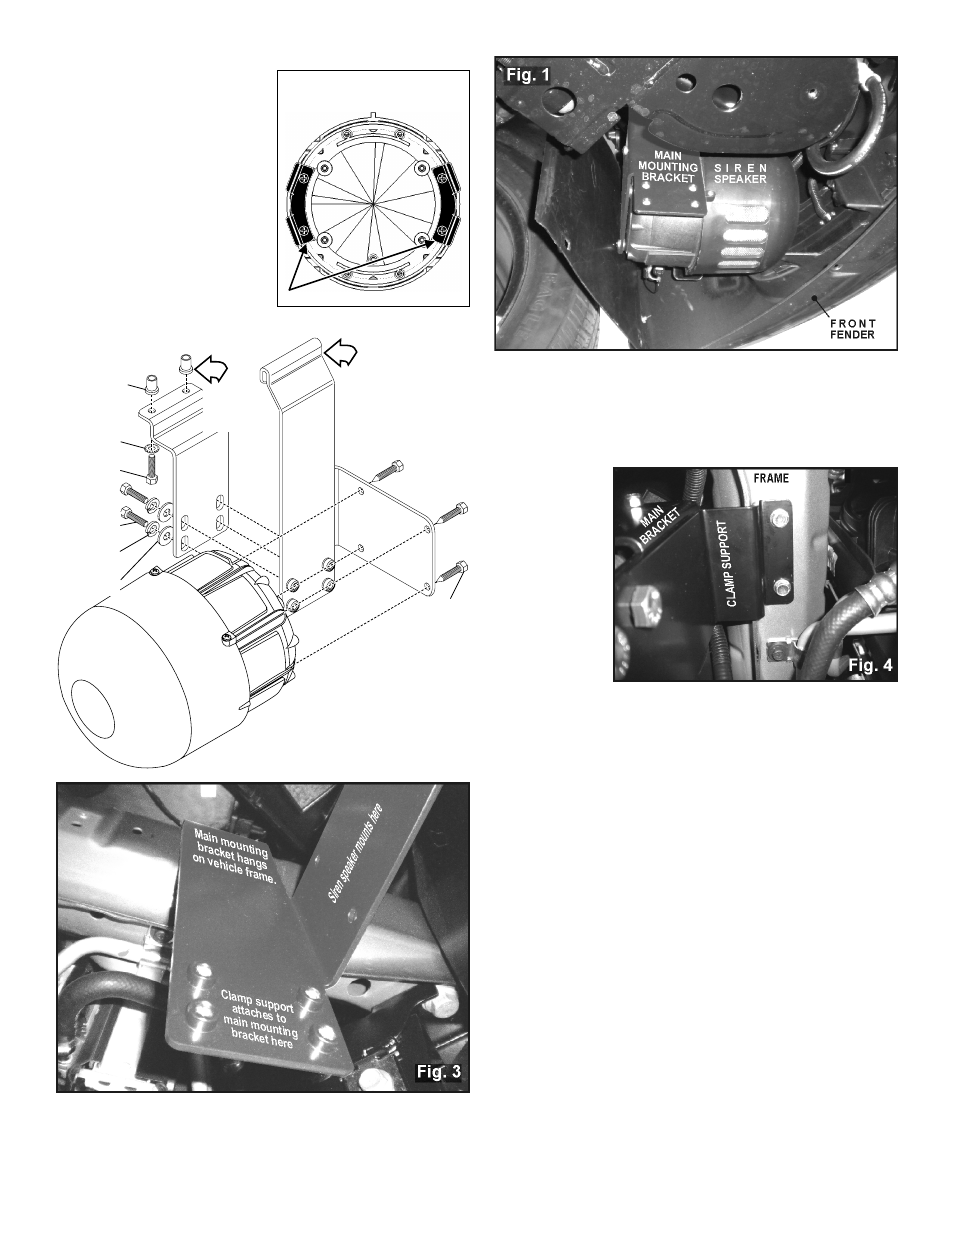
Installation:
Figure 1 shows the mounting
location of the siren speaker. The
main mounting bracket hangs on
the vehicle frame near the radiator
and attaches to the clamp
support. The clamp support
mounts to the vehicle frame with
two supplied Rivnuts®.
1.
First mount the siren speaker to
the main mounting bracket and
tighten securely (Fig. 2).
If present, the strap retainer
brackets must be removed for
this installation.
2.
Hang the main mounting bracket onto the frame with the siren
speaker attached. Position the bracket so that the speaker is clear of
any vehicle components (Fig. 3).
3.
Next mount the clamp support to the main mounting bracket (Do not
fully tighten the mounting hardware) (Fig 2).
4.
With the
clamp support
installed,
position it up
against the
frame in its
mounting
position and
mark the 2
mounting hole
locations onto
the frame
using the
clamp support
as a template
(Fig. 4).
5.
Remove the clamp support, drill the 2 mounting holes into the vehicle
frame using a 17/32 drill bit and install the 2 supplied Rivnuts® into
the holes.
6.
Remount the clamp support to the main mounting bracket (Do not
fully tighten the mounting hardware).
7.
Secure the top of the clamp support to the Rivnuts® you installed in
the vehicle frame and tighten securely (Fig. 4).
8.
Tighten the mounting hardware of the main mounting bracket and
clamp support securely so that the two tighten around the vehicle
frame and installation is complete.
9.
Extend the BLACK (-) negative and WHITE (+) positive speaker wires
to your amplifier and connect as described in the amplifier
instructions.
IMPORTANT! When routing wires, it is important to choose a path
that will keep the wires away from any excessive heat or from any
vehicle equipment that could compromise their integrity such as
trunk lids, door jams, etc....