Fig. 2, Installation: lower mount bracket, Installation: upper mount bracket – Whelen HWLRB15 User Manual
Page 2: Fig. 4
Page 2
Fig. 2
SPACER
5/16 - 16
E l a s t i c
Stop Nut
3/8 - 16
E l a s t i c
Stop Nut
5/16-18 X
1-3/4 Hex
Head Cap
Screw SS
MOUNTING STRAP
HARDWARE
5/16 Flat
Washer
Mounting
B r a c k e t
Radiator
Support
5/16 Flat
Washer
5/16 - 18
E l a s t i c
Stop Nut
Mounting
Plate
5/16-18 X 1 - 1/4
Hex Head Bolt
5/16-18 X 1 - 1/4
Hex Head Bolt
5/16-18 X 1 - 1/4
Hex Head Bolt
3/8 Flat
Washer
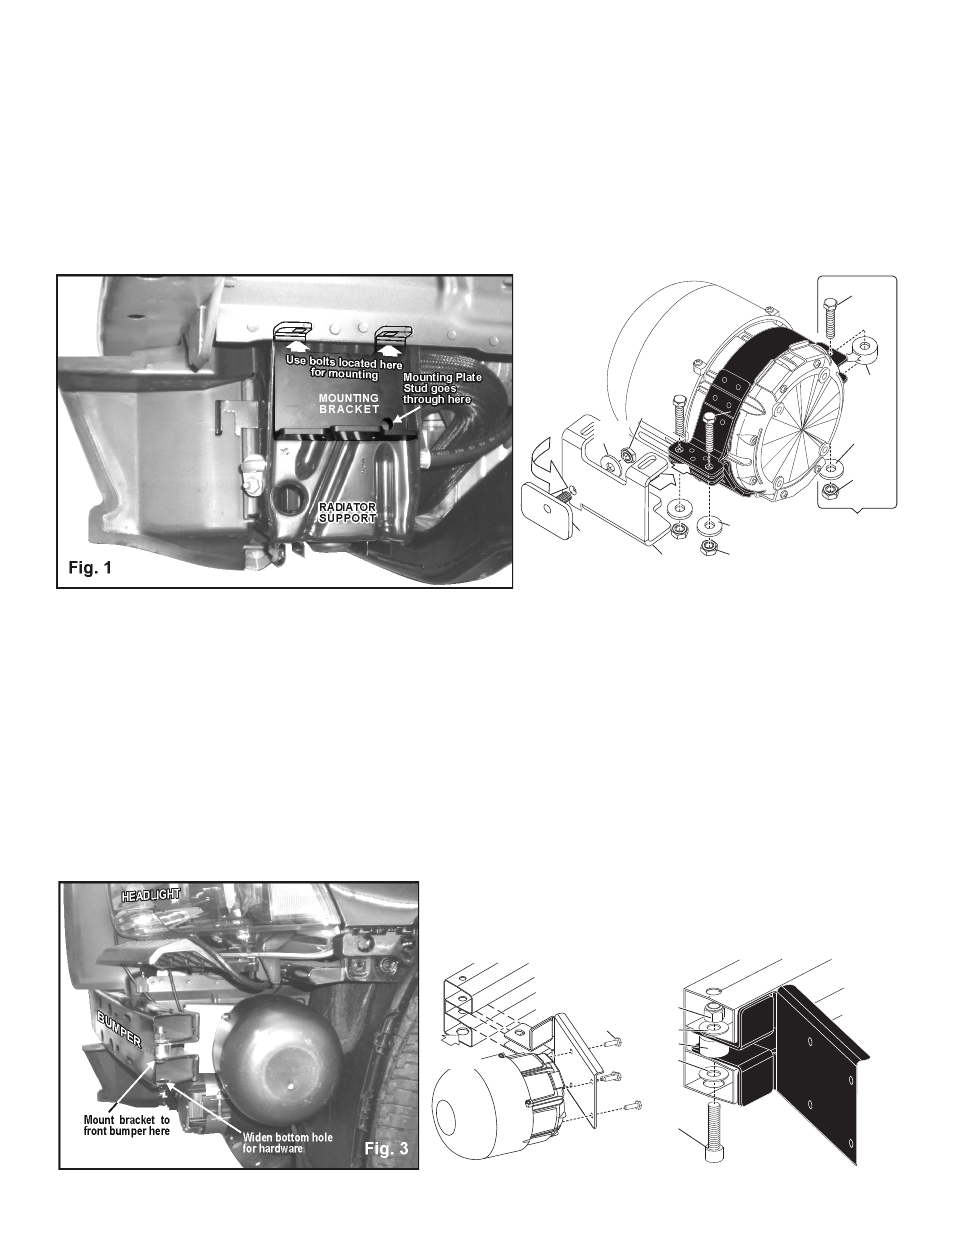
IMPORTANT: This bracket can only be mounted on Chargers equipped with a V8 engine and can not be used for vehicles equipped with a V6.
Installation: Lower Mount Bracket
IMPORTANT: The slotted holes in both siren speakers must face toward the road after mounting for proper drainage.
1.
Consult the vehicle owners manual to access the radiator support. Remove the two bolts from the radiator support indicated in Figure 1.
2.
Put the bracket into place and replace the 2 bolts you removed in step 1 to secure the bracket.
3.
Slide the mounting plate behind the radiator support so the stud goes through the radiator support and bracket as shown (Figs. 1 & 2). Secure the mounting
plate with the supplied hardware (Fig. 2).
4.
Mount the siren to the bracket and tighten all mounting hardware.
Installation: Upper Mount Bracket
1.
Secure the siren speaker to the mounting bracket using the four 5/16 X 1” HEX HEAD SHEET METAL SCREWS provided (Fig. 4)
2.
The UPPER mounting bracket will mount to existing holes in the front bumper (Fig. 3). Follow the vehicles owners manual to gain access to the bumper. First
widen the hole in the bumper (See figures 3 & 4) with a 3/4” drill to accommodate the mounting hardware and then slide the bracket into the bumper.
3.
With the two 1/2” FLAT WASHERS and SPACER in place, feed the 1/2 - 13 X 2” SOCKET HEAD CAP SCREW up through the bottom hole in the bumper,
through the bracket, washers and spacer and secure with the 1/2 - 13 ELASTIC STOP NUT.
4.
Extend the BLACK (-) negative and WHITE (+) positive speaker wires of both siren
speakers to your amplifier and connect as described in the amplifier instructions.
IMPORTANT! When routing wires, it is important to choose a path that will keep the
wires away from any excessive heat or from any vehicle equipment that could
compromise their integrity such as trunk lids, door jams, etc...
IMPORTANT! READ THESE WARNINGS BEFORE CONTINUING!
The Howler™ Supplemental Siren was designed for use in high-risk areas such as an intersection. It is not intended to be, nor should be operated as a
replacement or alternative to the vehicle’s primary siren.
The low-frequency tones of the Howler demonstrate significantly different audio characteristics as compared to those of a traditional higher-frequency
siren. While the low-frequency tones are better able to penetrate other vehicles, thus alerting drivers to the presence of the responding emergency
vehicle, these tones may also penetrate into the responding vehicle itself. This could potentially expose the operator to increased noise levels.
To help eliminate overexposure, the Howler siren has been designed with a built-in timing circuit. The Occupational Safety & Health Administration
(OSHA) (www.osha.gov) provides information necessary to determine safe exposure times in Noise and Hearing Conservation, Section 1910.95
(Occupational Noise Exposure). Until you have determined the safe exposure times for your specific application, this siren should be configured for the
minimum operating time and operators should be required to use an approved hearing protection device. FAILURE TO FOLLOW THIS
RECOMMENDATION COULD CAUSE HEARING LOSS!
IMPORTANT: It is the responsibility of the installation technician to make sure that the installation and operation of this product will not interfere with or
compromise the operation or efficiency of any vehicle equipment!
BUMPER
BUMPER
5/16 X 1"
HEX HD
S H E E T
M E T A L
SCREWS
1/2 - 13
ELASTIC
STOP NUT
1/2" FLAT
WASHER
1/2" FLAT
WASHER
SPACER
1/2 - 13 X 2"
SOCKET HD
CAP SCREW
WIDEN THIS
HOLE TO 3/4"
Fig. 4