Page 2, Specifications – Whelen BETAMIC User Manual
Page 2
Page 2
DESCRIPTION
FINAL ASSEMBLY, BETA MIC. AMP.
MICROPHONE HANGER KIT
MICROPHONE 4 POS RT. ANGLE CONN.
CONTROL CONN. ASSY. MIC AMP.
ELECTRONIC ASSY., BETA MIC. AMP.
PLATE, MTG. INTERCONNECT MIC CABLE
#6 X 5/8" PPHSM SS
PART NUMBER
01-0868379-00
46-0725932-00
43-0145762-00
01-0416246-00
01-0268378-00
07-746078-000
15-061416-100
ITEM
2
4
3
1
6
5
QTY
4
1
1
1
1
1
MOUNTING
HOLE
CONFIGURA
TION
Drill 4 mounting holes for #6
sheet metal screws with
appropriately sized drill bit
.625" DIA.
1.50"
1.50"
.750"
.750"
NUT SUPPLIED
W/ MIC CONN.
1
4
5
INPUT VOLTAGE
INPUT CURRENT
OUTPUT VOLTAGE
OPERATING TEMP.
OPERATING HUMIDITY
10 TO 32 VOLTS
16mA (MAX)
0db (TYP)
-30 C. TO +60 C.
95% NON CONDENSING
SPECIFICATIONS
BUTT
SPLICES
(+FEED)
(H/R)
+
100
W
ATT
SPEAKER
10 AMP
FUSE
(CTRL 1)
(CTRL 2)
(CTRL 3)
(AIRHRN)
FROM
HORN
SWITCH
VEHICLE
HORN
+12V
CAR HORN
RELAY
CIRCUIT
CUT HERE
AND
SPLICE
RED / WHITE
WHITE / BLUE
WHITE / BLACK
(MIC-)
(MIC+)
(PTT)
WHITE / VIOLET
RADIO
RED
BLACK
BROWN
ORANGE
RED / WHITE
WHITE / GREEN
WHITE / BROWN
WHITE / RED
WHITE / ORANGE
WHITE / YELLOW
WHITE / BLACK
WHITE / BLUE
WHITE / VIOLET
BLUE
BLUE
RADIO
CONTROL
SWITCHES
MICROPHONE
AMPLIFIER
BLACK
GREEN
BLACK
WHITE / VIOLET
MICROPHONE
BATTERY
J2-1
J2-2
J2-3
J2-4
1
2
3
4
WP
A
SERIES
W
ATERPROOF
AMPLIFIER
OR
BET
A
REMOTE
AMPLIFIER
Volume Level
Set Here
3
2
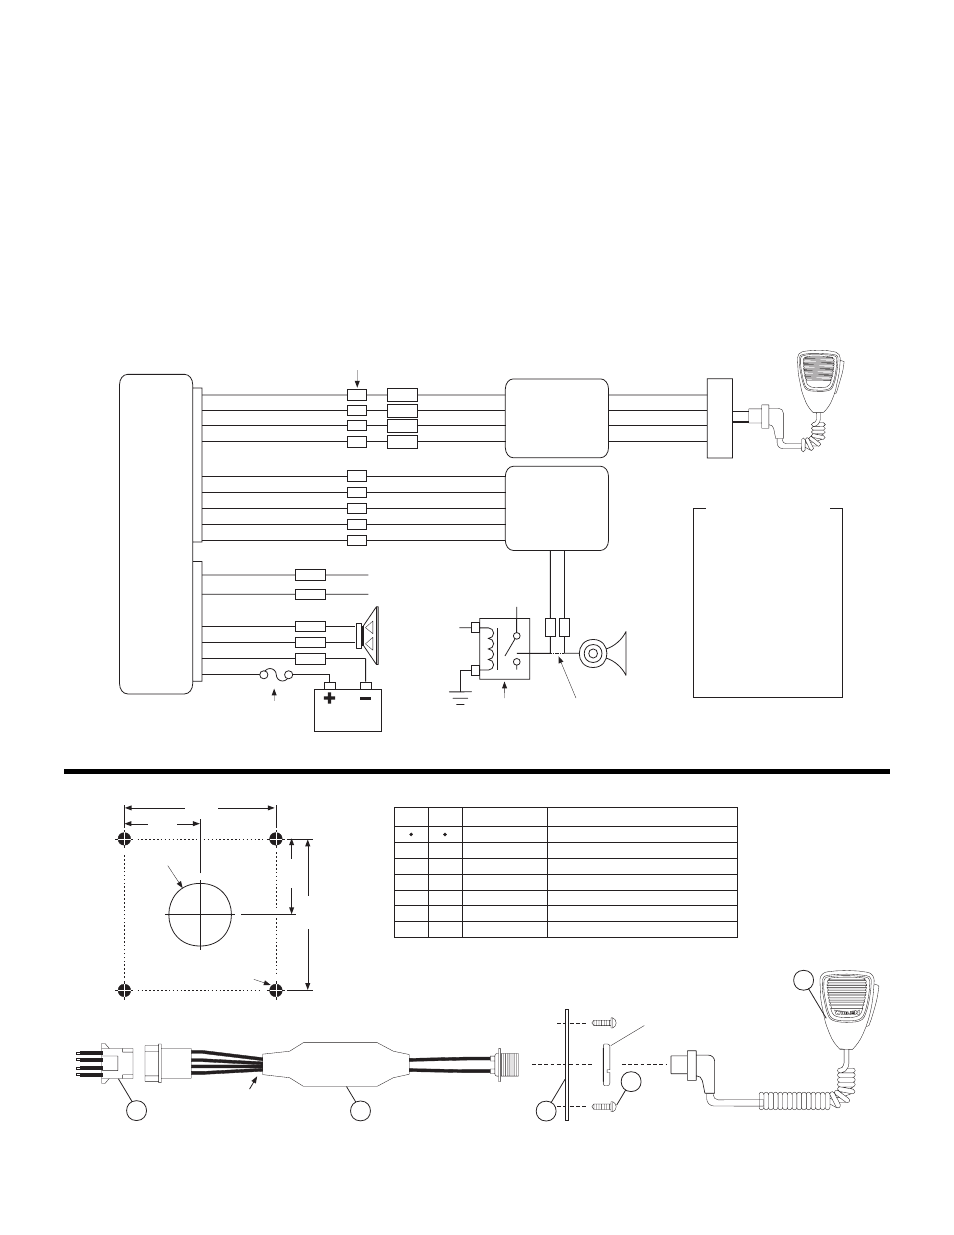
The Beta™ Microphone is for use when the application requires the use of your own control switches with a
Beta™ Remote Amplifier or a WPA™ Series Amplifier and you also need an amplified microphone. It is usually
installed in the dashboard of the vehicle. When picking the installation location, because there is drilling, make
absolutely sure it won’t damage any other vehicle components. Install the unit using the illustrations and
measurements provided. Wire the microphone amplifier as shown in the wiring diagram but refer to your BETA or
WPA amplifier instructions for proper installation and operation of control switches.
Volume Control: There is a potentiometer that can be preset with a thin, flat-blade screwdriver through the open
end of the protective cover (see illustration). This will adjust the signal level of the audio going back to the amplifier.
If you experience feedback, the signal level can be adjusted to eliminate it.