Caution, Mounting location, Installation – Whelen SABKT9 User Manual
Page 2: Page 2
Page 2
SA315 / Rear View
wire
exit &
drain
hole
A
A
A
A
SA314
Option
"B"
Option
"A"
Option
"B"
Option
"A"
1/4-20 X 1" HEX HD
CAP SS SCREW
BAIL
BRACKET
1/4 - 20 X 1-1/2"
HEX HEAD SS
1/4" SPLIT
LOCK WASHER
NOTE: The SA314 bail bracket
and mounting hardware mount
the same as the SA315.
SA314
SA
315
1/4" EXT. TOOTH
LOCK WASHER
SCREW / 14 X 1"
PPHSMS A POINT
1/4-20 X 7/16 HEX NUT
1/4" SPLIT LOCK WASHER
1/4" FLAT
WASHER
1/4-20 X 1/2"
HEX HD MS SS
1/4" EXT.
T O O T H
L O C K
WASHER
1/4" SPLIT
LOCK WASHER
1/4 X 20 X 1-1/4
HEX HEAD
Mounting Location:
The mounting location should be as flat as possible and allow the siren to project its tone
parallel with the road. The rear of the mounting area must be accessible.
Installation:
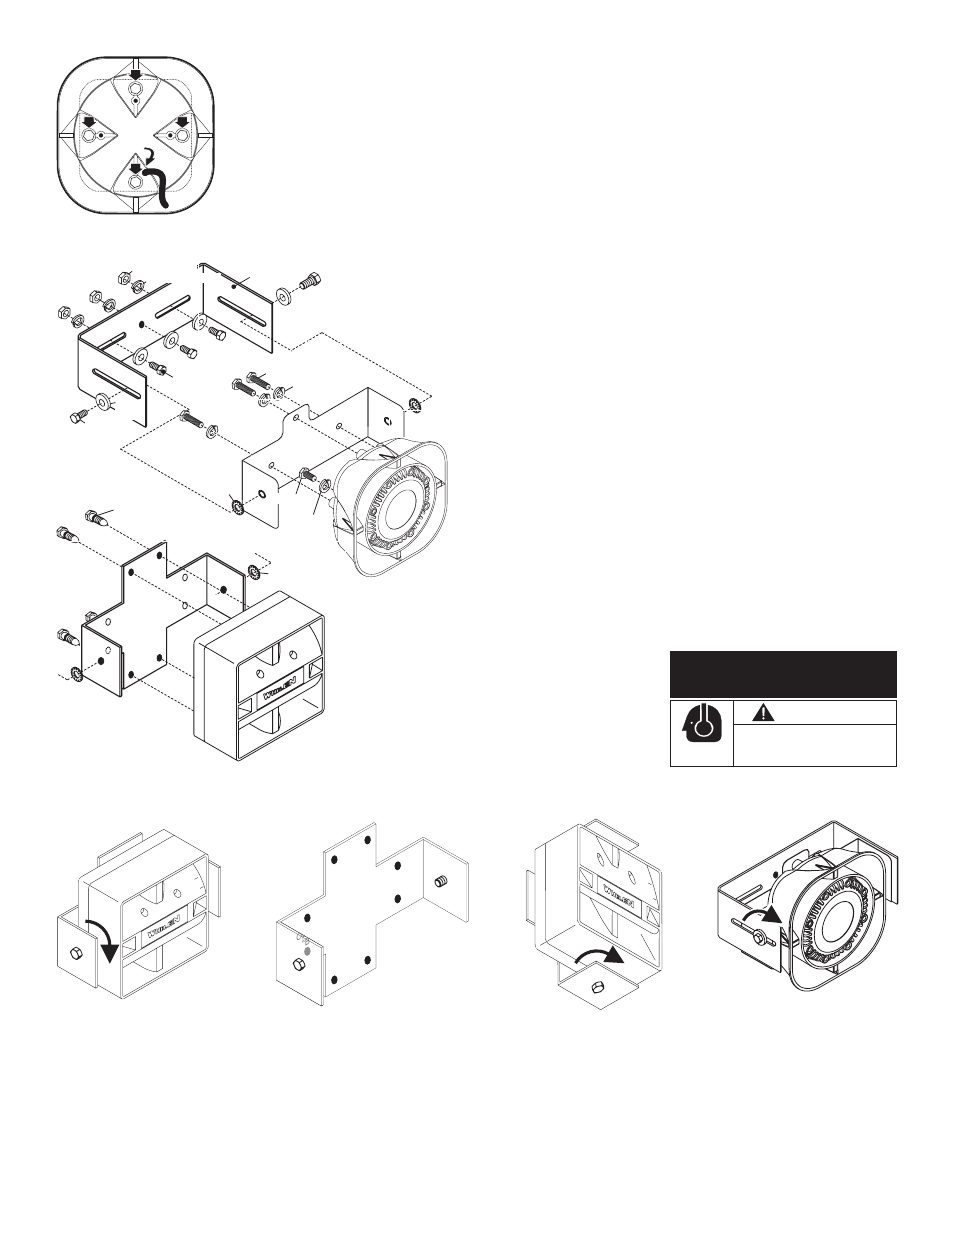
1. Attach the speaker to the mounting bracket as shown. The speaker can be
mounted one of two ways onto the mounting bracket as long as the wire hole is on
the bottom after installation (see below).
2. Position the bail bracket in the exact mounting location and mark off the
location of the mounting holes.
3. Drill two .281” clearance holes for the two side (elongated) mounting
holes first, then attach the bail bracket to the vehicle using the supplied
hardware. Do not tighten the bolts all the way.
4. Slide the bracket along the elongated holes until it is in the desired
position, than drill the hole for the center mounting bolt (using the
bracket as a template) and install its mounting bolt to anchor the
bracket in place.
5. Tighten the 3 mounting bolts securely than attach the mounting bracket
(with speaker attached) to the bail bracket that is mounted to the vehicle.
After swiveling the speaker to the desired position, tighten the bolts to secure it.
6. Extend the WHITE (Positive) and BLACK (Negative) speaker wires to your siren amplifier
and connect as shown in the amplifiers instructions.
IMPORTANT! It is the responsibility of the
installation technician to make sure that the
installation and operation of this product will not
interfere with or compromise the operation or
efficiency of any vehicle equipment!
IMPORTANT! Before returning the vehicle to
active service, visually confirm the proper
operation of this product, as well as all vehicle
components/equipment.
CAUTION
Loud siren noise can cause
hearing damage and/or loss.
Refer to OSHA Section 1910.95 prior
to putting ANY siren into service!
Wear
Protection!
ACTIVATION OF THIS
SIREN MAY DAMAGE
UNPROTECTED EARS!
The SA315 Siren Speaker mounting kit comes with 3 long bolts (1/4-20 X 1-1/2” Hex Head SS). The longer bolts are
necessary to go through the mounting bracket, through the siren housing and into the siren driver. They will
replace 3 of the 4 shorter bolts (“A”) that now secure the siren driver to the speaker housing. Your speaker is
shipped with 2 or more of the shorter bolts installed. A short bolt must be used in the hole that does not go
through the bracket so it will properly secure the driver to the housing. If you need to remove all 4 bolts at once be
sure to hold the driver securely in place.
IMPORTANT: For drainage purposes, the speaker must be oriented so that the wire passage hole is in the “6
o’clock” position (closest to the road). This is also the drain hole for the siren. Improper mounting will result in
premature driver failure and void the product warranty.