Whelen SAK24 User Manual
Au to m o ti ve: sirens & switches, Au to mo tive: sirens & switches
Page 1
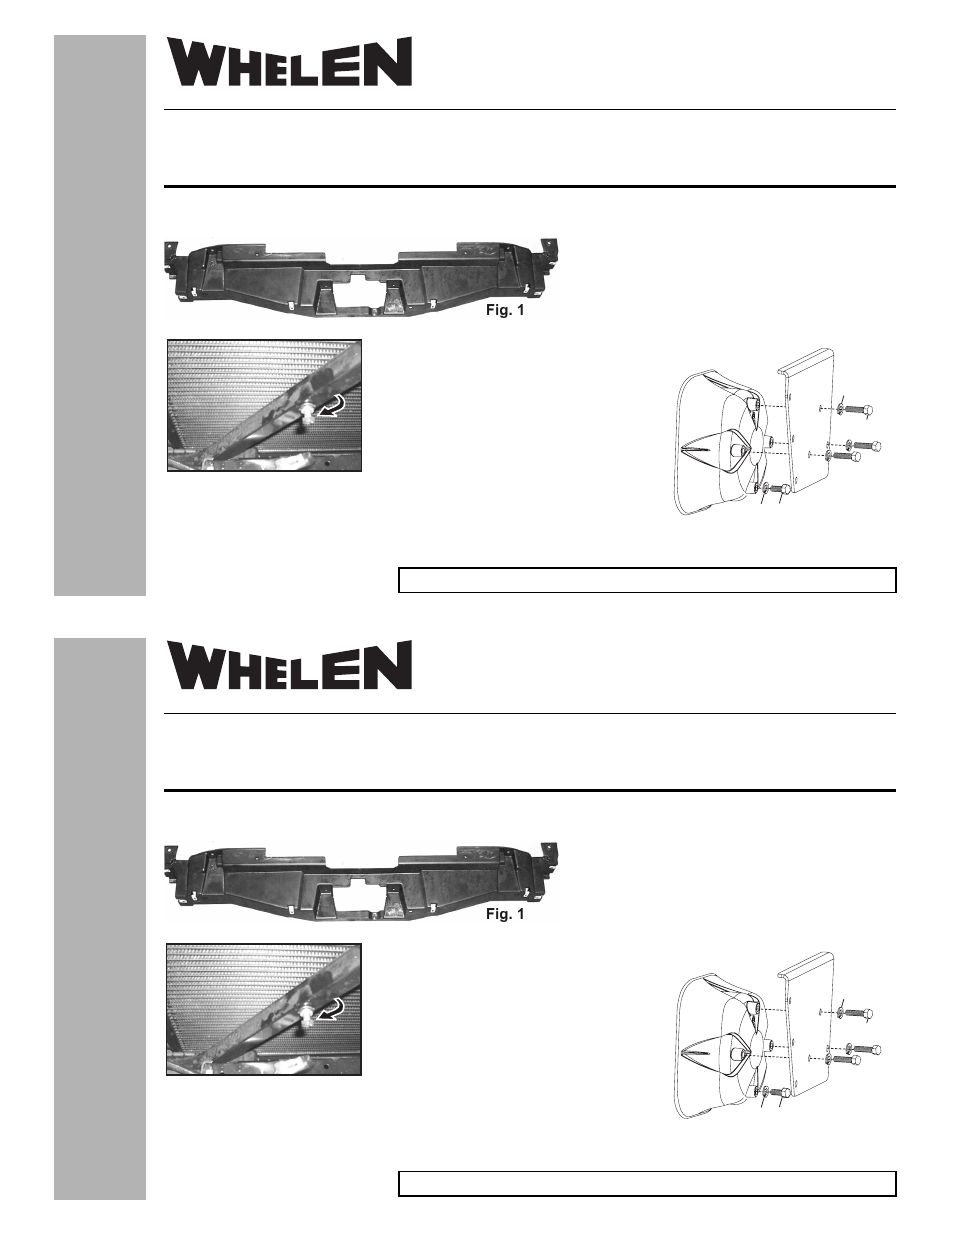
Existing
Rivnut
Fig. 2
Fig. 2
Fig. 2
Existing
Rivnut
Fig. 2
Fig. 2
Fig. 2
1/4 - 20 X 1-1/2"
HEX HEAD BOLT
1/4 - 20 X 1-1/4"
HEX HEAD BOLT
1/4" SPLIT
LOCKWASHER
1/4" SPLIT
LOCKWASHER
Fig. 3
©2007 Whelen Engineering Company Inc.
Form No.14117C (070909)
Installation Guide:
SA315 Siren Speaker Bracket
2007-2009 Suburban/Tahoe
®
ENGINEERING COMPANY INC.
Internet: www.whelen.com
Sales e-mail: [email protected]
Canadian Sales e-mail: [email protected]
Customer Service e-mail: [email protected]
For warranty information regarding this product, visit www.whelen.com/warranty
51 Winthrop Road,
Chester, Connecticut 06412-0684
Phone: (860) 526-9504
Fax: (860) 526-4078
Au
to
m
o
ti
ve:
Sirens & Switches
Installation:
1. Open the hood and remove the protective cover from the front of the engine compartment (Fig. 1). Refer to the vehicle owner’s manual.
2. Remove the existing bolt (Fig. 2) from the passenger side
radiator support and use it to secure the bracket to the vehicle.
IMPORTANT NOTE! This installation uses Rivnuts™ to secure
the bracket to the vehicle. This type of hardware requires the
use of a specialized installation tool. Refer to the owners
manual included with this tool for proper installation. Be sure to
follow the mounting hole specifications precisely!
3. With the bracket in its exact mounting location, mark off
the 2 bolt locations where you will install riv nuts then
remove the bracket.
4. Drill the 2 mounting holes (and widen the existing hole)
using a .391” drill bit and install the three Rivnuts.
5. Secure the siren speaker to the bracket with the supplied
hardware (Fig. 3). IMPORTANT: Refer to next page for
more information on mounting speaker to bracket.
6. Secure the bracket (with speaker) to the vehicle using the
three supplied 1/4 - 20 X 1” Hex Head Cap Screws and Internal Tooth Lockwashers.
7. Extend the WHITE (positive) and BLACK (negative) speaker wires to your siren amplifier and
connect as shown in the amplifiers instructions. Test the siren to confirm proper operation.
8. Reinstall the protective cover to complete this installation. Test all vehicle components and equipment before returning the vehicle to service.
1/4 - 20 X 1-1/2"
HEX HEAD BOLT
1/4 - 20 X 1-1/4"
HEX HEAD BOLT
1/4" SPLIT
LOCKWASHER
1/4" SPLIT
LOCKWASHER
Fig. 3
©2007 Whelen Engineering Company Inc.
Form No.14117C (070909)
Installation Guide:
SA315 Siren Speaker Bracket
2007-2009 Suburban/Tahoe
®
ENGINEERING COMPANY INC.
Internet: www.whelen.com
Sales e-mail: [email protected]
Canadian Sales e-mail: [email protected]
Customer Service e-mail: [email protected]
For warranty information regarding this product, visit www.whelen.com/warranty
51 Winthrop Road,
Chester, Connecticut 06412-0684
Phone: (860) 526-9504
Fax: (860) 526-4078
Au
to
mo
tive:
Sirens & Switches
Installation:
1. Open the hood and remove the protective cover from the front of the engine compartment (Fig. 1). Refer to the vehicle owner’s manual.
2. Remove the existing bolt (Fig. 2) from the passenger side
radiator support and use it to secure the bracket to the vehicle.
IMPORTANT NOTE! This installation uses Rivnuts™ to secure
the bracket to the vehicle. This type of hardware requires the
use of a specialized installation tool. Refer to the owners
manual included with this tool for proper installation. Be sure to
follow the mounting hole specifications precisely!
3. With the bracket in its exact mounting location, mark off
the 2 bolt locations where you will install riv nuts then
remove the bracket.
4. Drill the 2 mounting holes (and widen the existing hole)
using a .391” drill bit and install the three Rivnuts.
5. Secure the siren speaker to the bracket with the supplied
hardware (Fig. 3). IMPORTANT: Refer to next page for
more information on mounting speaker to bracket.
6. Secure the bracket (with speaker) to the vehicle using the
three supplied 1/4 - 20 X 1” Hex Head Cap Screws and Internal Tooth Lockwashers.
7. Extend the WHITE (positive) and BLACK (negative) speaker wires to your siren amplifier and
connect as shown in the amplifiers instructions. Test the siren to confirm proper operation.
8. Reinstall the protective cover to complete this installation. Test all vehicle components and equipment before returning the vehicle to service.