Installation, Fig. 1 fig. 3, Fig. 2 – Whelen SAK34 User Manual
Page 2: Mounting speaker to bracket
Page 2
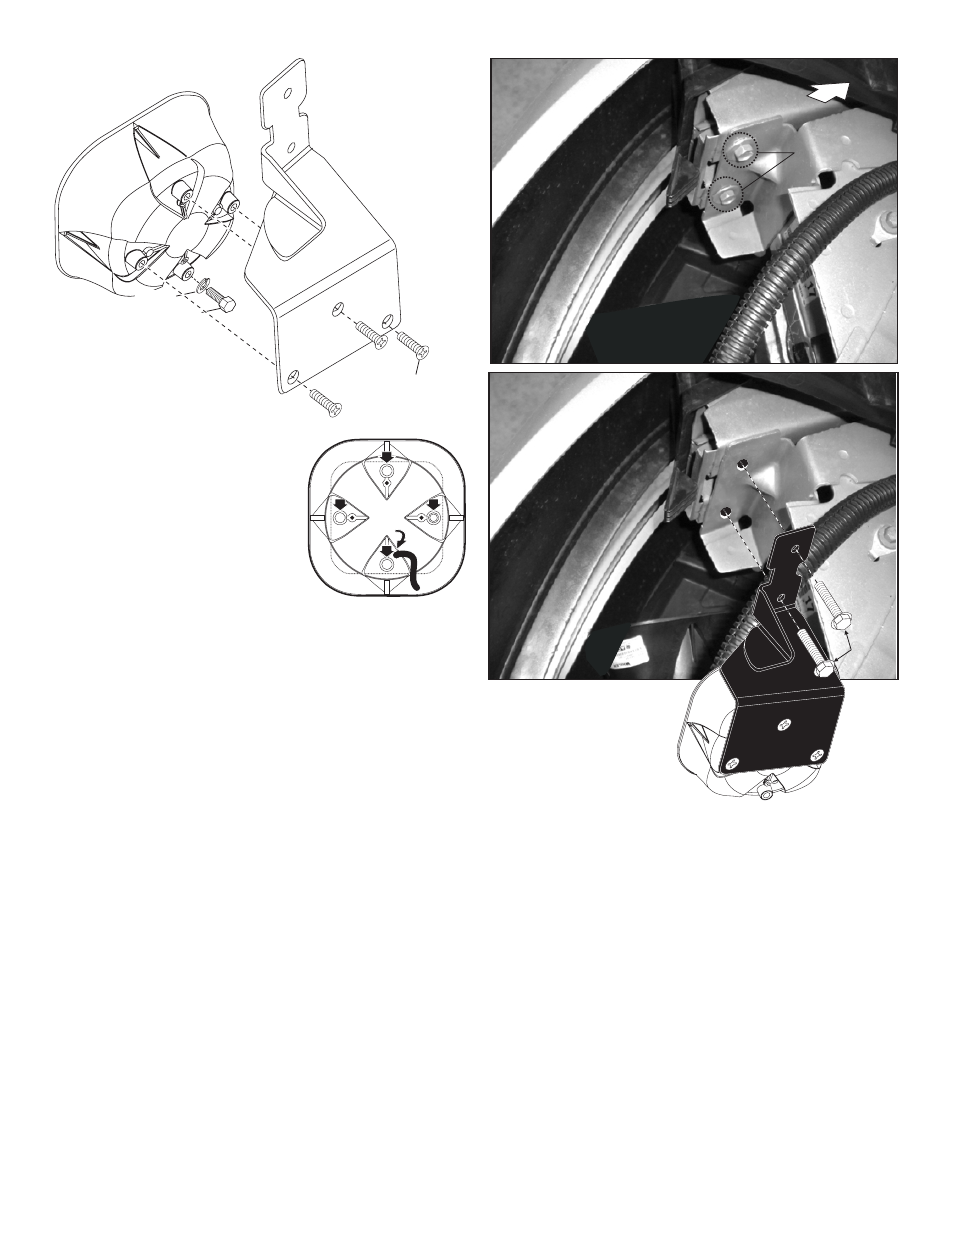
FIG. 1
FIG. 3
1/4 - 20 X 1-1/2"
HEX HEAD SS
(Speaker & Bracket)
1/4 X 20 X 1-1/4 PFHMS
(Speaker Only)
Mounting Speaker to Bracket
wire
exit &
drain
hole
A
A
A
A
SA315
Rear View
The SA315 mounting kit is supplied with 3
long bolts (1/4-20 X 1-1/4” FLAT HD) which
go through the mounting bracket, siren
housing and into the siren driver.
They will replace 3 of the 4 shorter bolts
(“A”) that now secure the siren driver to
the speaker housing. Your speaker is
shipped with 2 short bolts installed. A
short bolt must be used in the hole that
go through the bracket so it will
properly secure the driver to the housing.
If you need to remove 4 bolts at once be
sure to hold the driver securely in place.
does not
IMPORTANT: For drainage purposes, the speaker must be oriented so
the wire passage/drain hole is in the “6 o’clock” position (closest to
the road). Improper mounting will result in premature driver failure
and void the product warranty.
FRONT OF VEHICLE
Use
Existing
Hardware
Use
Existing
Hardware
FIG. 2
1/4" SPLIT
LOCK WASHER
Installation:
To access the speaker bracket mounting area, remove the driver-side
headlight assembly (refer to the vehicle service manual for proper removal
procedure). Do not mount to the passenger-side of the vehicle.
1.
First secure the siren speaker to the bracket (Fig. 1).
2.
With the headlight assembly removed, locate the mounting area
behind the headlight (Fig. 2). The speaker bracket mounts as
shown using the 2 existing bolts indicated in Fig. 3.
3.
Remove the 2 bolts indicated and secure the bracket using the 2
existing bolts.
4.
Extend the WHITE (positive) and BLACK (negative) speaker
wires to your siren amplifier and connect as shown in the
amplifiers instructions. Test the speaker to confirm proper
operation.
5.
Re-install the headlight
assembly to complete
this installation. Test all
vehicle components
and equipment for
proper operation before
returning the vehicle to service.
IMPORTANT! It is the responsibility of the installation technician
to make sure that the installation and operation of this product
will not interfere with or compromise the operation or efficiency
of any vehicle equipment!