Whelen SAK25 User Manual
Au to mo tiv e: sirens & switches, Au tom o tive : sirens & switches
Page 1
©2007 Whelen Engineering Company Inc.
Form No.14111A (050708)
Installation Guide:
SA315 Speaker Mounting bracket
2006 Chevrolet Express
®
ENGINEERING COMPANY INC.
Internet: www.whelen.com
Sales e-mail: [email protected]
Canadian Sales e-mail: [email protected]
Customer Service e-mail: [email protected]
For warranty information regarding this product, visit www.whelen.com/warranty
51 Winthrop Road,
Chester, Connecticut 06412-0684
Phone: (860) 526-9504
Fax: (860) 526-4078
Au
to
mo
tiv
e:
Sirens & Switches
©2007 Whelen Engineering Company Inc.
Form No.14111A (050708)
Installation Guide:
SA315 Speaker Mounting bracket
2006 Chevrolet Express
®
ENGINEERING COMPANY INC.
Internet: www.whelen.com
Sales e-mail: [email protected]
Canadian Sales e-mail: [email protected]
Customer Service e-mail: [email protected]
For warranty information regarding this product, visit www.whelen.com/warranty
51 Winthrop Road,
Chester, Connecticut 06412-0684
Phone: (860) 526-9504
Fax: (860) 526-4078
Au
tom
o
tive
:
Sirens & Switches
1/4 X 20 X 1-1/4
HEX HEAD
1/4" SPLIT
LOCK WASHER
1/4 - 20 X 1-1/2"
HEX HEAD SS
1/4" SPLIT
LOCK WASHER
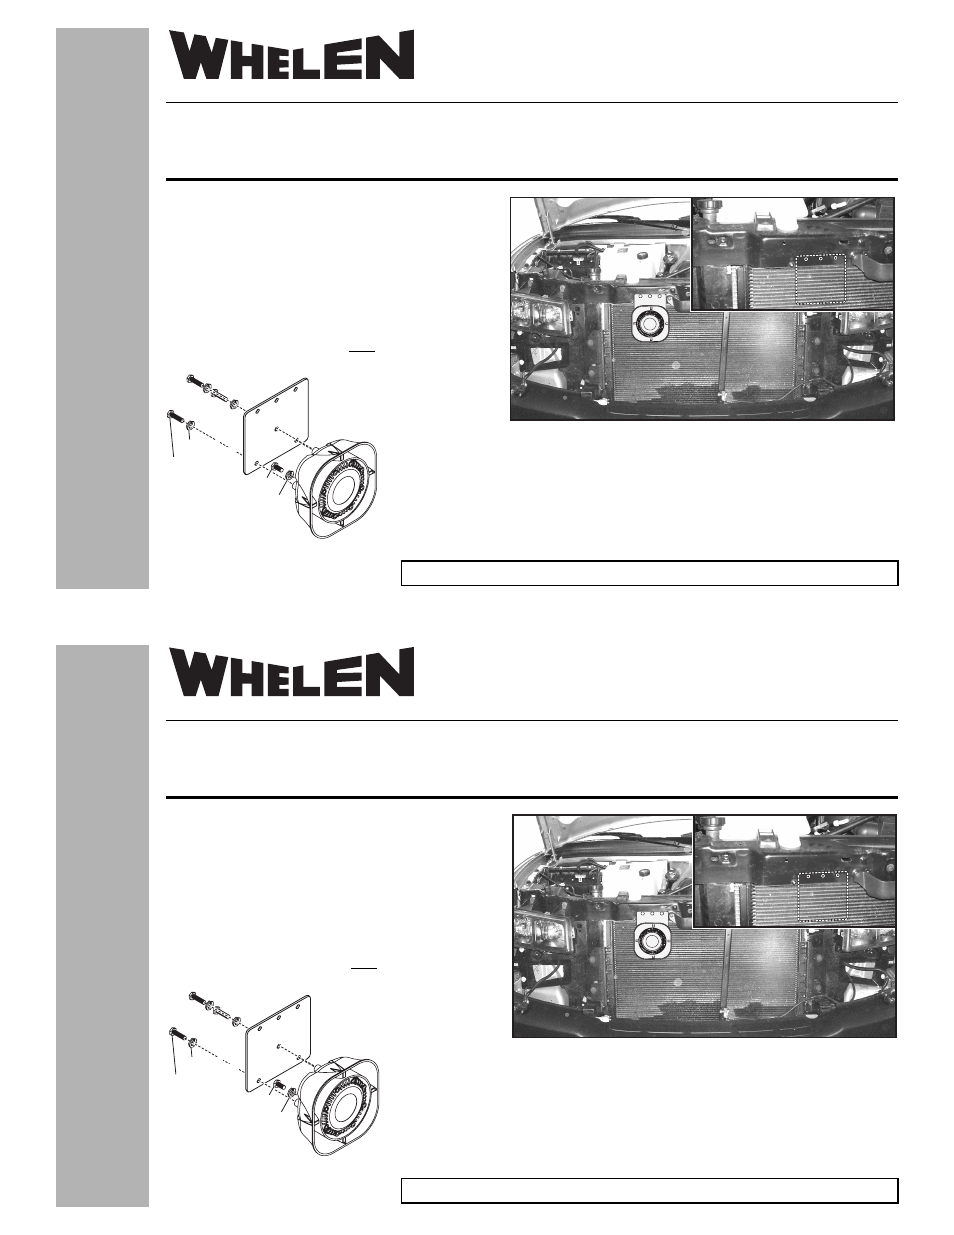
Installation:
IMPORTANT: Read all warnings before starting installation.
1. This bracket mounts above the radiator. Remove the front fascia
to gain access to the radiator (see manufacturers instructions).
2. Place the bracket onto the mounting area in its exact mounting
location. Mark the location of the 3 mounting holes onto the
mounting surface.
3. Secure the speaker to the bracket with the supplied hardware.
IMPORTANT: The SA315 is supplied with 3 long bolts (1/4-20 X 1-
1/2” Hex Head SS). The long bolts must go through the bracket.
The short bolt (already installed on the speaker) must be
used in the hole that does not go
through the bracket. The short bolt
secures driver to speaker body.
4. Secure the speaker/
bracket to the vehicle. with the supplied 1/4 X 3/4 Hex washer head self-tapping mounting screws.
Drive the mounting screws in only part way with the drill and socket.
WARNING: You must drive the self-tapping screws in until they are tightened almost all the way,
then finish tightening by hand. If you drill them all the way in, they will strip the hole. Tighten the
screws the rest of the way with a hand wrench being careful not to strip the holes.
5. Extend the WHITE (positive) and BLACK (negative) wires to your amplifier. Refer to the amplifiers
instructions for connections.
Fig. 1
1/4 X 20 X 1-1/4
HEX HEAD
1/4" SPLIT
LOCK WASHER
1/4 - 20 X 1-1/2"
HEX HEAD SS
1/4" SPLIT
LOCK WASHER
Installation:
IMPORTANT: Read all warnings before starting installation.
1. This bracket mounts above the radiator. Remove the front fascia
to gain access to the radiator (see manufacturers instructions).
2. Place the bracket onto the mounting area in its exact mounting
location. Mark the location of the 3 mounting holes onto the
mounting surface.
3. Secure the speaker to the bracket with the supplied hardware.
IMPORTANT: The SA315 is supplied with 3 long bolts (1/4-20 X 1-
1/2” Hex Head SS). The long bolts must go through the bracket.
The short bolt (already installed on the speaker) must be
used in the hole that does not go
through the bracket. The short bolt
secures driver to speaker body.
4. Secure the speaker/
bracket to the vehicle. with the supplied 1/4 X 3/4 Hex washer head self-tapping mounting screws.
Drive the mounting screws in only part way with the drill and socket.
WARNING: You must drive the self-tapping screws in until they are tightened almost all the way,
then finish tightening by hand. If you drill them all the way in, they will strip the hole. Tighten the
screws the rest of the way with a hand wrench being careful not to strip the holes.
5. Extend the WHITE (positive) and BLACK (negative) wires to your amplifier. Refer to the amplifiers
instructions for connections.
Fig. 1