Installation: 2011 dodge charger, Fig. 1, Fig. 2 – Whelen SAK37 User Manual
Page 2: Fig. 3, Page 2
Page 2
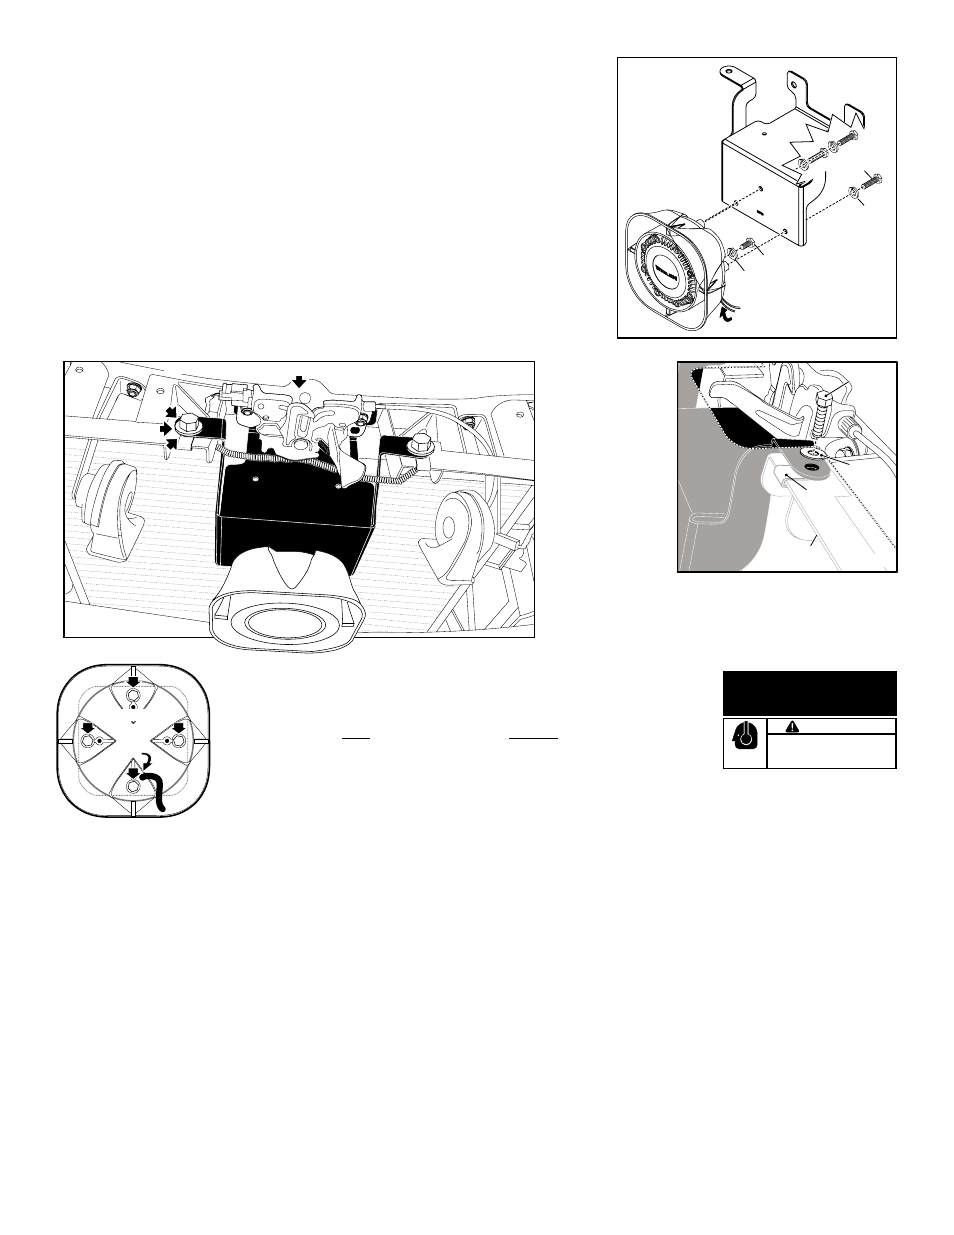
Fig. 1
wire passage
/drain hole
1/4 - 20 X 1-1/2"
HEX HEAD SS
1/4 X 20 X 1-1/4
HEX HEAD
SA315
1/4" SPLIT
LOCK WASHER
1/4" SPLIT
LOCK WASHER
5/16 - 18 X 1
HEX HD BOLT
"U" NUT
SUPPORT
BRACKET
Fig. 2
5/16 FLAT
WASHER
VEHICLE
B O D Y
Installation: 2011 Dodge Charger
1.
Remove any protective covers etc.. to access the hood latch assembly.
2.
Remove the 2 bolts that hold the hood latch assembly on and set it aside (do not disconnect the
cables). Unplug the horn wire and place the wire out of the way.
3.
Mount the speaker to the bracket (Fig. 1). (Refer to bolt and drain hole information at the bottom
of the page)
4.
Slide the 2 U-Nuts onto the support braces (under the body). Place the bracket (with speaker
attached) on top of the U-Nuts. The front “ears” of the bracket rest on the two U-Nuts which clip
onto the support braces. The rear of the bracket will mount behind the hood latch assembly
using the hood latch’s mounting hardware (Fig. 2).
5.
Be sure all the hood latch cables are properly located, then secure the hood latch assembly
(Over the siren bracket) using the hood latch assembly bolts. IMPORTANT: Make sure the two
bolt heads line up with the two indentations on the hood latch assembly made by the
bolts original position, so that the hood latch assembly reinstalls in the same position
and lines up properly with the hood.
6.
Reattach the horn wire. Secure the front of the bracket to the vehicle using the supplied
mounting hardware (Fig. 3) .
7.
You may need to
trim some plastic
off of any
protective covers
you removed in
step 1 to
accommodate
the bracket.
8.
Extend WHITE
(positive) and
BLACK
(negative)
speaker wires to
your siren
amplifier and
connect as shown in the amplifiers instructions.
Caution: It is the responsibility of the installation technician to make sure that the installation and operation of this product will not interfere
with or compromise the operation or efficiency of any vehicle equipment! Before returning the vehicle to active service, visually confirm the
proper operation of this product, as well as all vehicle components/equipment.
IMPORTANT: For drainage purposes, the speaker must be oriented so that the wire passage hole is in the “6 o’clock”
position (closest to the road).This is also the drain hole for the siren. Improper mounting will result in premature driver
failure and void the product warranty.
The SA315 siren speaker mounting kit comes with 3 long bolts (1/4-20 X 1-1/2” Hex Head).
The longer bolts are needed to go through the mounting bracket, the siren housing and
into the siren driver. They will replace 3 of the 4 shorter bolts (“A”) that now secure the
siren driver to the speaker housing. The speaker is shipped with the shorter bolts
installed. A short bolt
be used in the hole that
go through the bracket so it
will properly secure the driver to the housing. If you need to remove all 4 bolts at once be
sure to hold the driver securely in place.
must
does not
wire
exit &
drain
hole
A
A
A
A
SA315 / Rear View
Refer to OSHA Section 1910.95 prior
to putting ANY siren into service!
Loud siren noise can cause
hearing damage and/or loss.
C A U T I O N
Wear
Protection!
ACTIVATION OF THIS
SIREN MAY DAMAGE
UNPROTECTED EARS!
Fig. 3
5/16 FLAT WASHER
SUPPORT
5/16 - 18 X 1
HEX HD BOLT
5/16 - 18 X 1
HEX HD BOLT
5/16 - 18 X 1
HEX HD BOLT
"U" NUT
"U" NUT
"U" NUT
Secure hood latch and bracket with original
bolts
hood latch