Fig. 1, Fig. 2, Bracket/speaker assembly – Whelen SAK44 User Manual
Page 2: Mounting the sa315 to the main bracket, Mounting to vehicle frame
Page 2
SA315 / Rear View
wire
exit &
drain
hole
A
B
A
A
1/4" SPLIT
LOCKWASHER
1/4" SPLIT LOCKWASHER
(QTY 4)
1/4 - 20 X 1-1/4"
HEX HEAD SCREW
(QTY 1)
SA315 SIREN SPEAKER
MAIN BRACKET
1/4 - 20 X 1-1/2"
HEX HEAD
SCREW (QTY 3)
Fig. 1
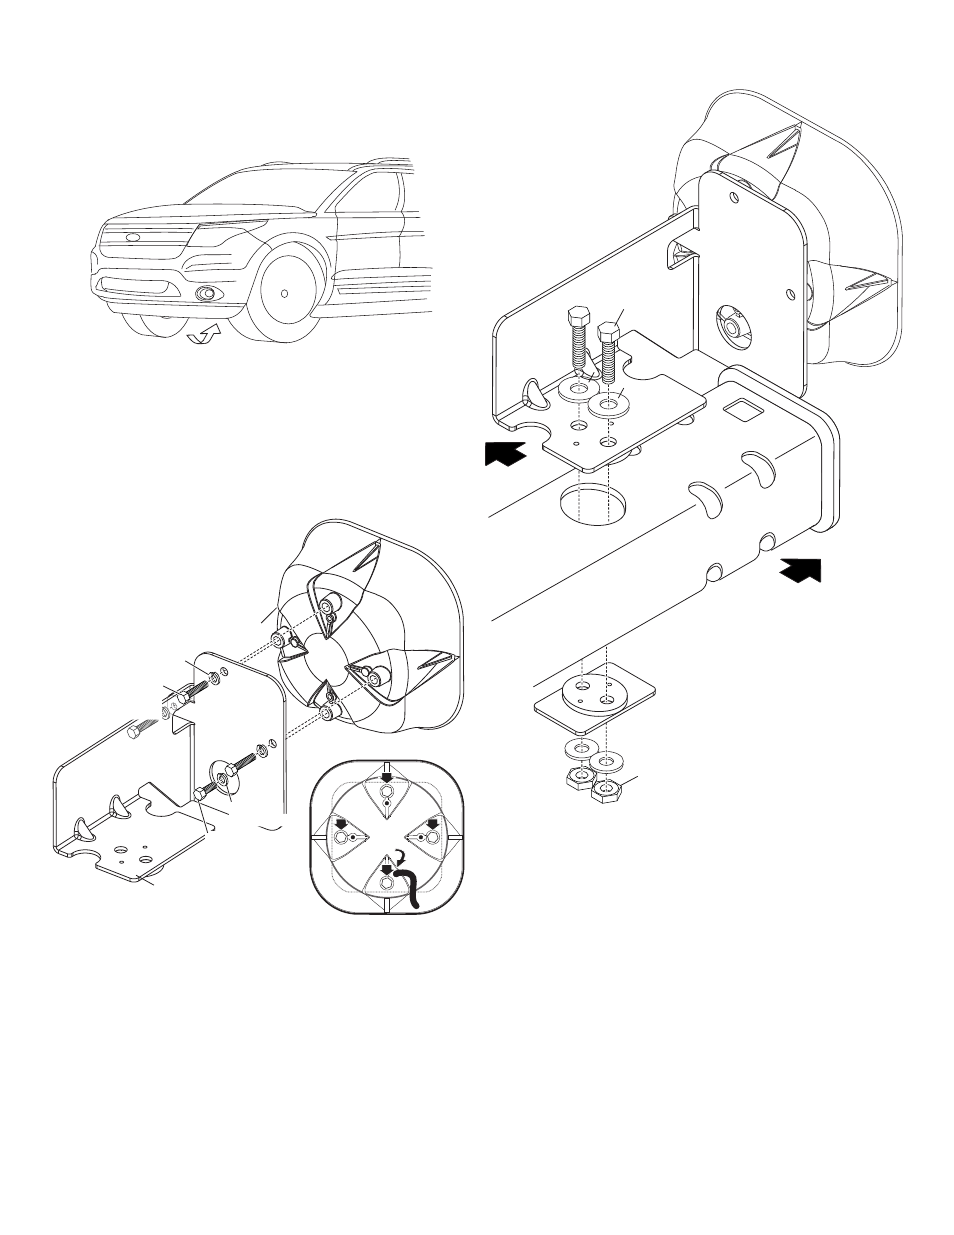
IMPORTANT: For drainage purposes, the speaker
must be oriented so that the wire passage hole is in the “6 o’clock” position
(closest to the road). This is the drain hole for the siren. Improper mounting
will result in premature driver failure and void the product warranty.
VEHICLE FRAME
FRONT OF
VEHICLE
DRIVER
SIDE TIRE
Lower
Clamp
Support
3/8 - 16
ELASTIC
STOP NUT
(QTY 2)
Fig. 2
3/8 - 16 X 4"
HEX HD BOLT
(QTY 2)
3/8 - 16 X 4"
HEX HD BOLT
(QTY 2)
3/8 - 16 X 4"
HEX HD BOLT
(QTY 2)
3/8" FLAT
WASHER
(QTY4)
3/8" FLAT
WASHER
(QTY4)
3/8" FLAT
WASHER
(QTY4)
MOUNTING LOCATION
Bracket/Speaker Assembly:
The bracket will mount to the vehicle frame just in front of the front tire, on
the drivers side.
Remove the bolts securing the protective plastic panel located underneath
the vehicle in front of the tire. Bend
the panel out to access the
vehicle frame.
Mounting the SA315 to the Main Bracket:
Secure the SA315 siren speaker to the main bracket using the supplied
mounting hardware. follow the instructions in figure 1 for mounting bolt location.
The SA315 siren speaker mounting kit comes with three 1/4-20 X 1-1/2
mounting bolts. The longer bolts are necessary to go through the mounting
bracket, the siren housing and into the siren driver. The long bolts (“A”) will be
used in 3 of the 4 mounting holes securing the siren driver to the speaker
housing. Your speaker is shipped with two 1/4-20 X
1-1/4 short bolts installed. A short bolt (“B”)
must be used in the hole that does not go
through the bracket to secure driver to
housing. If you need to remove all 4 bolts
at once, be sure to hold the driver
securely in place (Fig. 1).
Mounting to Vehicle Frame:
.Place the main bracket (with siren
speaker) onto the frame and secure it to
the vehicle by securing the lower
clamp support to the main bracket.
The two mounting bolts will go
through the frame. The two round
extensions protruding from the
lower clamp support and main
bracket will insert into the hole
in the frame (Fig. 2)
Extend the WHITE (positive) and BLACK (negative) speaker wires to your siren
amplifier and refer to the amplifiers instructions for connections. Re-secure the
protective plastic panel to the vehicle and installation is complete.