Model hwlci12, Mounting the howler speaker and bracket – Whelen SAK46 User Manual
Page 2
Page 2
1/4" SPLIT LOCKWASHER
(QTY 1)
1/4 - 20 X 1-1/4"
HEX HD SS (QTY 1)
TO HOWLER
B R
A C
K E
T
1/4 - 20 X 1-1/4"
PFHMS (QTY 3)
TO
SA315
BRACKET
5/16 X 1" HEX HD
SHEET METAL
SCREW (QTY 4)
3/8" FLAT
WASHER (QTY 2)
3/8 - 16 ELASTIC
STOP NUT (QTY 2)
5/16 ELASTIC
STOP NUT
(QTY 2)
5/16 - 18 X 1 HEX HD BOLT (QTY 2)
HEADLIGHT SUPPORT
5/16 FLAT WASHER (QTY 2)
DRAIN
HOLES
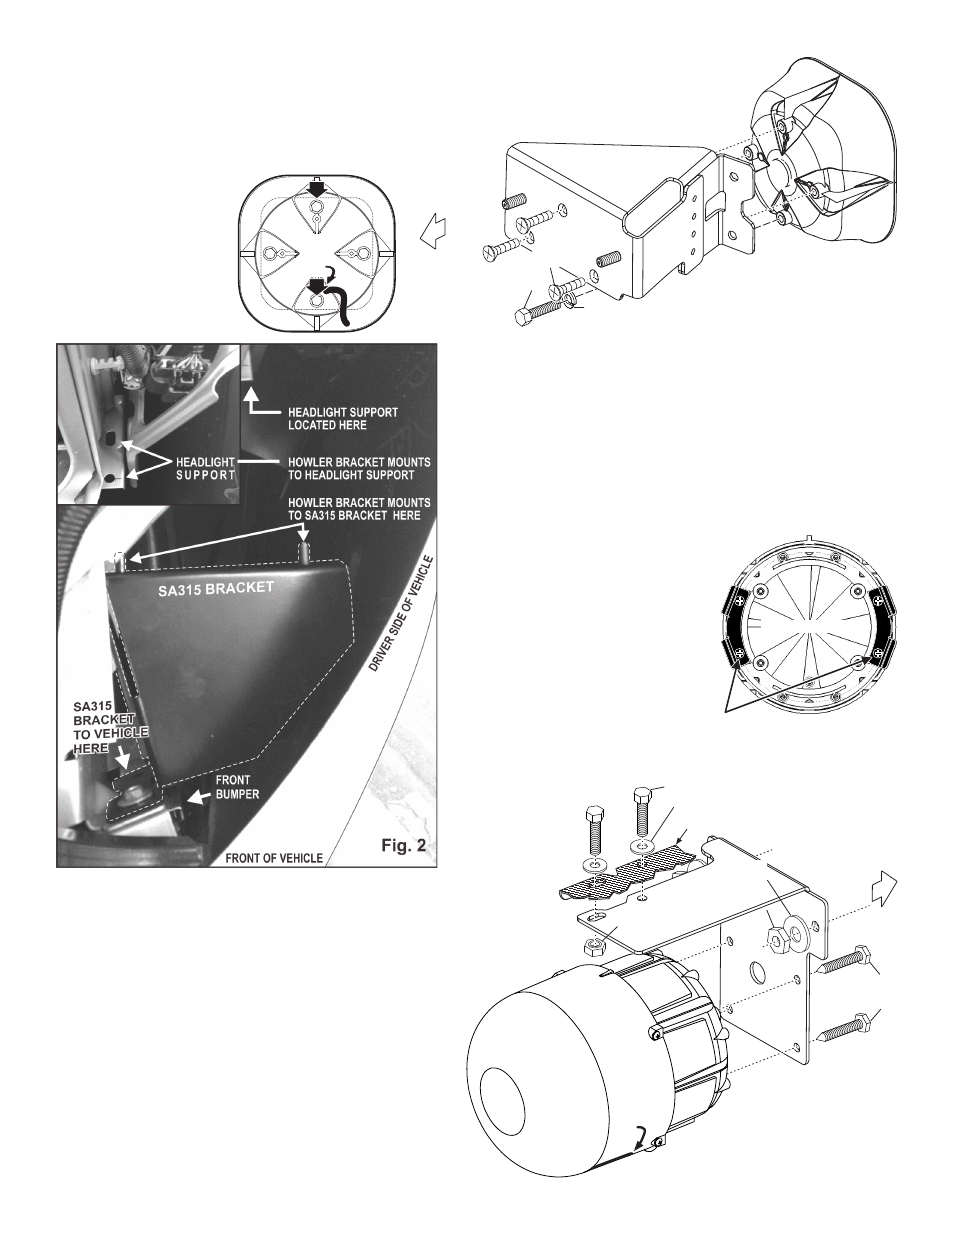
Model SAK46 / Mounting the SA315 siren speaker to the bracket:
Mount the SA315 siren speaker to its bracket (Fig. 1). The SA315 mounting kit comes with 3 long screws (1/4-20 X 1-1/4”
PHILLIPS FLAT HEAD METAL SCREWS) Longer screws are necessary to go through the mounting bracket, the siren
housing and into the siren driver. They will replace 1 of the 2 short screws (“A”) that now secure the driver to the speaker
housing when your speaker is shipped. A short screw must be used in the hole
that does not go through the bracket to properly secure the driver to the
housing. If you remove all 4
screws at once be sure to hold
the driver in place.
IMPORTANT: The SA315
speaker must be oriented so
the wire passage hole is in the
“6 o’clock” position (closest to
the road). This is also the drain
hole. Improper mounting will
result in premature driver
failure and void the warranty.
A
A
wire
exit &
drain
hole
SA315 Rear View
Fig. 1
Fig. 3
Mounting the SA315 bracket to the vehicle:
1.
Unplug and remove the driver side headlight assembly from the vehicle
following manufacturers instructions.
2.
Remove the 2 bolts which help secure the bumper (Fig. 2) and secure the
bracket to the vehicle where the bumper mounts using these 2 bolts.
3.
Extend the WHITE (Positive) and Black (Negative) wires to your siren
amplifier and connect as instructed in the amplifier manual. Reinstall the
headlight assembly.
Model HWLCI12
(requires SAK46)
Mounting the Howler speaker
and bracket:
IMPORTANT! READ THESE WARNINGS
BEFORE CONTINUING!
The Howler™ Supplemental Siren was
designed for use in high-risk areas such as an
intersection. It is not intended to be, nor should
be operated as a replacement or alternative to
the vehicle's primary siren. The low-frequency
tones of the Howler demonstrate significantly
different audio characteristics as compared to
those of a traditional higher-frequency siren.
While the low-frequency tones are better able to penetrate other vehicles, thus
alerting drivers to the presence of the responding emergency vehicle, these tones
may also penetrate into the
responding vehicle itself.
This could potentially
expose the operator to
increased noise levels.
To help eliminate
overexposure, the
Howler siren has been designed with a built-in timing circuit. The Occupational Safety &
Health Administration (OSHA) (www.osha.gov) provides information necessary to
determine safe exposure times in Noise and Hearing Conservation, Section 1910.95
(Occupational Noise Exposure). Until you have determined the safe exposure times for your
specific application, this siren should be configured for the minimum operating time and
operators should be required to use an approved hearing protection device. FAILURE
TO FOLLOW THIS RECOMMENDATION COULD CAUSE HEARING LOSS!
1.
Mount the Howler to the bracket using the supplied 5/16 X 1” HEX HD
SHEET METAL SCREWS. The Howler must be mounted with the
drainage holes on the bottom.
2.
Mount the Howler bracket to the back of the SA315 bracket with the
supplied 5/16 HEX HEAD BOLTS, 5/16 FLAT WASHERS AND 5/16
ELASTIC STOP NUTS (Figs. 2 & 3).
3.
Secure the Howler bracket to the vehicle headlight support using
the supplied 5/16 - 18 X 1” HEX HEAD BOLTS, 5/16 FLAT
WASHERS AND 5/16 ELASTIC STOP NUTS (Figs. 2 & 3).
4.
Extend the WHITE (Positive) and Black (Negative) wires to your siren
amplifier and connect as instructed in the siren manual.
Remove 4 screws and remove brackets.
NOTE: If strap retainer brackets are
present on your Howler speaker, they
must be removed for this installation.
Howler Front View