Installation – Whelen SAK45 User Manual
Page 2
Page 2
Installation:
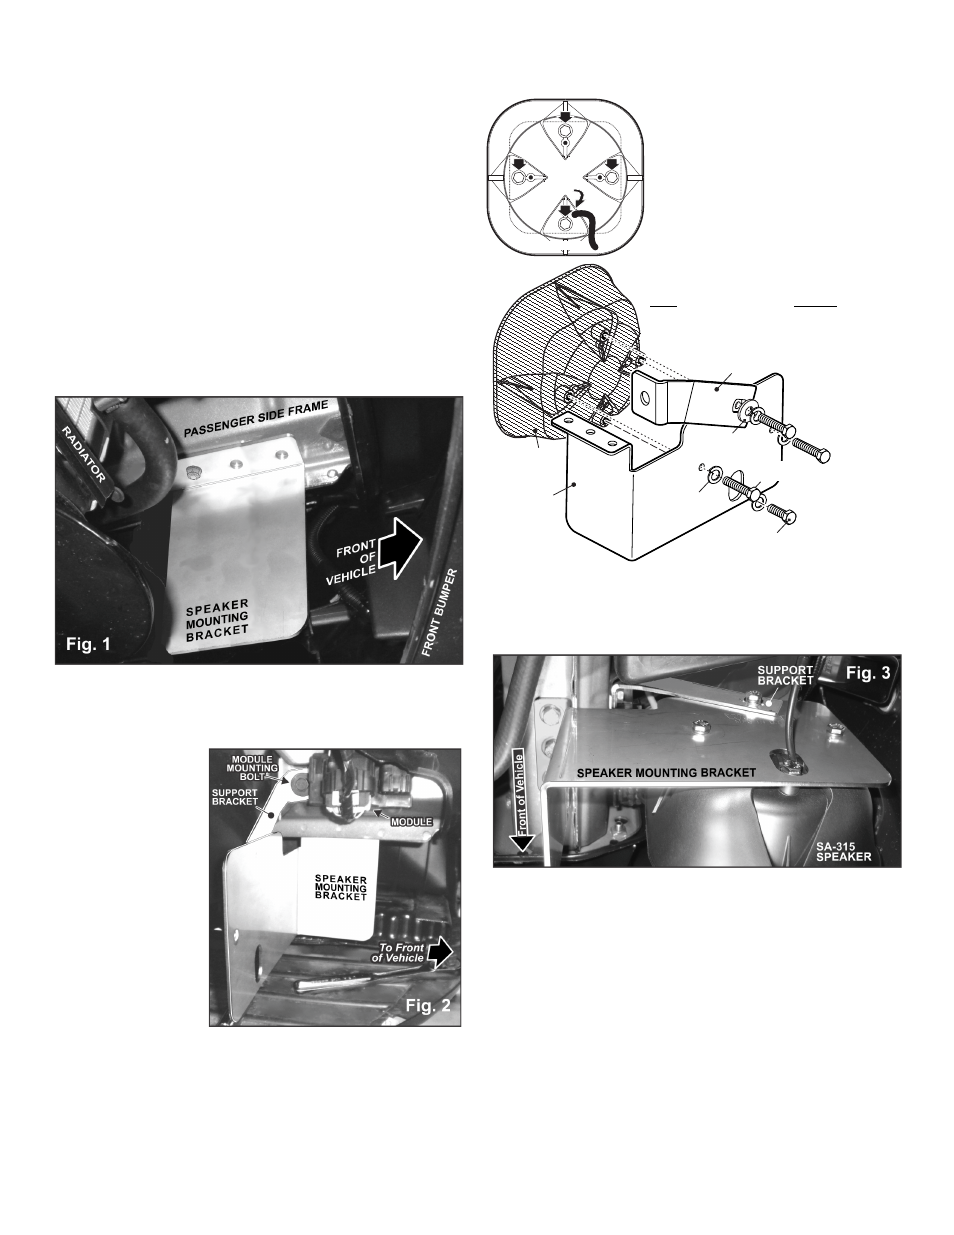
The speaker bracket mounts toward the front of the vehicle, to the
vehicle frame near the radiator. There is one existing hole in the
frame you will need to widen for the rear mounting hole in the
bracket. You will need to drill the other 2 mounting holes into the
frame. the bracket is mounted with the supplied Rivnuts™. There is
also a bracket support that will mount to the vehicle using an
existing bolt which holds one of the electronic modules to the frame.
IMPORTANT NOTE! This installation uses Rivnuts™ to secure the
speaker bracket to the vehicle. This type of hardware requires the
use of a specialized installation tool. Refer to the owners manual
included with this tool for proper installation. Be sure to follow the
mounting hole specifications precisely!
1.
Widen the existing hole in the vehicle frame with a 17/32 drill bit and
install a RIVNUT into the hole.
2.
Using a 5/16 - 18 x 1” HEX HEAD BOLT (supplied), mount the
speaker bracket to the RIVNUT installed in step 1 using the rear
mounting hole in the bracket (Fig. 1).
3.
With the bracket installed, mark the other 2 mounting holes off onto
the vehicle frame using the bracket as a template.
4.
Remove the bracket and drill the other 2 mounting holes into the
vehicle frame using
a 17/32 drill bit and
install Rivnuts™.
5.
Locate the vehicle
module which sits
adjacent to where
the speaker bracket
will sit. The top of
the support bracket
will mount here
using the bolt that
secures the module
(Fig. 2). Remove
and reinstall the
module mounting
bolt, while also
mounting the
support bracket.
6.
Secure the speaker mounting bracket to the vehicle using the three
supplied 5/16 - 18 x 1” HEX HEAD BOLTS and 5/16 LOCK
WASHERS and tighten.
7.
Mount the siren speaker to the speaker bracket using the supplied
hardware (Fig. 3) while securing the bottom of the support bracket to
the speaker bracket with the speaker mounting hardware and tighten
firmly. (See “Securing the Siren Speaker to the Mounting Bracket”)
8.
Extend the WHITE POSITIVE (+) wire and BLACK NEGATIVE (-)
wire to the siren amplifier and connect following the amplifiers
instructions.
The SA315 siren speaker mounting kit comes with
3 long bolts (1/4-20 X 1-1/2” Hex Hd). The longer
bolts are needed to go through the mounting
bracket, through the siren housing and into the
siren driver. They will replace 3 of the 4 shorter
bolts (“A”) that now secure the siren driver to the
speaker housing. Your speaker is shipped with 2
or more of the short bolts installed. A short bolt
be used in the hole that
go through
the bracket so it will properly secure the driver to
the housing. If you need to remove all 4 bolts
at once be sure to hold the driver in place.
must
does not
Securing the Siren Speaker to the Mounting Bracket:
IMPORTANT: For drainage, the speaker must be
oriented so that the wire passage hole is in the
6 o’clockposition (closest to the road). This hole is
also the drain hole for the siren. Improper mounting
will result in premature driver failure and void the
product warranty.
1/4 - 20 X 1-1/4"
HEX HD BOLT (1)
SUPPORT BRACKET
1/4" SPLIT LOCK
WASHER (4)
1/4" FLAT WASHER (1)
S I R E N
SPEAKER
S I R E N
SPEAKER
BRACKET
1/4 - 20 X 1-1/2"
HEX HD BOLT SS
wire
exit &
drain
hole
A
A
A
A
Rear View