Fig 4 g7 series, Fig 5 g8 series, Fig 1 – Whelen G1MM90 User Manual
Page 2: Magnet installation, Cigar plug conversion, Important electrical warnings
Page 2
REAR OF LIGHTBAR
REAR OF LIGHTBAR
REAR OF LIGHTBAR
Fig 2 G1 / G2 / G3 & G4 Series
Fig 3 G5 Series
BLACK-WHITE ORANGE BLACK
BLACK-WHITE
ORANGE
BLACK
POS. 1
POS. 2
POS. 3
POS. 4
/ SMOOTH
/ RIBBED
/
/
WIRE
WIRE
N/C
N/C
Fig 4 G7 Series
4 POSITION CONN.
GUARDIAN
S T R O B E
P O W E R
S U P P L Y
GUARDIAN
S T R O B E
P O W E R
S U P P L Y
RIBBED
WIRE
SMOOTH
WIRE
NEG (-)
POS (+)
NEG (-)
POS (+)
SMOOTH
WIRE
RIBBED
WIRE
Fig 5 G8 Series
FROM WIRING
HARNESS
BUTT
BLACK
WHT/VIO
RED
BUTT
BUTT
SMOOTH GROOVED
IMPORTANT! The lightbar should be located a minimum of 16" from any radio
antennas!
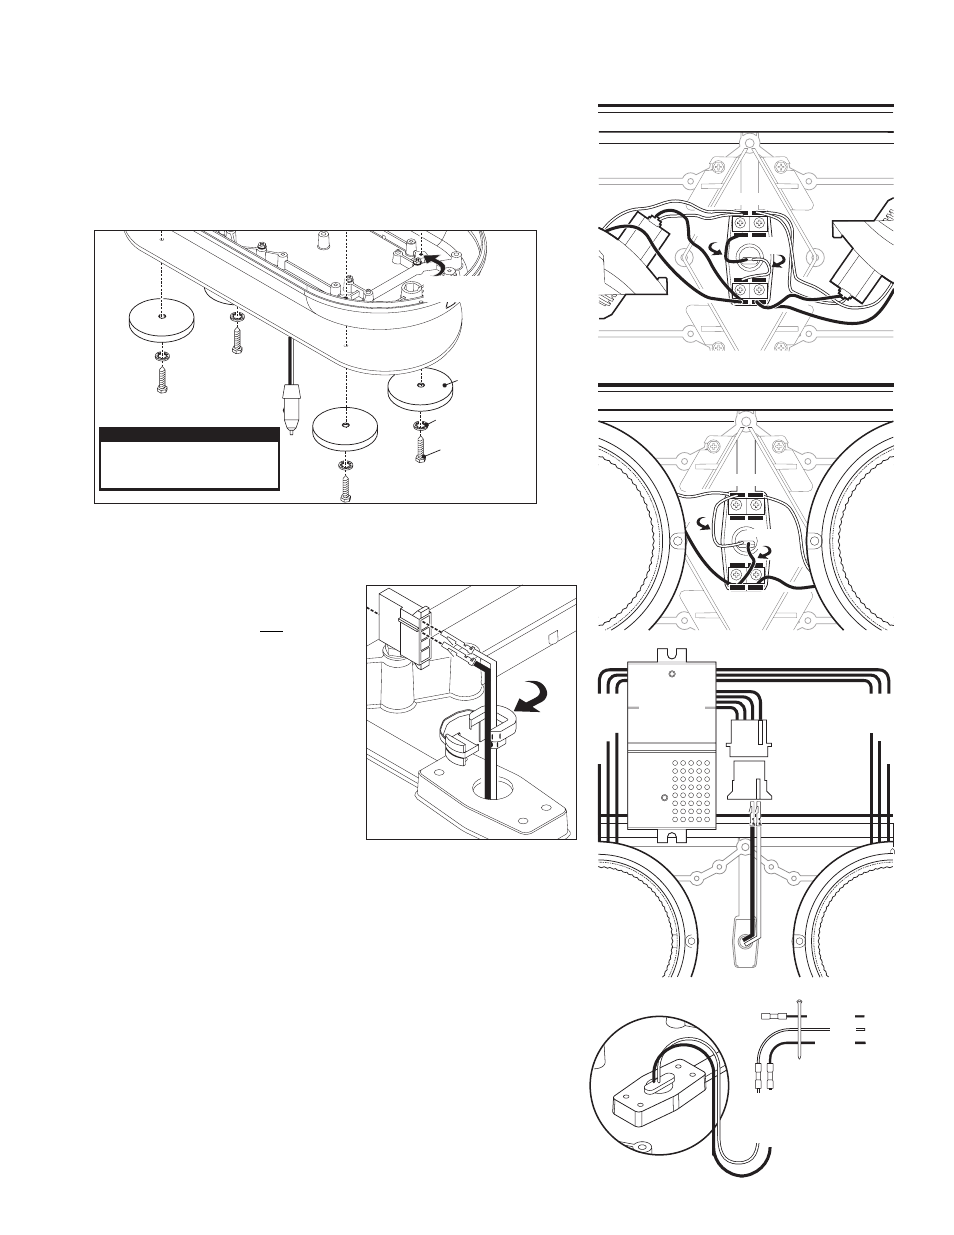
Magnet Installation:
WARNING: The use of any magnetic or suction cup mounted warning light on the
outside of a vehicle, while in motion, is not recommended and is at the sole discretion
and risk of the user.
WARNING: The strobe light power supply is a high voltage device. Do not remove strobe
tubes or dismantle strobe lightheads in the system while it is in operation. Wait 10
minutes after turning off power before starting work or any trouble shooting.
To install magnets as shown, you will first need to enlarge the mounting screw holes in
the base using a 7/32 drill bit.
Cigar plug conversion:
1.
Remove the dome to access the inside of the
lightbar (see lightbar manual.)
2.
Remove the strain relief and only the existing
wiring you are replacing. You will replace only the
wiring exiting the lightbar, with the cigar plug and
wire that comes with the kit.
3.
Run the new wire up through the wire exit hole in
the lightbar base and plug it into the terminals as
shown.
4.
The G1, G2, G3, G4, & G5 series will have faston
connectors that you will plug into the lightbar’s
center terminal (Figs. 2 & 3).
5.
In the G7 series, you will use the 4-position
connector that comes with the kit and wire as
shown (Fig. 4). In the G8 series you will connect
the wires to the internal wiring harness with
supplied butt splices (Fig. 5).
6.
All models require you to replace the strain relief to protect the wiring (Fig. 1).
IMPORTANT ELECTRICAL WARNINGS!
Guardian models equipped with cigar cords are intended for short duration, intermittent
operation only! Prolonged operation requires the Guardian to be wired to the vehicle.
DO NOT use a cigar lighter socket as a power source for this or any electrical
accessory! Use a 12-volt accessory power port or auxiliary power outlet of sufficient
capability. Do not exceed the manufacturers power rating for the selected port/outlet.
DO NOT pull on the power plug wires when removing the plug from the outlet! To
remove, firmly grasp the power plug housing and pull.
ANY DEVIATIONS FROM THE ABOVE ELECTRICAL GUIDLINES WILL VOID THE
PRODUCT WARRANTY.
IMPORTANT! It is the responsibility of the installation technician to make sure that the
installation and operation of this product will not interfere with or compromise the
operation or efficiency of any vehicle equipment!
IMPORTANT! Before returning the vehicle to active service, visually confirm the proper
operation of this product, as well as all vehicle components/equipment.
90 LB MAGNET
1/4" INTERNAL TOOTH
LOCKWASHER
1/4"
#14 X 3/4 HEX HEAD
"A" POINT SMS
Enlarge 4 mounting
holes with 7/32 drill.
Secure
strain relief
here.
Secure
strain relief
here.
Secure
strain relief
here.
Fig 1
CAUTION! DO NOT LOOK DIRECTLY AT
THESE LEDS WHILE THEY ARE ON.
MOMENTARY BLINDNESS AND/OR EYE
DAMAGE COULD RESULT!
IMPORTANT WARNING!