Whelen TA20TL12 User Manual
Automotive: li ghtheads, Automot ive: li ghtheads
Page 1
©1996 Whelen Engineering Company Inc.
Form No.13114B (110496)
Automotive:
Li
ghtheads
Replaceable Bulb Guide:
20 Watt
®
ENGINEERING COMPANY INC.
Internet: www.whelen.com
Sales e-mail: [email protected]
Canadian Sales e-mail: [email protected]
Customer Service e-mail: [email protected]
©1996 Whelen Engineering Company Inc.
Form No.13114B (110496)
Automot
ive:
Li
ghtheads
Replaceable Bulb Guide:
20 Watt
®
ENGINEERING COMPANY INC.
Internet: www.whelen.com
Sales e-mail: [email protected]
Canadian Sales e-mail: [email protected]
Customer Service e-mail: [email protected]
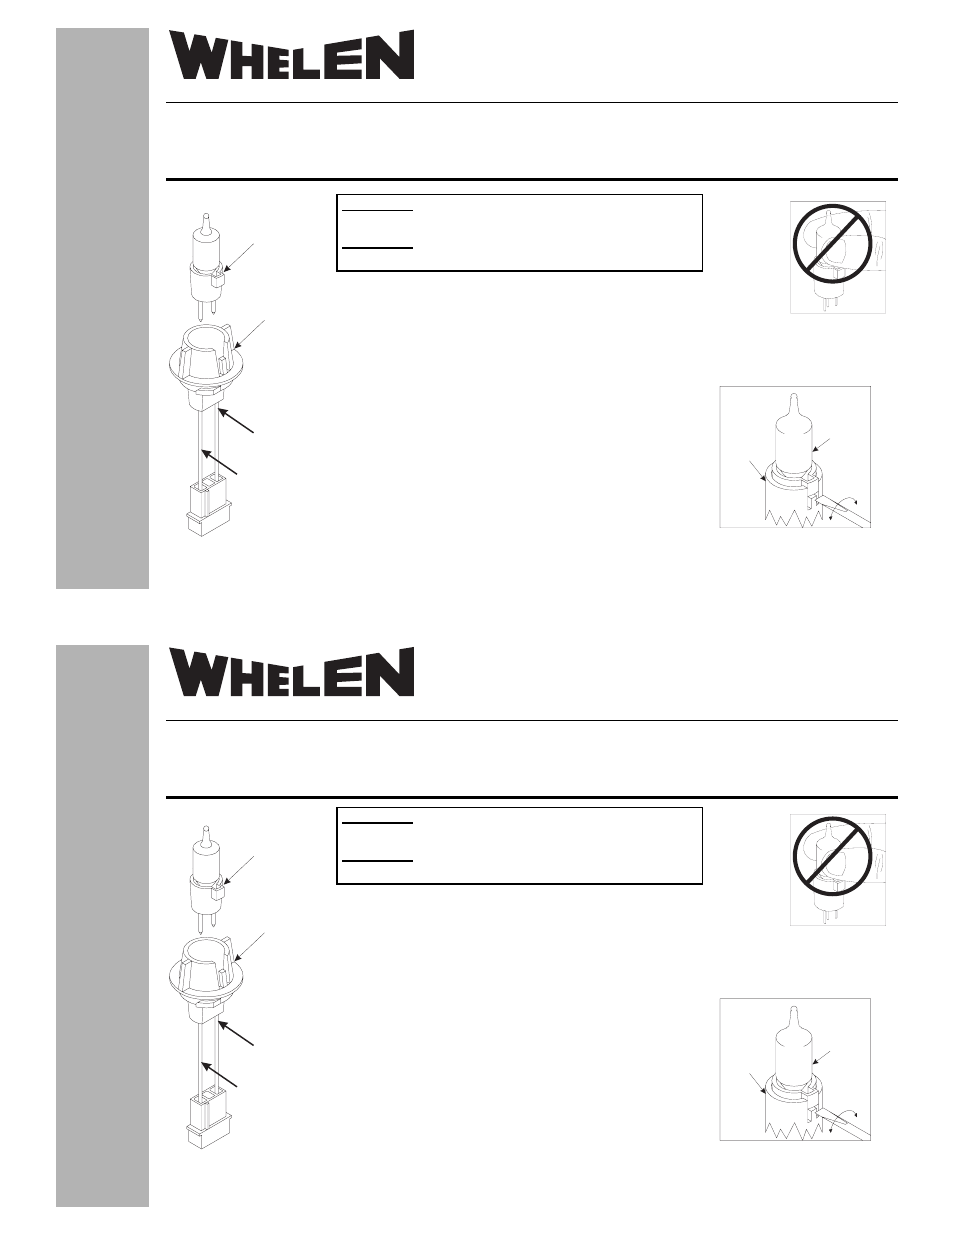
RED
(+)
WHITE
(-)
Snap-In
Bulb Assembly
Twist-In
Lamp Holder
Fig. 1
Your New Twist-In Lamp Holder....
This new lamp holder is installed in the same manner as your previous lamp holder. The new
lamp wires connect exactly as before. Bulb replacement, however, is performed differently and
this procedure is explained below. Please note that the size of some reflectors prevent bulb replacement unless the
lamp holder is removed. If the bulb cannot be accessed by a screwdriver, as shown in Fig. 2, remove the lamp holder
from the reflector before proceeding with bulb relacement.
To replace a Snap-In bulb....
1. Be sure the power to the lamp is turned off.
2. Insert a small, flat-blade screwdriver into the space between the twist-in
lamp holder and the lamp assembly.
3. Gently rotate the screwdriver as shown in Fig. 2. Repeat this action until the
bulb is loose.
4. Pull the bulb in an upward direction until it is free.
5. Insert the alignment tab of the new bulb into the bulb holder and press
downwards to lock the new bulb into place.
Sample
Twist-In
Lamp
Holder
Snap-In
Bulb
Assembly
Twist-In Lamp Holder (no bulb)
P/N - SNADAPT
Snap-In Bulb Assembly (20 Watt)
P/N - H20SN12
Fig. 2
CAUTION! Replacing any halogen bulb requires
the use of safety glasses to prevent injury.
CAUTION
!
Do not handle the bulb with bare hands.
Use gloves to prevent possible injury.
RED
(+)
WHITE
(-)
Snap-In
Bulb Assembly
Twist-In
Lamp Holder
Fig. 1
Your New Twist-In Lamp Holder....
This new lamp holder is installed in the same manner as your previous lamp holder. The new
lamp wires connect exactly as before. Bulb replacement, however, is performed differently and
this procedure is explained below. Please note that the size of some reflectors prevent bulb replacement unless the
lamp holder is removed. If the bulb cannot be accessed by a screwdriver, as shown in Fig. 2, remove the lamp holder
from the reflector before proceeding with bulb relacement.
To replace a Snap-In bulb....
1. Be sure the power to the lamp is turned off.
2. Insert a small, flat-blade screwdriver into the space between the twist-in
lamp holder and the lamp assembly.
3. Gently rotate the screwdriver as shown in Fig. 2. Repeat this action until the
bulb is loose.
4. Pull the bulb in an upward direction until it is free.
5. Insert the alignment tab of the new bulb into the bulb holder and press
downwards to lock the new bulb into place.
Sample
Twist-In
Lamp
Holder
Snap-In
Bulb
Assembly
Fig. 2
CAUTION! Replacing any halogen bulb requires
the use of safety glasses to prevent injury.
CAUTION
!
Do not handle the bulb with bare hands.
Use gloves to prevent possible injury.
Twist-In Lamp Holder (no bulb)
P/N - SNADAPT
Snap-In Bulb Assembly (20 Watt)
P/N - H20SN12
51 Winthrop Road,
Chester, Connecticut 06412-0684
Phone: (860) 526-9504
Fax: (860) 526-4078
51 Winthrop Road,
Chester, Connecticut 06412-0684
Phone: (860) 526-9504
Fax: (860) 526-4078