PLANET ICA-1200 User Manual
Cube ip camera, English / italian germany / france
Cube IP Camera
Quick Guide
PLANET Technology Corporation
Tel: 886-2-2219-9518
Fax: 886-2-2219-9528
Email: [email protected]
www.planet.com.tw
11F., No.96, Minquan Rd., Xindian Dist., New Taipei City 231, Taiwan (R.O.C.)
PLANET reserves the right to change specifications without prior notice. All brand names and trademarks are property of
their respective owners. Copyright © 2013 PLANET Technology Corp. All rights reserved.
2011-AB5660-001
Quick Installation Guide (English / Italian / Germany / France)
Note :
1. If you are not familiar with IP
setting, remain with the default
setting.
2. The default IP address of Cube
IP Camera is 192.168.0.20.
Note :
1. Se non si conoscono gli IP della
rete non modificare il valore
esistente.
2. I valori di fabbrica per la
Telecamera IP Cube sono
192.168.0.20.
Step 3 : (Optional) Setup Camera IP address
Passo 3 : (Opzionale) configura l’indirizzo IP della IP Camera
Select the IP Camera you want to configure and click the
browser icon.
You will connect to IP Camera via web browser automatically;
The IP Camera will prompt for logon username / password,
please enter
admin / admin as the default user name and
password.
Doppio click sulla IP Camera da configurare.
Verrà visualizzata la pagina di configurazione della IP Camera
nel browser; Viene richiesto il login alla IP Camera digitare
username e password (
admin / admin come valore impostato
di fabbrica).
Step 4 : Bring up the web page for further configura-
tion
Passo 4 : Utilizzare la pagina web per ulteriori
configurazioni
Step 5 : (Optional) Wireless setup for Wireless Model
Passo 5 : (Opzionale) configurazione rete Wireless per la Modello wireless
Go to the Network of Website Wireless setting page for wireless configuration
Scecliere Network of Website Wireless setting page per la configurazione wireles
Press “Reload” to search Access Point nearby
Select the Access Point you would like to connect
Enter your authentication key into the fields if required
Press “OK” to make settings effective
Premere “Reload” per ricercare l Access Point più vicino
Selezionare l’Access Point a cui si vuole connettere
Digitare la chiave di protezione nell’apposito campo (WPA KEY)
Premere il tasto “OK” per rendere effettive le modifiche
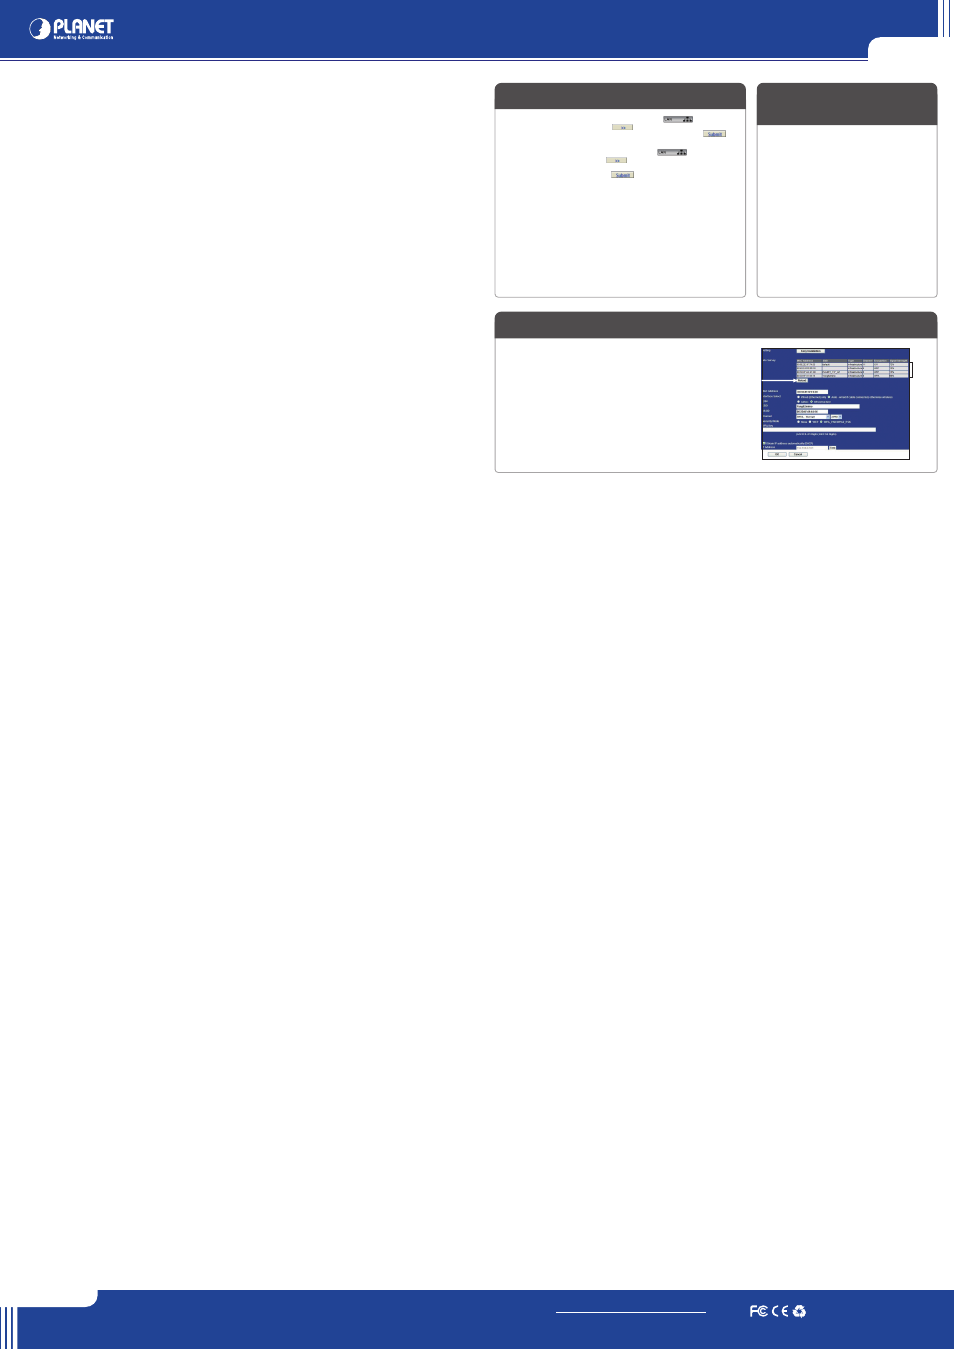
Selecting the IP Camera you want to configure, and press the button.
Key in the desired IP address, and press button.
Input username and password, default are admin / (no password). Then press
button.
Selezionare la IP Camera da configurare, e premere il tasto .
Digitare l’indirizzo IP, e premere il tasto .
Inserire username e password, I valori di fabbrica sono admin / (nessuna password). Per
salvare i nuovi parametri premere il tasto .
Further Configuration
For detail configuration, please check user’s manual on the bundled CD.
If you have any other questions, please contact the dealer where you
purchased this product or you can contact PLANET directly at the following
email address: [email protected]
Step 6 : (Optional) Wireless connection for ICA-HM101W
Passo 6 : (Opzionale) Connessione Wireless solo per la ICA-HM101W
IP Camera will reboot
Remove the lan cable after got the reminder window
The wireless connection will take effect
La IP Camera si riavvia
Rimuovere il cavo lan dopo aver effettuato la configurazione
A questo punto la connessione wireless sarà disponibile
Ulteriori informazioni
Per maggiori dettagli sulla configurazione, fare riferimento al manuale presente sul
CD fornito nella confezione.
Se I dubbi persistono si prega di contattare il rivenditore dove è stato acquistato il
prodotto oppure in alternativa è possibile contattare direttamente la PLANET al
seguente indirizzo di posta elettronica: [email protected]
PC
(DHCP Client or 192.168.0.X)
802.11 b/g/n Wireless Access Point
N
N
N
N
Note : Antenna only for Wireless Model
Note : Antenna solo per il modello Modello wireless
VERIFY THE CONTENTS INSIDE PACKAGE BOX
The package should contain the items plus Cube IP Camera. If any item is missing or damaged, please contact the seller immediately.
VERIFICARE IL CONTENUTO DELLA CONFEZIONE
I
l contenuto della confezione per Telecamera IP Cube dovrebbe contenere I seguenti componenti. Se mancano o sono danneggiati contattare il rivedintore.
Quick Installation Guide
CD-ROM
Camera stand
Power adapter
Antenna
A/V Cable
Guida all’installazione rapida
CD-ROM
Staffa
Alimentatore
Antenna
Cavo A/V
Note : PoE Model also supports IEEE802.3af, be reminded to power either from AC adapter or PoE switch.
Note : La Modello PoE supporta lo standard PoE IEEE802.3af, per cui alimentare con uno switch PoE o con l’alimentatore fornito di serie.
Step 1 : Connecting Network and AC Adapter Power
Passo 1 : Connettere il cavo di rete e l’alimentatore
Step 2 : (Optional) the utility installs and run the utility to locate the IP camera
Passo 2 : (Opzionale) Programma per la ricerca della IP camera
Please insert the CD-ROM supplied in the product package, and the CD will automatically run the installation, if not, please click the Utility hyperlink to install.
The IP Wizard II Utility description.
After the camera utility is launched, all cameras found in your local area network will be displayed.
Inserire il CD-ROM contenuto nella confezione nel lettore, ed automaticamente partirà il programma di installazione, se non si avvia utilizzare la Utility hyperlink.
Descrizione dell’utility IP Wizard II.
Dopo l’avvio del programma, tutte le telecamere presenti nella rete saranno visualizzate nella lista.
Current existing IP Cameras in local network
Search the IP Camera in the network
To view the IP Camera’s pictures that you selected
To modify the IP parameters of the selected IP Camera
To view and assign the available wireless network
Shows the selected IP Camera images
Lista delle IP Cameras presenti nella rete
Il tasto Search ricerca le IP camera nella rete
Visualizza le immagini della IP Camera selezionata
Modifica I parametri della IP Camera selezionata
Visualizza ed assegna le reti wireless disponibili
Riquadro di visualizzazione della IP Camera selezionata
Hinweis : Antenne nur bei der Modell mit WLAN
Remarque : Antenne uniquement pour I’Modèle sans fil
INHALTE DES LIEFERKARTONS PRÜFEN
Der Karton sollte die folgenden Artikel enthalten plus IP-Kamera in Würfelform. Falls etwas fehlen oder beschädigt sein sollte, wenden Sie sich bitte umgehend an Ihren Händler.
VÉRIFIER LE CONTENU À L'INTÉRIEUR DE LA BOÎTE
L'emballage doit contenir les éléments ainsi que Cube caméra IP. Si l'un des éléments manque ou est endommagé, veuillez contacter immédiatement le revendeur.
Schnellinstallationsanleitung
CD-ROM
Kameraständer
Netzteil
Antenne
A/V-Kabel
Guide d'installation rapide
CD-ROM
Support caméra
Adaptateur secteur
Antenne
Câble A/V
Hinweis : Die Modell mit PoE unterstützt auch IEEE802.3af; achten Sie darauf, das Gerät entweder per Netzteil oder per PoE-Switch mit Strom zu versorgen.
Remarque : L’Modèle avec fourniture électrique par câble Ethernet prend également en charge l'IEEE802.3af, rappelez-vous d'allumer soit l'adaptateur secteur
soit le switch PoE.
Schritt 1 : Nwerkverbindung herstellen und Netzteil anschließen
Étape 1 : Connexion au réseau et à l'adaptateur secteur
Schritt 2 : Dienstprogramm installieren und zur Lokalisierung der IP-Kamera ausführen (optional)
Étape 2 : (Facultatif) l'utilitaire s'installer et s'exécute pour localiser la caméra IP
Bitte legen Sie die beim Produkt mitgelieferte CD-ROM in das CD-Laufwerk, die Installation wird automatisch ausgeführt; falls nicht, klicken Sie zum.
Installieren bitte auf das Dienstprogramm.
Beschreibung des Dienstprogramms IP Wizard II.
Nachdem das Kameradienstprogramm gestartet ist, werden alle in Ihrem lokalen Netzwerk gefundenen Kameras angezeigt.
Veuillez insérer le CD-ROM fourni dans l'emballage du produit, ce CD lance automatiquement l'installation, si ce n'est pas le cas, veuillez cliquer sur le lien
hypertexte Utilitaire pour l'installer.
Description de l'Utilitaire IP Wizard II.
Une fois l'utilitaire de la caméra lancé, toutes les caméras se trouvant sur votre réseau local sont affichées.
Aktuelle IP-Kameras im lokalen Netzwerk
Suche nach IP-Kameras im Netzwerk
Zum Betrachten der Bilder der von Ihnen ausgewählten IP-Kamera
Zum Modifizieren der IP-Parameter der ausgewählten IP-Kamera
Zum Betrachten und Zuweisen des verfügbaren WLAN-Netzwerks
Zeigt die Bilder der ausgewählten IP-Kamera
Caméras IP existantes actuelles sur le réseau local
Rechercher la caméra IP sur le réseau
Pour afficher les images de la caméra IP que vous avez sélectionné
Pour modifier les paramètres IP de la caméra IP sélectionnée
Pour visualiser et affecter le réseau sans fil disponible
Affiche les images de la caméra IP sélectionnée
Schritt 3 : Kamera-IP-Adresse einrichten (optional)
Étape 3 : (Facultatif) Configurer l'adresse IP de la caméra
Wählen Sie die IP-Kamera, die Sie konfigurieren möchten,
klicken Sie auf das Browser-Symbol.
Die Verbindung zur IP-Kamera wird automatisch per
Webbrowser hergestellt; die IP-Kamera fordert Sie zur
Anmeldung per Benutzername / Kennwort auf; bitte geben Sie
den Standardbenutzernamen und das Standardkennwort
admin / admin ein.
Sélectionnez la caméra IP que vous souhaitez configurer et
cliquez sur l'icône du navigateur.
Vous allez vous connecter à la caméra IP via un navigateur
Web automatiquement; La caméra IP va vous demandera
l'identifiant d'ouverture de session / le mot de passe, veuillez
saisir
admin / admin comme identifiant et mot de passe par
défaut.
Schritt 4 : Webseite zur weiteren Konfiguration
aufrufen
Étape 4 : Affichez la page web pour la configuration
avancée
Schritt 5 : WLAN-Einrichtung für Modell mit WLAN (optional)
Étape 5 : (Facultatif) Configuration sans fil de l'Modèle sans fil
Rufen Sie zur WLAN-Konfiguration die Seite Network of Website (Netzwerk der
Webseite) Wireless WLAN-Einstellun auf
Allez dans Réseau sur la page de réglages sa fil du site Web pour la configuration
sans fil
Klicken Sie zur Suche nach einem Zugangspunkt in der Nähe auf “Reload (Neu laden)“
Wählen Sie den Zugangspunkt, mit dem Sie sich verbinden möchten
Geben Sie erforderlichenfalls den Authentifizierungsschlüssel in die Felder ein
Klicken Sie zum Übernehmen der Einstellungen auf “OK“
Appuyez sur “Recharger” pour rechercher un point d'accès à proximité
Sélectionnez le point d'accès auquel vous souhaitez vous connecter
Entrez votre clé d'authentification dans les champs si nécessaire
Appuyez sur "OK" pour que les réglages prennent effet
Wählen Sie die Kamera, die Sie konfigurieren möchten; klicken Sie auf .
Geben Sie die gewünschte IP-Adresse ein, klicken Sie auf .
Geben Sie Benutzernamen und Kennwort ein, Standard: admin / (kein Kennwort). Klicken
Sie dann auf .
Sélectionnez la caméra IP que vous voulez configurer, et appuyez sur le bouton
.
Saisissez l'adresse IP souhaitée, et appuyez sur le bouton .
Entrez l'identifiant et le mot de passe, les paramètres par défaut sont admin / (sans mot de
passe). Puis appuyez sur le bouton .
Hinweis :
1. Wenn Sie mit den
IP-Einstellungen nicht vertraut
sind, sollten Sie die Standardein-
stellungen verwenden.
2. Die Standard-IP-Adresse der
IP-Kamera in Würfelform lautet
192.168.0.20.
Remarque :
1. Si vous n'êtes pas familier avec
les réglages IP, conservez le
réglage par défaut.
2. L'adresse IP par défaut de Cube
caméra IP est 192.168.0.20.
Weitere Konfiguration
Detaillierte Hinweise zur Konfiguration entnehmen Sie bitte der Bedienungsanleitung
auf der mitgelieferten CD.
Falls Sie weitere Fragen haben, wenden Sie sich bitte an den Händler, bei dem Sie
dieses Produkt erworben haben, oder unter folgender eMail-Adresse direkt an
PLANET: [email protected]
Schritt 6 : WLAN-Verbindung für Modell mit WLAN (optional)
Étape 6 : (Facultatif) Connexion sans fil pour l'Modèle sans fil
IP-Kamera startet neu
Ziehen Sie nach Einblenden des Erinnerungsfensters das
LAN-Kabel
Die WLAN-Verbindung wird hergestellt
La caméra IP va redémarrer
Retirez le câble LAN après avoir obtenu la fenêtre de rappel
La connexion sans fil va prendre effet
Configuration avancée
Pour les détails de la configuration, veuillez consulter le manuel de l'utilisateur sur le
CD fourni.
Si vous avez d'autres questions, veuillez contacter le revendeur où vous avez acheté
ce produit ou contacter PLANET directement à l'adresse courriel suivante:
[email protected]
PC
(DHCP Client or 192.168.0.X)
802.11 b/g/n Wireless Access Point
N
N
N
N
English / Italian
Germany / France
DC
Ethernet Switch
User PC
(192.168.0.X)
Cube IP Camera
DC
Ethernet Switch
User PC
(192.168.0.X)
Cube IP Camera