PLANET WAP-7500 User Manual
Product package, System installation, Installation precautions
- 1 -
- 2 -
- 3 -
- 4 -
- 5 -
- 6 -
- 7 -
- 8 -
1. Product Package
WAP-7500 x 1
Mounting Kit x 1
PoE Injector & Power cord x 1
Grounding Wire with screw x 1
Water Proof RJ-45 Connector Kit x 1
Quick Installation Guide (QIG) x 1
Product CD x 1
Note
1. If any of them are not included or
damaged, please contact your local
vendor for support.
2. Product
CD
contains
Management
Tool, Quick Installation Guide and User
Manual.
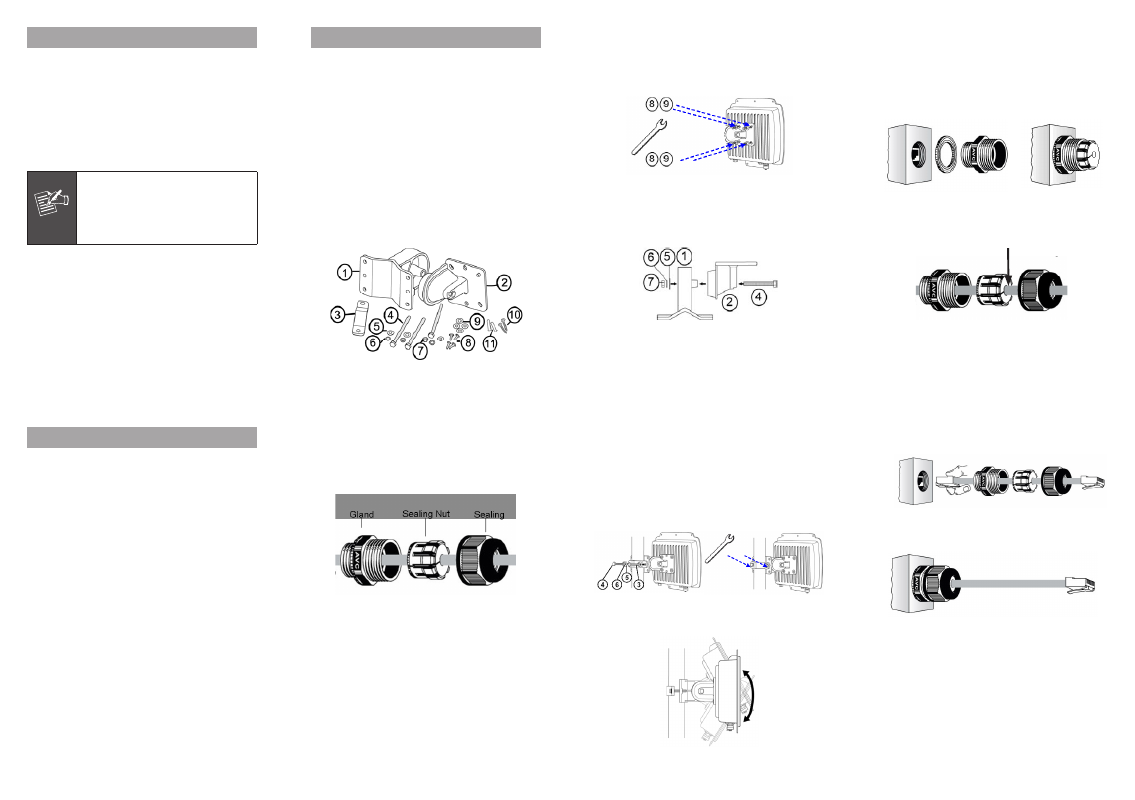
3. System Installation
3.1 Mounting Kit
Wall/Pole Mounting Bracket
1 T-Form Bracket x 1
2 Articulation Pole x 1
3 Pole Mount Bar x 1
Fasteners
4 M8×80 Screw x 2, M8×90 Screw x 1
5 M8 Washer x 3
6 M8 Spring Washer x 3
7 M8 Nut x 1
8 M5×16 Screw x 4
9 M5 Washer x 4
10 Wood Screw (for Wall Mount) x 4
11 Wall/Gyprock Plug (for Wall Mount) x 4
3.5 Connect Up
Before installing the Ethernet cable with a waterproof RJ-45
connector, it is recommended that the Cat-5 RJ-45 coaxial
cable be used for the bridge to power injector connections.
1. To connect to the hole labeled PoE+Data, open the black
cover in advance by using a coin or a slotted screwdriver
and then screw in the body of the gland and tighten.
2. Slide the sealing nut to the RJ-45 cable from its middle
breach and then insert the sealing into the cable.
Slide the Sealing Nut from its Breach
3.3 Assemble the Mounting Bracket
1. Place the main bracket into the seating and use a
spanner to fasten the bracket to the WAP-7500 with
M5×16 screws
and M5 washers
provided in the
hardware packets.
2. Assemble the main bracket by placing articulation pole
to the T-form bracket
via a M8×90
screw through
the insertion axe and fix with the M8 washer
, spring
washer
and M8 nut
.
2. Installation Precautions
1. Users MUST use a proper and well-installed surge arrestor
and grounding kit with WAP-7500; otherwise, a random
lightening could easily cause fatal damage to WAP-7500.
EMD (Lightning) DAMAGE IS NOT COVERED UNDER
WARRANTY.
2. Make sure PoE is correctly connected to the RJ-45 port
on the WAP-7500 labeled PoE+Data. DO NOT CONNECT
TO THE PORT LABELED “Warning!! No POE”, other-
wise the WAP-7500 will be severely damaged!
3. Users MUST power off the WAP-7500 first before
connecting the external antenna to it; otherwise, damage
might be caused to the WAP-7500 itself.
3.2 Waterproof RJ-45 Connector Kit
Gland x 1
Sealing Nut x 1
Sealing x 1
3.4 Pole Mounting
1. Install the main bracket and the pole mount bar
over
the top of the pole by securing the drill holes of the
pole mount bar to the main bracket ones and insert two
M8×80
screws, spring washers
and washers
through the drill holes and main bracket.
2. Fasten two M8×80 screws
and washers
through the
drill holes and main bracket with a spanner.
3. Adjust the antenna for appropriate tilt / vertical orienta-
tion.
3. Insert the RJ-45 connector and make sure that the
locking tab snaps home.
WAP-7500 RJ-45 Port
4. Screw the sealing on the gland and tighten.