Ке з й и, Further configuration, Step3: (optional) setup camera ip address – PLANET ICA-107 User Manual
Page 2: Step5: (optional) wireless setup for ica-107w, Step6: (optional) wireless connection for ica-107w
– 7 –
– 8 –
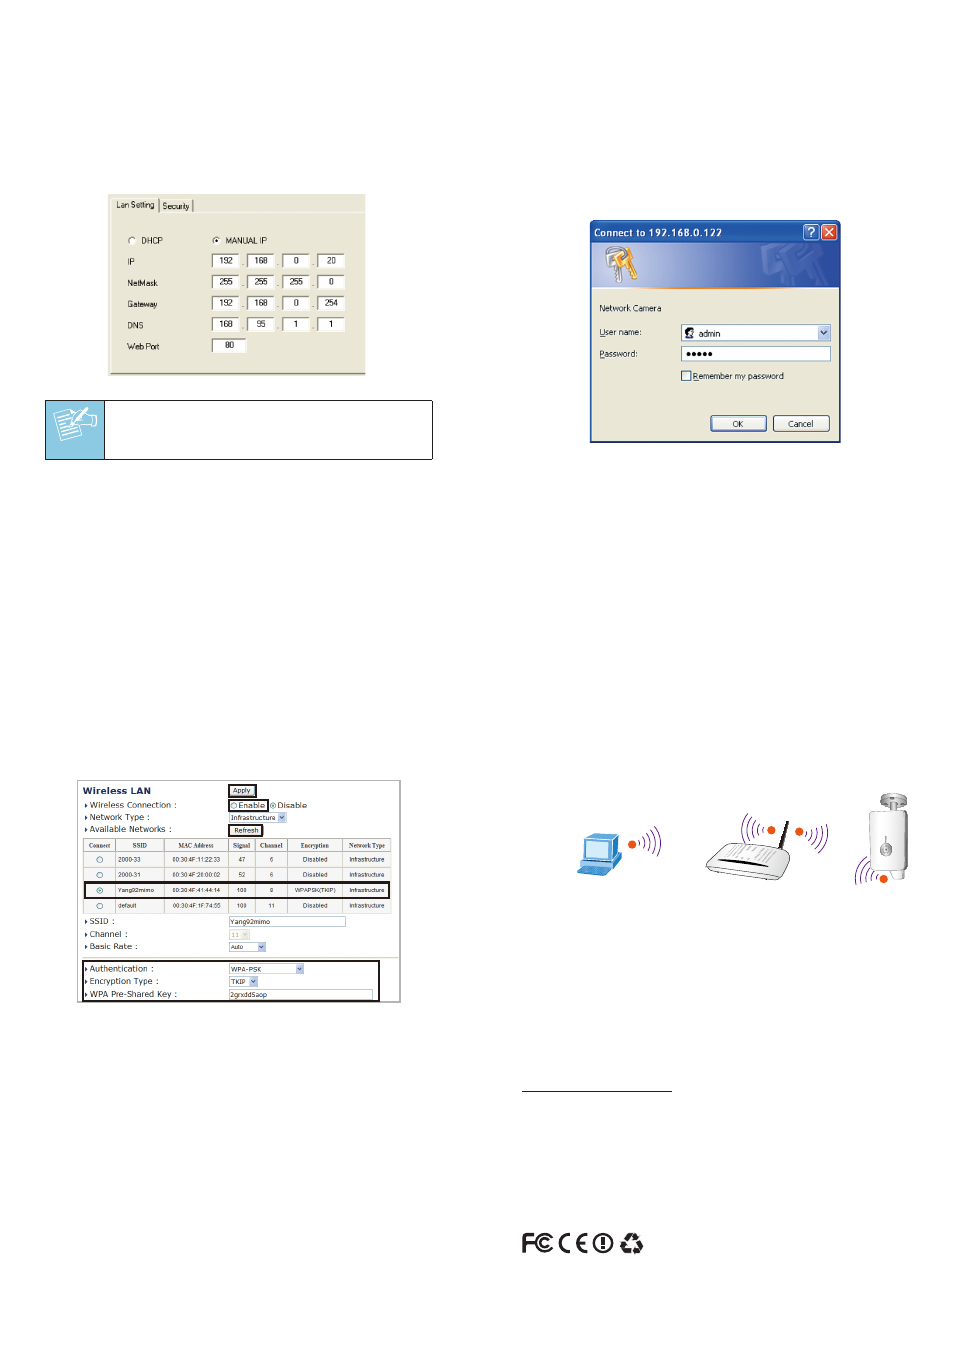
Step3: (Optional) Setup Camera IP address
1. Double click the IP Camera you want to configure.
2. The utility will prompt require the username and
password to logon, please enter:
admin / admin to
continue device configuration.
3. Key in the desired IP address.
Click this button to search the IP
Camera in the network
Change the utility
interface language
Current existing IP
Cameras in local network
Search the IP Camera
in the network
Bring up the Browser page
of the selected Camera
Manually setup the IP address
of the selected Camera
å
Select “Enable” to activate wireless notwork
ç
Press “Refresh” to search Access Point nearby
é
Select the Access Point you would like to connect then press
“Connect” icon
è
Enter your authentication key into the fields
ê
Press “Apply” to make settings effective
ICA-107/ICA-107W
Ethernet Switch
User PC
(192.168.0.X)
PC
(DHCP Client or 192.168.0.2)
802.11 b/g/n Wireless
Access Point
N
N
N
N
к
е
з
й
и
Note
If you are not familiar with IP setting, remain
with the default setting.
Step5: (Optional) Wireless setup for ICA-107W
1. Go to the WLAN setting page for wireless configuration.
Click this button to search the IP
Camera in the network
Change the utility
interface language
Current existing IP
Cameras in local network
Search the IP Camera
in the network
Bring up the Browser page
of the selected Camera
Manually setup the IP address
of the selected Camera
å
Select “Enable” to activate wireless notwork
ç
Press “Refresh” to search Access Point nearby
é
Select the Access Point you would like to connect then press
“Connect” icon
è
Enter your authentication key into the fields
ê
Press “Apply” to make settings effective
ICA-107/ICA-107W
Ethernet Switch
User PC
(192.168.0.X)
PC
(DHCP Client or 192.168.0.2)
802.11 b/g/n Wireless
Access Point
N
N
N
N
к
е
з
й
и
Step4: Bring up the web page for further
configuration
1. Select the IP Camera you want to configure and click the
browser icon
2. You will connect to IP Camera via web browser
automatically; The IP Camera will prompt for logon
username / password, please enter admin / admin as the
default user name and password
Click this button to search the IP
Camera in the network
Change the utility
interface language
Current existing IP
Cameras in local network
Search the IP Camera
in the network
Bring up the Browser page
of the selected Camera
Manually setup the IP address
of the selected Camera
å
Select “Enable” to activate wireless notwork
ç
Press “Refresh” to search Access Point nearby
é
Select the Access Point you would like to connect then press
“Connect” icon
è
Enter your authentication key into the fields
ê
Press “Apply” to make settings effective
ICA-107/ICA-107W
Ethernet Switch
User PC
(192.168.0.X)
PC
(DHCP Client or 192.168.0.2)
802.11 b/g/n Wireless
Access Point
N
N
N
N
к
е
з
й
и
– 5 –
– 6 –
Step6: (Optional) Wireless connection for ICA-107W
1. Remove the wired cable.
2. Restart ICA-107W activating wireless connection.
Click this button to search the IP
Camera in the network
Change the utility
interface language
Current existing IP
Cameras in local network
Search the IP Camera
in the network
Bring up the Browser page
of the selected Camera
Manually setup the IP address
of the selected Camera
å
Select “Enable” to activate wireless notwork
ç
Press “Refresh” to search Access Point nearby
é
Select the Access Point you would like to connect then press
“Connect” icon
è
Enter your authentication key into the fields
ê
Press “Apply” to make settings effective
ICA-107/ICA-107W
Ethernet Switch
User PC
(192.168.0.X)
PC
(DHCP Client or 192.168.0.2)
802.11 b/g/n Wireless
Access Point
N
N
N
N
к
е
з
й
и
Further Configuration
For detail configuration, please check user’s manual on the
bundled CD.
If you have any other questions, please contact the dealer
where you purchased this product or you can contact
PLANET directly at the following email address:
[email protected]
2011-AB5070-003