Nzoom2 special setting, Nschedule, Menu items – Sharp PN-V602 User Manual
Page 29
E
29
n
ZOOM2 SPECIAL SETTING
If you connect a laptop computer with any of the following
screen resolutions and black bands appear around the
screen, set ZOOM2 SPECIAL SETTING of INPUT SIGNAL on
the OPTION menu to ON and then select ZOOM2 in the SIZE
setting.
This displays the area inside the black band.
Laptop computer
resolution
Corresponding signal*
1
1280x800
1280x1024, 1280x960, 1400x1050*
2
1280x600
1280x720
1024x600
1024x768
*1: This setting is effective only when the screen resolution,
including the black band, is one of the resolutions listed
above.
*2: Use the automatic screen adjustment.
n
SCHEDULE
You can set the time to switch the monitor on and off.
Set this function with “SCHEDULE” in the OPTION menu. (See
page 26.)
When BRIGHT is set, set BRIGHTNESS SENSOR to OFF on
the SETUP menu.
-
:
– –
– –
– –
– –
– –
–
– –
– –
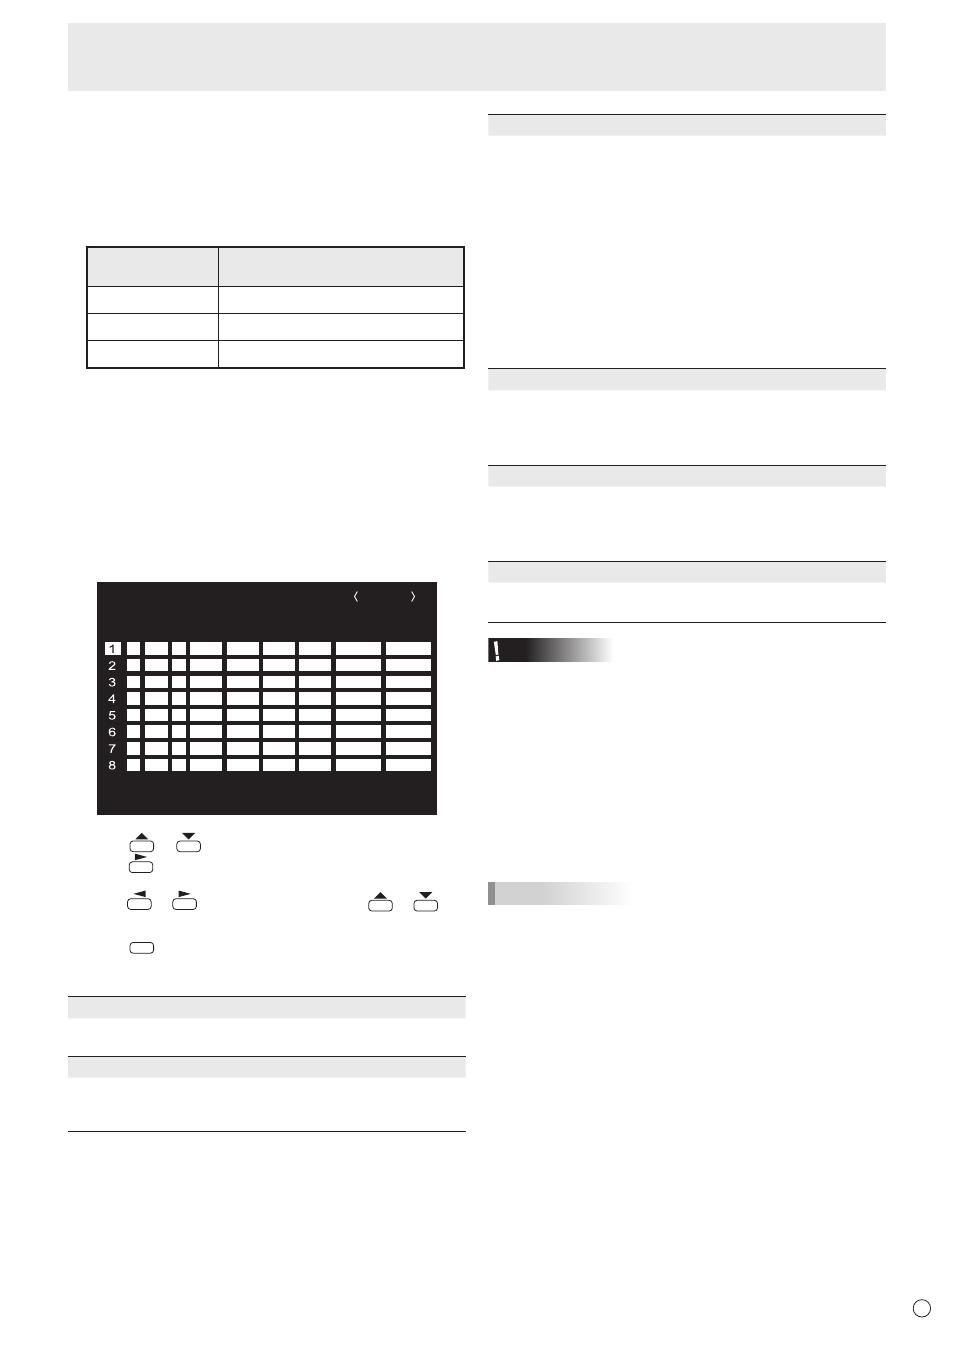
SCHEDULE
No.
POWER DAY OF THE WEEK
TIME
INPUT
BRIGHT
– –/– –/– – – – – – – – –:– –:– –
PC D-SUB
(1)
–
-
:
– –
– –
– –
– –
– –
–
– –
– –
–
-
:
– –
– –
– –
– –
– –
–
– –
– –
–
-
:
– –
– –
– –
– –
– –
–
– –
– –
–
-
:
– –
– –
– –
– –
– –
–
– –
– –
–
-
:
– –
– –
– –
– –
– –
–
– –
– –
–
-
:
– –
– –
– –
– –
– –
–
– –
– –
–
-
:
– –
– –
– –
– –
– –
–
– –
– –
–
(5)
(2)
(3)
(4)
(6)
OK···[MENU]
1 3 6 6 x 7 6 8
V: 60 Hz H: 47.7 kHz
1. Press
or
to select the SCHEDULE number, and
press
.
2. Set the SCHEDULE. (See the description below.)
Press
or
to select items, and press
or
to
change the setting.
3. Press
MENU
.
SCHEDULE becomes effective.
(1)
●: SCHEDULE effective
-: SCHEDULE not effective
(2) POWER
ON : Switches the monitor on at the specified time.
OFF : Switches the monitor off at the specified time and puts
the monitor in standby mode.
(3) DAY OF THE WEEK
Specifies the day of the week to execute the SCHEDULE.
0: ONLY ONCE
Executes the SCHEDULE once on the specified day.
Specify the day of the week to execute the SCHEDULE.
1: EVERY WEEK
Executes the SCHEDULE on the specified day of the week
every week. Specify the day of the week to execute the
SCHEDULE.
Periodic setting such as “Monday through Friday” is also
possible.
2: EVERY DAY
Executes the SCHEDULE every day regardless of the day
of the week.
(4) TIME
Specifies the time to execute the SCHEDULE.
Set the time on a 24-hour basis. (Factory default)
Can be entered as 12-hour time using the TIME setting in
DATE/TIME FORMAT.
(5) INPUT
Specifies the input mode at power-on. When not specifying,
the screen at the previous power-off appears.
Input modes displayed on DVI, HDMI, BNC and D-SUB
depend on INPUT SELECT settings.
(6) BRIGHT
Sets the brightness when changing the screen brightness at
a specified time.
Caution
• Do not switch off the main power after setting the
SCHEDULE.
• Specify the correct date and time. (See page 26.)
SCHEDULE does not function unless the date and time are
specified.
• Check regularly that the set date and time are correct.
• When STANDBY MODE is LOW POWER, SCHEDULE
cannot be set.
• When a temperature abnormality occurs and the backlight
brightness is reduced, the brightness is not changed even
if a schedule set to BRIGHT is executed.
TIPS
• Up to 8 SCHEDULE items can be registered.
• Setting the SCHEDULE flashes the power LED alternately
in red and orange in standby mode.
• A SCHEDULE that has a large number has precedence
over that of a small number when schedules overlap.
• If D-SUB of INPUT SELECT on the OPTION menu is set to
AV VIDEO, the input mode will switch to AV VIDEO (D-SUB)
regardless if set to D-SUB or VIDEO.
Menu Items