Philips AVENT SCF922 User Manual
Scf922
l
English
1 Introduction
Congratulations on your purchase and welcome to Philips Avent!
To fully benefit from the support that Philips Avent offers, register
your product at www.philips.com/welcome.
2 Important
Read this user manual carefully before you use the appliance and
save it for future reference.
Danger
- Never immerse the base, the mains cord or
the mains plug in water or any other liquid.
- Failure to follow the descaling instructions
may cause irreparable damage.
- Never disassemble the base to avoid the risk
of electric shock.
Warning
- This appliance shall not be used by children.
Keep the appliance and its cord out of reach
of children.
- This appliance can be used by persons
with reduced physical, sensory or mental
capabilities or lack of experience and
knowledge if they have been given
supervision or instruction concerning use of
the appliance in a safe way and understand
the hazards involved.
- Children shall not play with the appliance.
- Cleaning and user maintenance shall not be
made by children.
- Check if the voltage indicated on the
appliance corresponds to the local mains
voltage before you connect the appliance.
- Only connect the appliance to an earthed
wall socket, and make sure the plug is firmly
inserted in the wall socket. Keep the mains
cord away from hot surfaces.
- Do not use the appliance if the plug,
the mains cord or the appliance itself is
damaged.
- If the mains cord is damaged, it must be
replaced by Philips Avent, a service centre
authorised by Philips Avent or similarly
qualified persons in order to avoid a hazard.
- There are no serviceable parts inside the
electric steam steriliser. Do not attempt to
open, service or repair the electric steam
steriliser by yourself.
- The appliance becomes very hot during
sterilisation and may cause burns if it is
touched.
- Beware of hot steam that comes out of the
vent in the lid or when you remove the lid.
Steam can cause burns.
- Do not touch the base, the baskets, the lid
and sterilised items during or shortly after
sterilisation to avoid getting burnt. Only lift
the lid by its grip.
- Never move or open the appliance when it is
in use or before it has cooled down.
- Never place items on top of the appliance when
it is in use.
4241 210 46896
Overview
ةماع ةلمح
یلک یانم
Before first use
ىلولأا ةرملل مادختسلاا لبق
هدافتسا نیلوا زا لبق
Using the steriliser
ميقعتلا زاهج مادختسا
هدننک ینوفعدض هاگتسد زا هدافتسا
Tips
ةحيصن
هتکن
Cleaning
فيظنتلا
ندرک زیتم
Specifications are subject to change without notice
© 2017 Koninklijke Philips N.V.
All rights reserved.
- Only use water without any additives for
sterilisation. Recommend to use purified
water to decrease limescale.
- Only use white vinegar according to the user
manual when descaling. Do not put bleach
or other chemicals in the appliance.
- Only sterilise baby bottles and other items
that are suitable for steam sterilisers. Check
the user manual of the items you want to
sterilise, to make sure they are suitable for
steam sterilisers.
- To stop the sterilisation under urgent
circumstances, press the power-off button,
and unplug the appliance. Sterilising for
a shorter period of time may affect the
sterilisation efficacy.
- The heating plate surface is subject to
residual heat after use. Be careful not to get
burnt by it.
- This appliance is intended for household use
only.
- Do not use abrasive or aggressive cleaning
agents (e.g. bleach) or a scouring pad to
clean this appliance.
- The steriliser is not dishwasher-proof.
Caution
- Never use any accessories or parts from
other manufacturers or that Philips Avent
does not specifically recommend. If you use
such accessories or parts, your guarantee
becomes invalid.
- The appliance is intended to be used
indoors. Do not expose it to extreme heat or
direct sunlight.
- Always unplug the appliance and let it cool
down before moving or storing it.
- Do not sterilise very small items which can
fall through the holes to the heating plate.
- Never place items directly on the heating
plate when the appliance is switched on.
- Do not use the appliance if it has fallen or is
damaged in any way. Take it to an authorised
Philips Avent service centre for repair.
- Always place and use the appliance on a dry,
stable, level and horizontal surface.
- Do not place the appliance on a hot surface.
- Do not let the mains cord hang over the
edge of the table or worktop on which the
appliance stands.
- Pour any remaining water out of the
appliance after use and when the appliance
has cooled down.
- Always unplug the appliance after use.
- Environmental conditions, such as altitude
above 2500 meters, may affect the sterilising
performance of this appliance.
- Switch off the appliance and disconnect
from supply before changing accessories or
approaching parts that move in use.
- Always disconnect the device from supply if
it’s left unattended.
Electromagnetic fields (EMF)
This Philips appliance complies with all applicable standards and
regulations regarding exposure to electromagnetic fields.
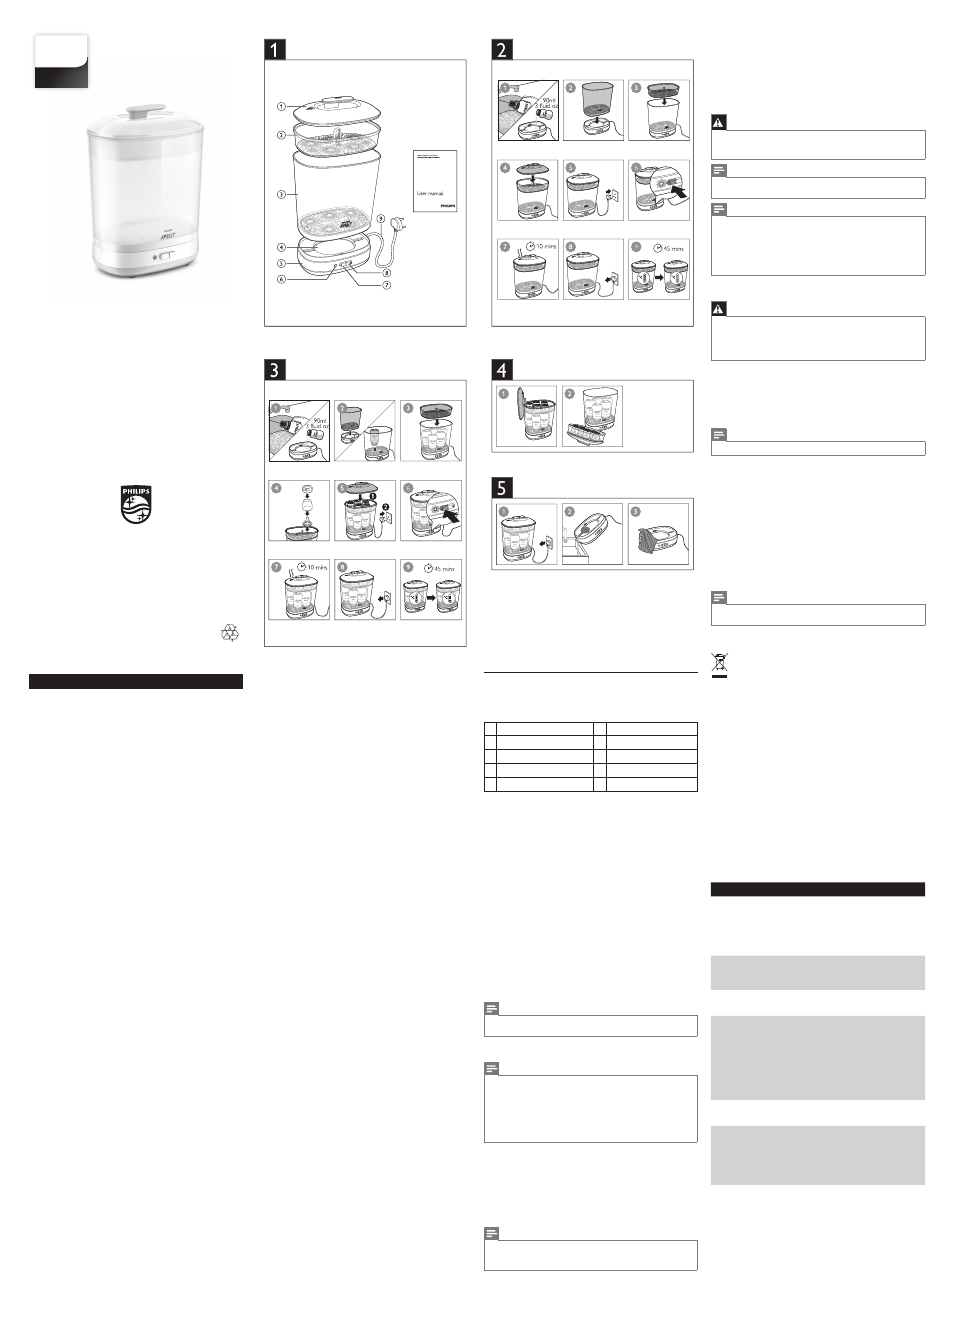
3 Overview (Fig. 1)
a Lid
f Power-on indicator
b Small basket
g Power-on button “
I”
c Big basket
h Power-off button “
O”
d Heating plate
i Mains cord
e Base
4 Before first use (Fig. 2)
When you use the appliance for the first time, we advise you to let
it complete one sterilisation process with empty baskets.
1 Use a clean baby bottle and pour 90ml/3 fluid oz purified water
or tap water directly into the heating plate. (Fig. 2-1)
2 Place the big basket on the base. Adjust the position of the big
basket so that it fits properly on the base. (Fig. 2-2)
3 Place the small basket in the big basket. Adjust the position
of the small basket so that it fits properly in the big basket.
(Fig. 2-3)
4 Place the lid on top of the small basket. Adjust the position of
the lid so that it fits properly on the small basket. (Fig. 2-4)
5 Put the plug in the wall socket. (Fig. 2-5)
6 Press the power-on button to switch on the appliance.
(Fig. 2-6)
» The power-on indicator lights up to indicate that the appliance
starts operating.
» A sterilising cycle takes around 10 minutes (Fig. 2-7). When
the sterilisation process is finished, the power-on indicator
goes out and the appliance switches off automatically.
7 Unplug the appliance (Fig. 2-8). Wait until the appliance has
cooled down completely (Fig. 2-9), and then remove the lid, the
small basket and the big basket, and wipe them dry.
Note
• The appliance does not work for about 10 minutes after a sterilising
cycle, it needs to cool down first.
5 Using the steriliser (Fig. 3)
Note
• To make sure the steriliser stands stable, clip the mains cord into the
cord slot in the bottom of the base.
• Make sure all parts that need to be sterilised are completely
disassembled and place them in the basket with their openings
pointing down to prevent them from filling up with water.
• Only place items which are suitable for sterilising in the steriliser. Do
not sterilise items that are filled with liquid, e.g. a teether with cooling
fluid.
1 Thoroughly clean the items to be sterilised.
2 Use a clean baby bottle and pour 90ml/3 fluid oz purified water
or tap water directly into the heating plate. (Fig. 3-1)
3 Place the big basket on the base. Adjust the position of the
basket so that it fits properly on the base. Then put the bottles
in the basket with their openings pointing down. (Fig. 3-2)
4 Place the small basket in the big basket (Fig. 3-3). Adjust the
position of the small basket so that it fits properly in the big
basket, then put the accessories in the small basket.
Tip
• When putting larger teats in the small basket, place the teat in the
basket first, then place the dome cap on the teat, and place the screw
ring on the dome cap.
(Fig. 3-4)
5 Place the lid on top of the small basket. Adjust the position of
the lid so that it fits properly on the small basket. (Fig. 3-5-1)
6 Put the plug in the wall socket. (Fig. 3-5-2)
7 Press the power-on button to switch on the appliance.
(Fig. 3-6)
» The power-on indicator lights up to indicate that the appliance
starts operating.
» A sterilising cycle takes around 10 minutes (Fig. 3-7). When
the sterilisation process is finished, the power-on indicator
goes out and the appliance switches off automatically.
8 Unplug the appliance (Fig. 3-8). Wait until the appliance has
cooled down completely (Fig. 3-9), and then remove the lid and
the sterilised items from the baskets.
Warning
• Be careful when removing the lid, hot steam may come out of the
steriliser.
• The sterilised items might be hot. Be careful not to get burnt by them.
Note
• Make sure you wash your hands thoroughly before you touch the
sterilised items.
Tip
• After the appliance has cooled down, you can hang the lid on the
side of the big basket (Fig. 4-1). You can also place the lid on a table
with the handle facing down (Fig. 4-2), this way you can put the small
basket on the tilted lid to keep it hygienic, and easily take out the
sterilised items in the big basket.
• When removing the items from the big and small baskets, you can use
a Philips Avent bottle tong (sold separately).
6 Cleaning (Fig. 5)
Warning
• Do not use abrasive or aggressive cleaning agents (e.g. bleach) or a
scouring pad to clean this appliance.
• Never immerse the base, the mains cord or the mains plug in water or
any other liquid.
• The steriliser is not dishwasher-proof.
1 Always unplug the appliance after use. (Fig. 5-1)
2 After the appliance has cooled down, pour out any remaining
water from the heating plate (Fig. 5-2), and then clean the
surfaces around the base and heating plate with a soft cloth
(Fig. 5-3).
3 Clean the big basket, small basket and lid under the tap with
some washing-up liquid, and wipe them dry.
Note
• After cleaning, store the steriliser in a clean and dry place.
7 Descaling
When you use the steriliser, small spots may appear on the
heating plate in the base. This is limescale that is building up.
The harder the water, the faster limescale builds up. Descale
the steriliser once each week to ensure that it continues to work
effectively. The frequency of descaling depends on how much
limescale is building up.
1 Pour 60ml/2 fluid oz of water and 30ml/1 fluid oz of white
vinegar (6-8% acetic acid) into the heating plate.
2 Leave the solution in the heating plate until the limescale has
resolved. The process takes about 20 minutes, but should not
be longer than 1 hour.
3 Empty the heating plate, thoroughly rinse it and wipe with a
soft cloth.
Note
• When descaling, do not put the plug in the wall socket.
• After descaling, store the steriliser in a clean and dry place.
8 Recycling
This symbol means that this product shall not be disposed
of with normal household waste (2012/19/EU).
Follow your country’s rules for the separate collection of
electrical and electronic products. Correct disposal helps
prevent negative consequences for the environment and
human health.
9 Guarantee and service
Philips Consumer Lifestyle guarantees its products under correct
usage for a period of two years after the date of purchase. If any
defect due to faulty materials and workmanship occurs within this
two-year guarantee period, Philips Consumer Lifestyle will repair
or replace the product at its expense. For repair or replacement,
make sure to provide convincing proof, for instance by means of
a receipt, that the day on which service is claimed is within the
guarantee period.
The guarantee only covers the base and its electrical components.
It does not cover non-electrical parts, accessories and
consumable parts. The guarantee does not cover shipping and
handling fees, and on-site services fees either.
If you need service or information, or if you have a problem,
please contact the Philips Avent Service Centre in your country.
Website: http://www.philips.com/support
10 Troubleshooting
This chapter lists the questions most frequently asked about the
appliance. If you cannot find the answer to your question, contact
the Consumer Care Centre in your country.
Question
Solution
Why does water
flow out of the
steriliser?
• You may have poured too much water
into the steriliser. Do not pour more than
90ml water into the heating plate.
• The steriliser may not be stably
positioned. Make sure the mains cord is
well fitted inside of the cord slot in the
bottom of the base.
Why are there
white spots on the
heating plate, the
baskets or the lid?
• Limescale build-up is normal and occurs
more quickly in hard water areas. Descale
the appliance regularly (see chapter
‘Descaling’).
Why does a lot of
steam escape from
under the lid?
• Check if the lid has been placed on the
small basket properly.
Why does the
sterilisation
process take so
long?
• To sterilise the items thoroughly, the
default sterilising time is around 10
minutes (when 90ml water is poured into
the heating plate).
• You may have poured too much water
into the steriliser (see chapter ‘Using the
steriliser’). The amount of water in the
steriliser and the number of items placed
in the baskets determine the actual
sterilising time.
Why is the
sterilisation
process so short?
• You may have poured too little water
into the steriliser (see chapter ‘Using the
steriliser’).
Why does the
appliance start
to heat up, and
the power-on
indicator lights up
immediately when
I plug it in?
• When you press the power-on button
before you put the plug in the wall socket,
the steriliser starts operating immediately
when you plug it in. Do not touch the
heating plate as it starts heating up
immediately. You can press the power-off
button to stop the heating process.
Why can’t I restart
the appliance?
• After a sterilising cycle, the appliance
does not work before it has cooled down.
Wait for around 10 minutes before you
switch on the appliance again.
SCF922
Always here to help you
Register your product and get support at
www.philips.com/welcome
user manual
مدختسلما ليلد
ربراک یامنهار هچرتفد