Operation, 1 functions of the individual buttons, 2 key assignments in individual menus – MacroSystem Shuttle TT User Manual
Page 6
6
3. Operation
3.1 Functions of the individual buttons
For the buttons
A-I, the shuttle TT offers two configuration
possibilities from which you can choose. You will find the func-
tions of the individual buttons in the different configurations
modes in the chapter Configuration of buttons in individual
menus. A button has not been assigned a function if a menu
is not listed. The assignment can be change by pressing the
Z
button (not possible in all menus).
The
L and R buttons have similar functions as both big track-
ball buttons, but they don‘t replace them. Use
L to confirm a
choice or an action, such as marking a scene in the scene bin,
and use
R to abort or reject. Directly controlling the elements
under the mouse pointer is not possible, however.
The
W button opens the navigation menu, in which you may
use the wheel of the Shuttle TT to select the menu you want to
access. This choice can be confirmed with
L, rejected with R.
Depending on the menu, the
X button is used to abort an ac-
tion. The table below contains an overview of the correspond-
ing action in each menu:
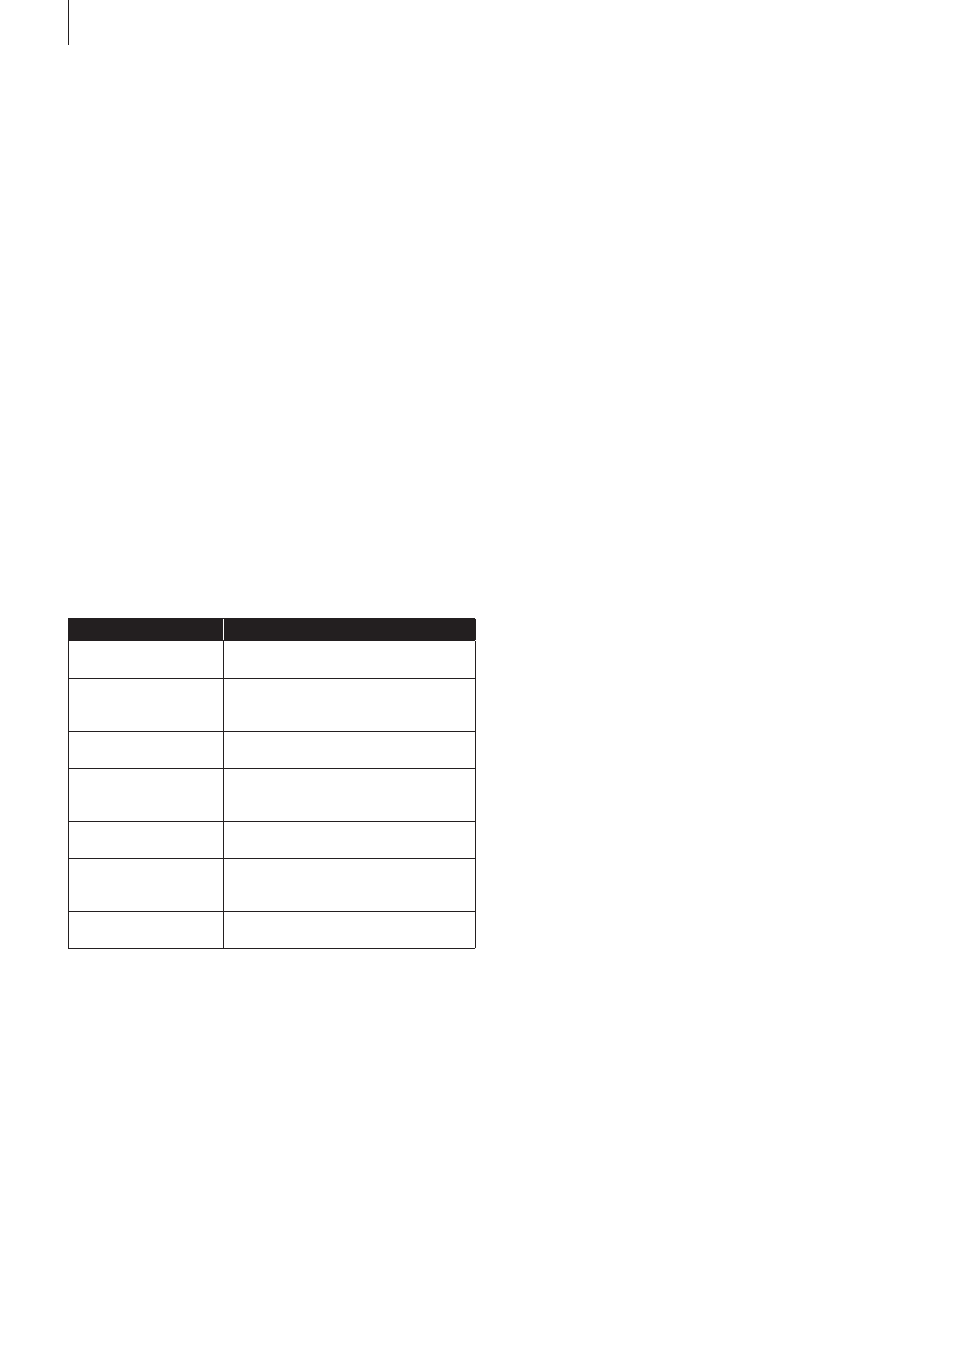
Menu
Action
Splitting, trimming
Switching between the different display
modes.
Insert, duration,
Period of time (audio
dubbing)
The context menu is opened to make it
possible to select between “Moving” and
“Trimming”.
Video
Opens a context menu for selecting an
input.
Transition, image pro-
cessing and title effects
The context menu is opened to make
it possible to select between different
products.
Individual image (video
effects)
Opens a context menu to select the
display.
Audio dubbing
Opens a context menu to select the
sound track for correcting the sound
volume.
Inserting (audio dubbing) Opens the context menu for sorting the
list.
The
Y button is used to switch between using the storyboard
and the scene bin in the Edit menu, identified by a symbol
for the title text of the part that is active at the time. This button
is also used to switch between the storyboard and the ef-
fect list in the transition, image processing and title effects. In
Video, Splitting, Trimming and Inserting, the
Y button can be
used to change the position of the tool bar, just as in Duration
in the “Audio dubbing” menu and “Individual image” in Video
effects. In the “Audio dubbing” menu, pressing this button will
switch between the storyboard and the timeline display, if the
Gold Edition has been installed on your device.
The
Z button includes the configuration options of buttons A-I,
which you can select.
When using
wheel and jog, the so-called jog-wheel, you
will be able to control these also with both components, in
all menus where the storyboard is displayed. If you turn the
external
jog, you will roll through the storyboard, just as you
would with the slider located below the storyboard. Other than
the
wheel, the jog has a resting position and can be turned
in both directions until it reaches a clear stop. The farther you
turn, the faster the scroll movement is in that direction. Use the
inner
wheel if you want to navigate scene by scene through
the storyboard, it will behave in a similar way as the individual
buttons located below the storyboard.
In the Edit menu there is also the possibility to navigate
through the scene bin with the
wheel or the jog. The inner
wheel is used, just as with the storyboard, to scroll image by
image through the scene bin. The
jog behaves like the slider. If
you are in one of the “Video effect” menus, both components
will allow you to navigate through the active effect list. The
wheel will allow you to scroll slowly, whereas the jog will allow
you to scroll faster through the effect list.
As described before, the
Y button can be used to select what
has to be controlled by the
wheel or the jog.
Sliders and individual context menus can also be used through
the wheel or the
jog. The selection can accordingly be con-
firmed with
L or rejected with R. Selecting a piece of music to
insert in audio dubbing is also possible.
Additionally, the
wheel or the jog can also be used in the au-
dio dubbing menu to scroll through the individual sound clips
of the active sound track.
3.2 Key assignments in individual menus
Below, you will find a list of the functions that can be con-
trolled by buttons
A-I, depending on the assignments. Some
function could not present, depending on whether you are
using the Basic, Silver or Gold Edition.
The lists indicate the situation at the moment of writing. It is
possible that the functions and available assignments will be
expanded.
Labelling the buttons with the supplied prints will help you to
become familiar with the operation of the shuttle as fast as
possible. Besides letters, we also offer you symbols to make it
easier to assign the functions: