Airless spray gun operation, Fig. 7, Fig. 10 – AIRLESSCO SS4550 User Manual
Page 13: Fig. 8 fig. 9
10
11
SPRAY
Attach spray gun to airless unit and tighten fittings securely.
Set the gun safety latch. (Also may be called gun safety
lock, or trigger lock)
* The gun safety latch should always be set when the gun
is not being triggered.
Read all warnings and safety precautions supplied with the
spray gun and in product manual.
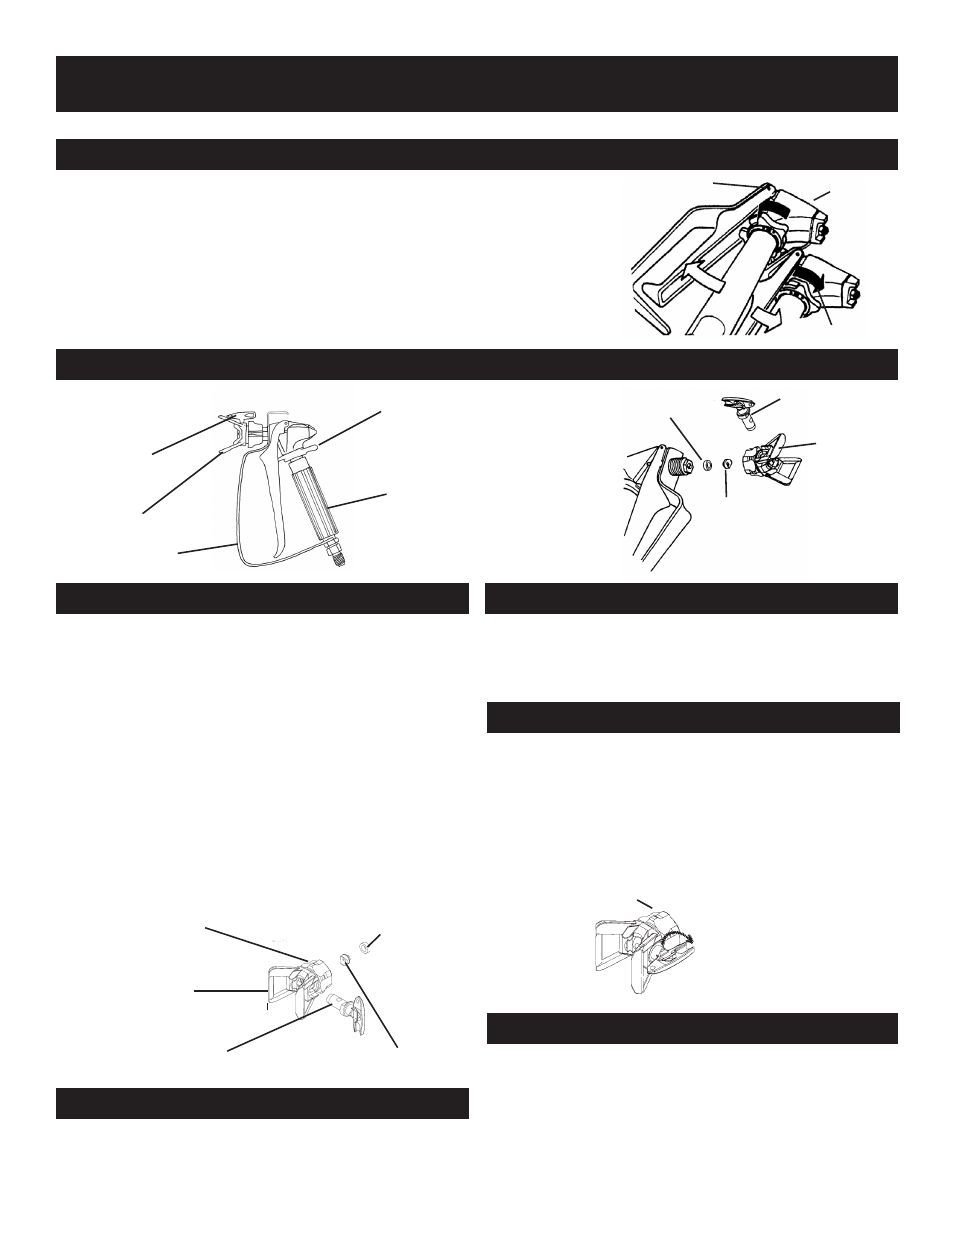
MAJOR COMPONENTS OF SPRAY GUN AND REVERSIBLE SPRAY TIP
FIG. 7
1. Be sure pressure relief procedure is followed before
assembling tip and housing to the gun.
2. Lock gun safety latch.
3. Insert REV-TIP™ cylinder into the REV-GUARD™
(guard housing assembly).
4. Guide metal seat into REV-GUARD™ (guard housing
assembly) through retaining nut & turn until it seats
against the cylinder.
5. Insert O-Ring gasket on metal seat so it fits in the
grooves.
6. Finger tighten REV-GUARD™ retaining nut onto the gun.
7. Turn guard in the desired position.
8. Completely tighten the retaining nut.
1. Lock gun safety latch.
2. Turn REV-TIP™ handle 180 degrees.
3. Disengage trigger lock & trigger gun into pail.
4. If the REV-TIP™ handle appears locked (resists
turning), loosen the retaining nut. The handle will now
turn easily.
5. Engage gun safety latch & return handle to the
spray position.
Spray Position Shown
REVERSE TO
UNPLUG
RETAINING NUT
CLOGGED FLAT TIP
Should the spray tip become clogged, relieve pressure
from hose by following the "PRESSURE RELIEF
PROCEDURE." Secure gun with the safety latch, take
off guard, take out the tip, soak in appropriate solvent &
clean with a brush. (Do not use a needle or sharp pointed
instrument to clean the tip. The tungsten carbide is brittle
and can chip.)
CLEANING SPRAY GUN
Immediately after the work is finished, flush the gun out
with a solvent. Brush pins with solvent and oil them lightly
so they will not collect dried paint.
To clean the filter, use a brush dipped in an appropriate
solvent. Change or clean filters at least once a day. Some
types of latex may require a filter change after four hours of
operation.
SPRAY TIP ASSEMBLY
CLEANING FILTER IN GUN HANDLE
TO REMOVE CLOGS FROM SPRAY TIP
FIG. 10
O-RING GASKET
Part # 561-026
METAL SEAT
Part # 561-029
REV-TIP™ CYLINDER
Part # 561-XXX
RETAINING NUT
REV-GUARD™
GUARD HOUSING ASSEMBLY
G Thread 7/8" 561-002
F Thread 11/16" 561-001
REVERSIBLE
SPRAY TIP
TRIGGER GUARD
TIP GUARD
HANDLE
(FILTER INSIDE)
GUN SAFETY
LATCH OR LOCK
FIG. 8
FIG. 9
O-RING GASKET
METAL SEAT
REV-GUARD™
REV-TIP™
AIRLESS SPRAY GUN OPERATION
GUN SAFETY LATCH
IN LOCKED POSITION
GUN SAFETY
LATCH
RELEASED