How to flush, Fig. 2, Fig. 5 fig. 4 – AIRLESSCO SS4550 User Manual
Page 8: Fig. 6, Fig. 3
6
7
WARNING: To reduce the risk of static sparking, which
can cause fire or explosion, always hold a metal part of
the gun firmly against the metal pail when flushing. This
also reduces splashing. Refer to Fig 6.
1. Be sure the gun safety latch is engaged and there
is no spray tip in the gun. Refer to Fig. 2. Refer to your
separate instruction manual provided with your gun on its
safety features and how to engage safety latch.
2. Pour enough clean, compatible solvent into a large,
empty metal pail to fill the pump and hoses.
3. Place the suction tube into the pail or place the pail
under the pump.
4. Turn pressure control knob to low. Refer to Fig. 4.
5. Open the prime valve to the open - "Priming Position".
This will allow an easy start. Refer to Fig. 3.
6. Turn the engine ON/OFF switch to ON.
7. Move the choke toward the closed position as per Fig.5.
8. Move the throttle lever slightly to the left as per Fig.5.
9. Turn the fuel valve ON as per Fig. 5. Pull the start rope.
Pull the engine over against compression stroke and
then let the rope rewind slowly into the starter. Pull
firmly and rapidly to start the engine. Do NOT drop the
rope. Hold on to the handle while rewinding, or the rope
may rewind improperly and jam the assembly. If the
engine does not start, open the choke a little more. If the
engine floods, open the choke all the way and continue
cranking.
10. After the engine is warm, gradually close the choke,
raise the RPM of engine slightly by moving throttle to the
left. Close the prime valve. Refer to Fig. 3
11. Point the gun into the metal pail and hold a metal part of
the gun firmly against the pail Refer to fig.6.
12. Disengage the gun safety latch and squeeze the gun
trigger. At the same time, slowly turn the pressure
control knob clockwise just enough to move liquid at low
pressure.
13. Allow the pump to operate until clean solvent comes
from the gun.
14. Release the trigger and engage the gun safety latch.
15. If you are going to start spraying, place the pump or
suction tube into the supply container. Release the
gun safety latch and trigger the gun into another empty,
metal container, holding a metal part of the gun firmly
against the metal pail (Fig. 6), forcing the solvent from
the pump and hose. When paint starts coming from gun,
turn pressure control knob to minimum pressure, place
prime valve in prime (open) position and engage the gun
safety latch.
16. If you are going to store the sprayer, remove the suction
tube or pump from the solvent pail force the solvent from
the pump and hose. Engage the gun safety latch and
refer to the "Storage" Procedure on page 5. Step 5.
17. Whenever you shut off the sprayer follow the
PRESSURE RELIEF PROCEDURE warning on page 9.
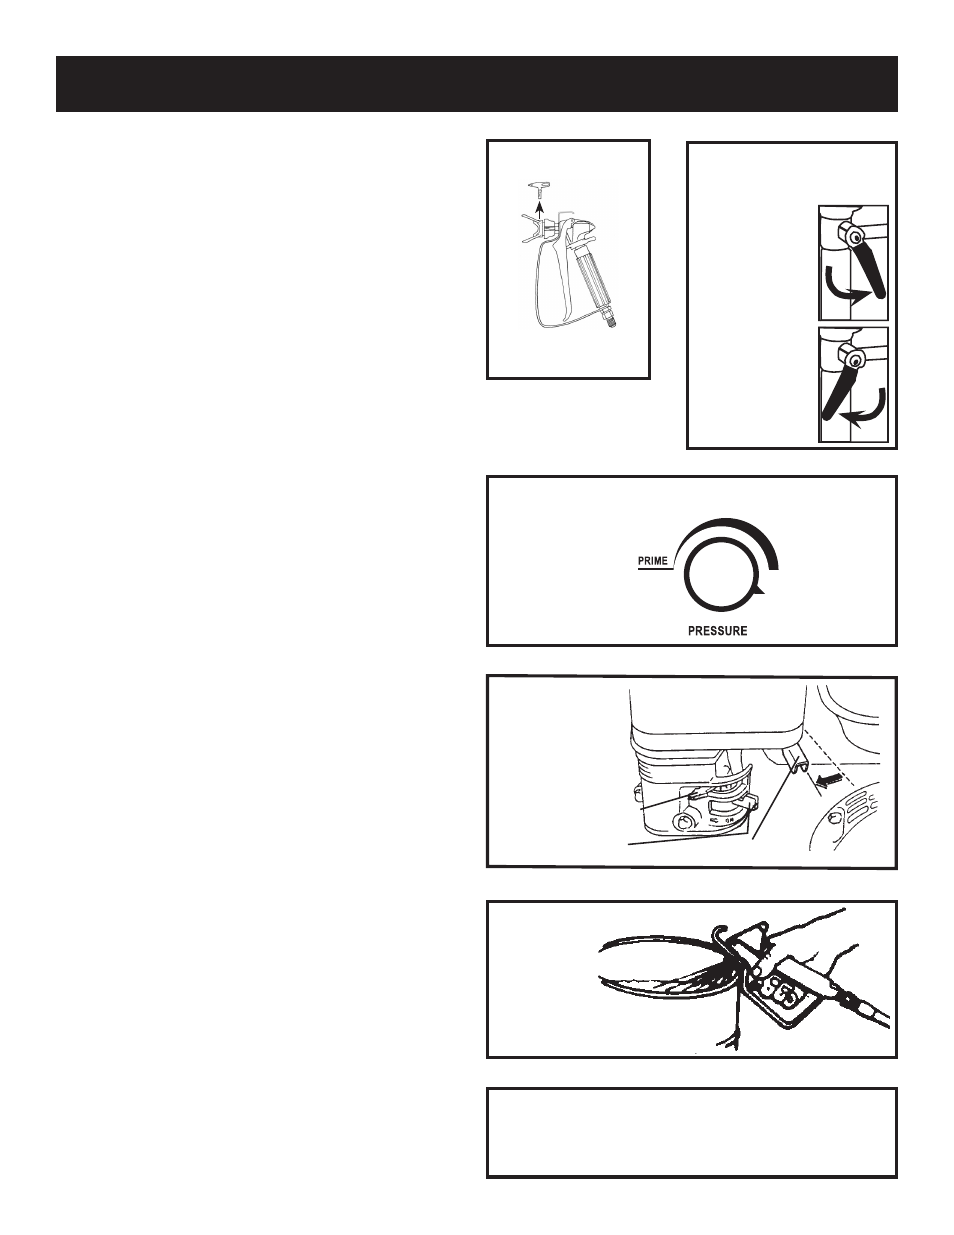
HOW TO FLUSH
REMOVE SPRAY TIP. ENGAGE
GUN SAFETY LATCH.
FIG. 2
CHOKE LEVER
FUEL VALVE
THROTTLE LEVER
FIG. 5
FIG. 4
PRESSURE CONTROL KNOB
HIGH
PRESSURE
MAINTAIN FIRM
METAL TO METAL
CONTACT BE-
TWEEN GUN AND
CONTAINER
FIG. 6
PRIME VALVE
CLOSED
(Pressure)
OPEN
(Priming &
Pressure Relief
FIG. 3