Yaskawa AC Drive Z1000 Bypass Technical Manual User Manual
Page 275
n
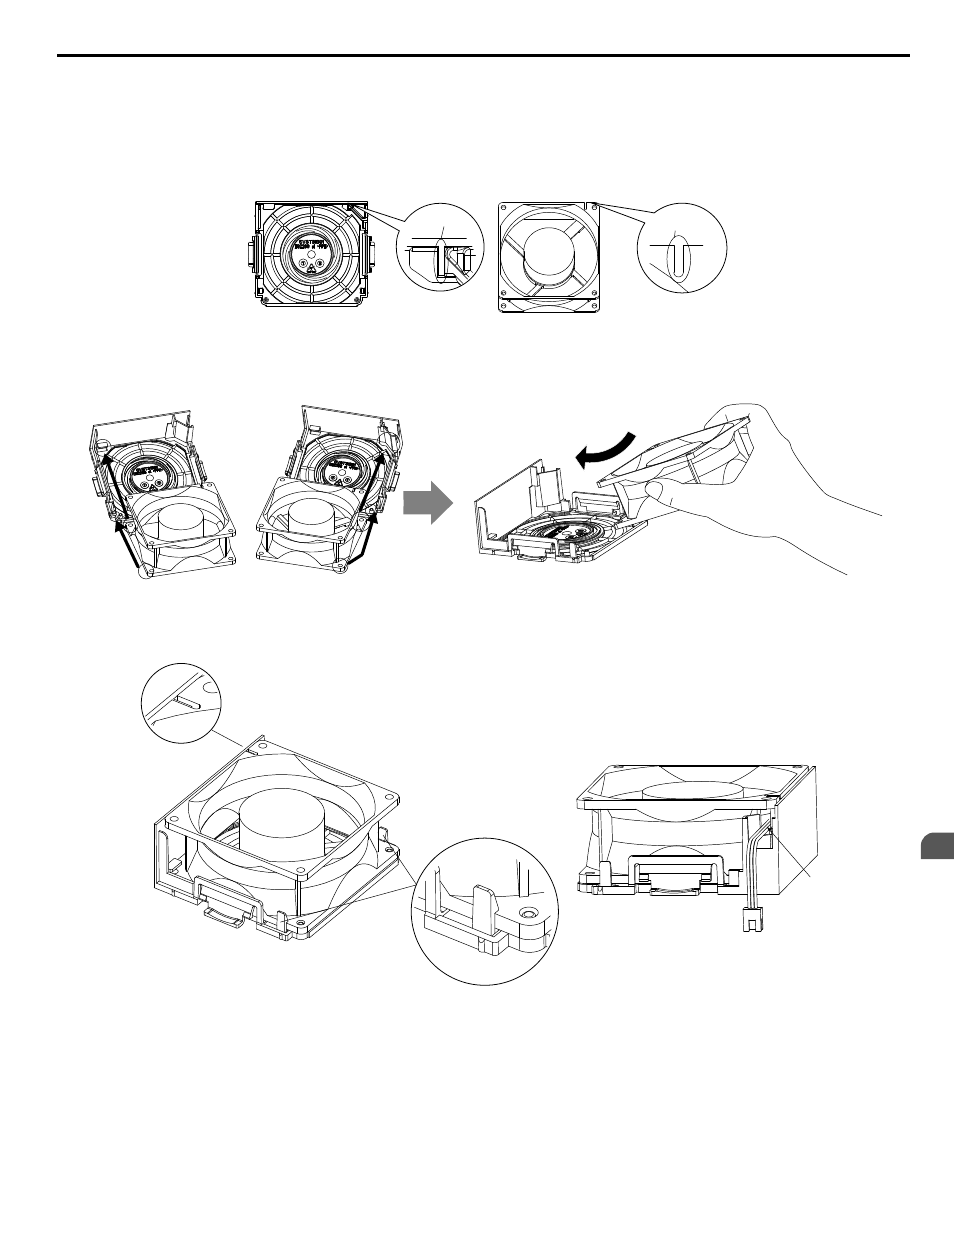
Installing the Cooling Fan: 2A0011 to 2A0059, 4A0005 to 4A0040, and 4A0052ooB
NOTICE: Prevent Equipment Damage. Follow cooling fan replacement instructions. Improper cooling fan replacement could result in
damage to equipment. When installing the replacement cooling fan into the drive, make sure the fan is facing upwards. To ensure maximum
useful product life, replace all cooling fans when performing maintenance.
Reverse the procedure described above to reinstall the cooling fan.
1.
Line up the small alignment notch on the cooling fan and the corresponding protrusion on the fan finger guard.
A
B
A – Protrusion
B – Alignment notch
Figure 7.7 Alignment Notch and Protrusion: 2A0011 to 2A0059, 4A0005 to 4A0040, and 4A0052ooB
2.
Insert the cooling fan diagonally into the fan finger guard so the bosses and holes match. It should click into place.
Figure 7.8 Insert the Cooling Fan into the Fan Finger Guard: 2A0011 to 2A0059, 4A0005 to 4A0040, and 4A0052ooB
3.
Make sure that the cooling fan has been correctly inserted into the fan finger guard.
A
B
A
A – Alignment notches should fit into
the corresponding protrusions.
B – Hooks should hold the cooling fan
tightly, and the bosses should
align properly with the
corresponding holes.
Figure 7.9 Check the Placement of the Fan Finger Guard: 2A0011 to 2A0059, 4A0005 to 4A0040, and 4A0052ooB
4.
Plug the fan connector, then slide the protective cover over the connector.
7.5 Drive Cooling Fans
YASKAWA ELECTRIC SIEP YAIZ1B 01D YASKAWA AC Drive – Z1000 Bypass Technical Manual
275
7
Periodic Inspection & Maintenance