Fig.6 fig.7, Fig.8 fig.9, Fig.10 – Sealey TP6905 User Manual
Page 3: Operation 6. spares
4.4
Position the extractor close to the front or side of the vehicle.
Plug the extension tube fitting into the fluid inlet/outlet fitting
on top of the extractor (see fig.3-13).
6.1
PART NO:
DESCRIPTION
6.1.1 tP6905.01 mAIn tuBe (9.8 x 1010mm)
6.1.2 tP6905.02 mIddle tuBe (6.7 x 870mm)
6.1.3 tP6905.03 smAll tuBe (5.8 x 870mm)
5. OPERATION
6. SPARES
5.1
DRAWING FLUID INTO THE EXTRACTOR
5.1.2 Before operating the extractor you must press the pressure
release button (see fig.3-1) to dissipate any vacuum or
pressure remaining in the tank from previous use. the
pressure gauge needle should return to the zero position.
NOTE: The extractor should never be stored with any
vacuum or pressure left within the tank.
5.1.3 set up the unit for oil extraction as described in sections 4.1
to 4.4 so that the extractor probe is inserted into the vehicle’s
dipstick tube. the other end of the extractor probe should be
joined to the extension tube with the adaptor provided and
the extension tube should be connected to the inlet/outlet
coupling (see fig.3-13). NOTE: Extraction via the dipstick
tube should only be done whilst the oil is warm.
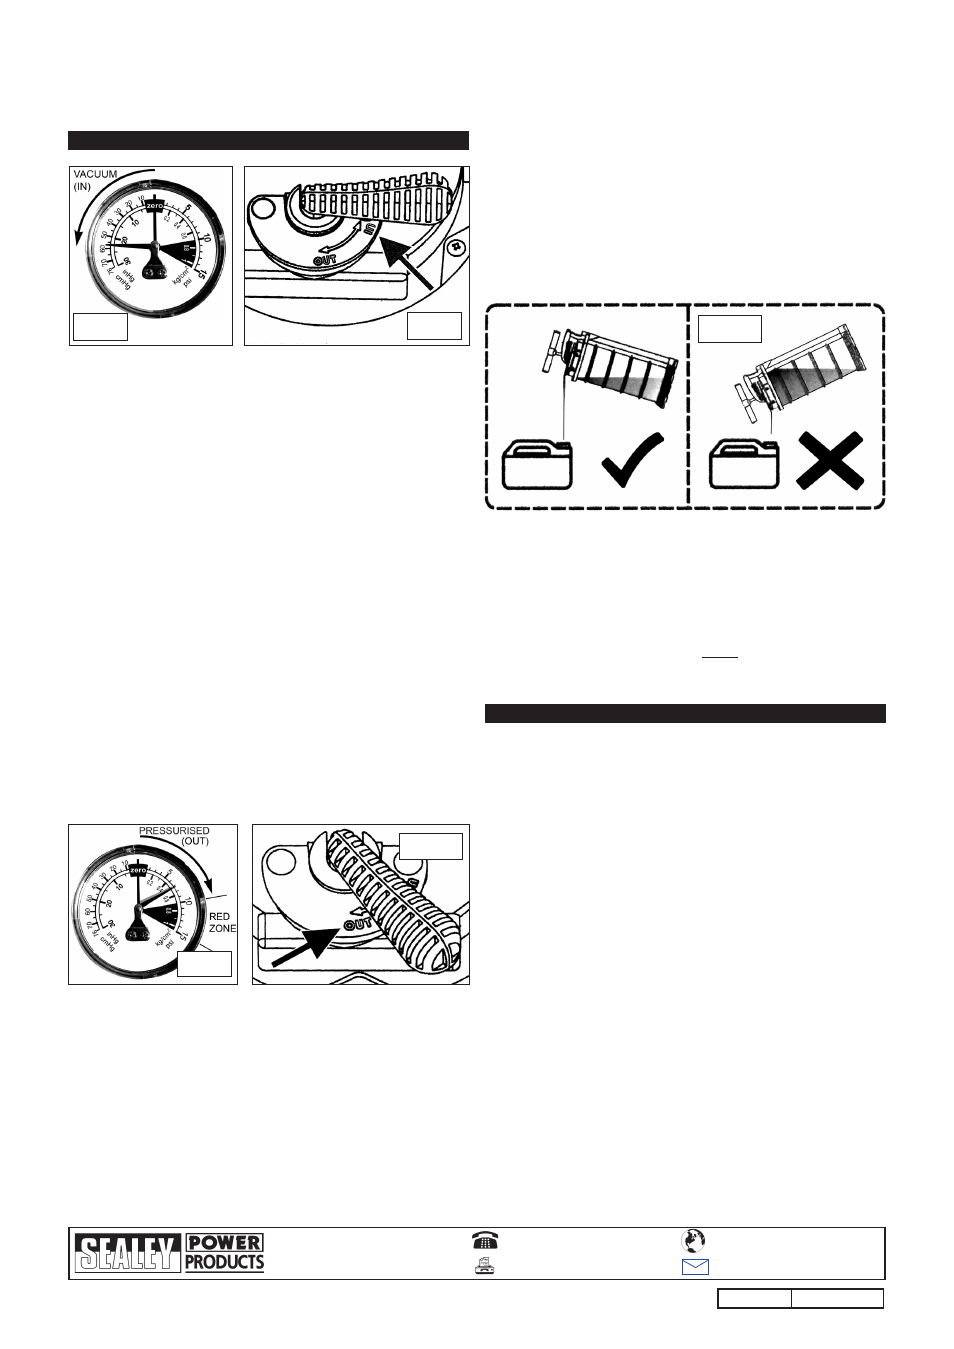
5.1.4 move the In/out valve lever to the In position as shown in fig.7.
5.1.5 fold out rod foot rest as shown in fig.3-6.
5.1.6 to commence suction place your foot over the foot rest to
steady the unit and start to pump the handle up and down
through its full travel. the needle on the gauge should move
anti-clockwise from the zero position as shown in fig.6.
5.1.7 As you pump up and down, the tank will begin to fill. When
the tank is full the auto shut off mechanism will operate and
the pump handle will lock up. to return the handle to the
down position hold down the pressure relief button and push
the handle down.
5.1.8 remove the extractor probe from the dipstick tube and
replace the dipstick.
tP6905,tP6906
Issue no:1 17/10/08
fig.6
fig.7
5.2
EXPELLING FLUID FROM THE EXTRACTOR
5.2.1 Place the end of the extension tube into a suitable container
ensuring that it is large enough to hold the volume of liquid in
the extractor's tank.
5.2.2 move the In/out valve lever to the out position as shown in fig.9.
5.2.3 fold out rod foot rest as shown in fig.3-6.
5.2.4 to empty the extractor's tank place your foot over the foot rest
to steady the unit and start to pump the handle up and down
through its full travel. the needle on the gauge should move
clockwise from the zero position as shown in fig.8. If excess
pressure is created the needle will move into the red zone
and the pressure will be automatically relieved.
5.2.5 As you pump up and down, the tank will begin to empty.
continue pumping until all fluid has been expelled. When the
tank is empty, press the pressure relief button to dissipate any
residual pressure remaining in the tank.
5.2.6 If extracted oil has cooled down and thickened we
recommend that it should be poured from the extractor tank.
5.2.7 remove the outlet bung from the pouring spout as described
in sections 3.1 and 3.2.
fig.8
fig.9
5.2.8 Pour the oil from the tank as shown above. do not overtip the
unit as this will result in inconsistent flow form the tank.
5.2.9 Insert the bung into the spout and turn fully anti-clockwise to
lock in position for future use.
WARNING! When the extractor's tank contains liquid that is
under pressure do not remove or insert the extension tube
connector into the inlet/outlet fitting as this may result in a
sudden discharge of liquid that could be dangerous. Always
press the pressure relief button before connecting or
disconnecting the extension tube.
fig.10
01284 757500
01284 703534
Sole UK Distributor
Sealey Group,
Bury st. edmunds, suffolk.
www.sealey.co.uk
Web
NOTE:
It is our policy to continually improve products and as such we reserve the right to alter data, specifications and component parts without prior notice.
IMPORTANT: no liability is accepted for incorrect use of this product.
WARRANTY: Guarantee is 12 months from purchase date, proof of which will be required for any claim.
INFORMATION: for a copy of our catalogue and latest promotions call us on 01284 757525 and leave your full name, address and postcode.