Panel descriptions, Top panel / side panel – Roland V-600UHD 4K HDR Multi-Format Video Switcher User Manual
Page 4
4
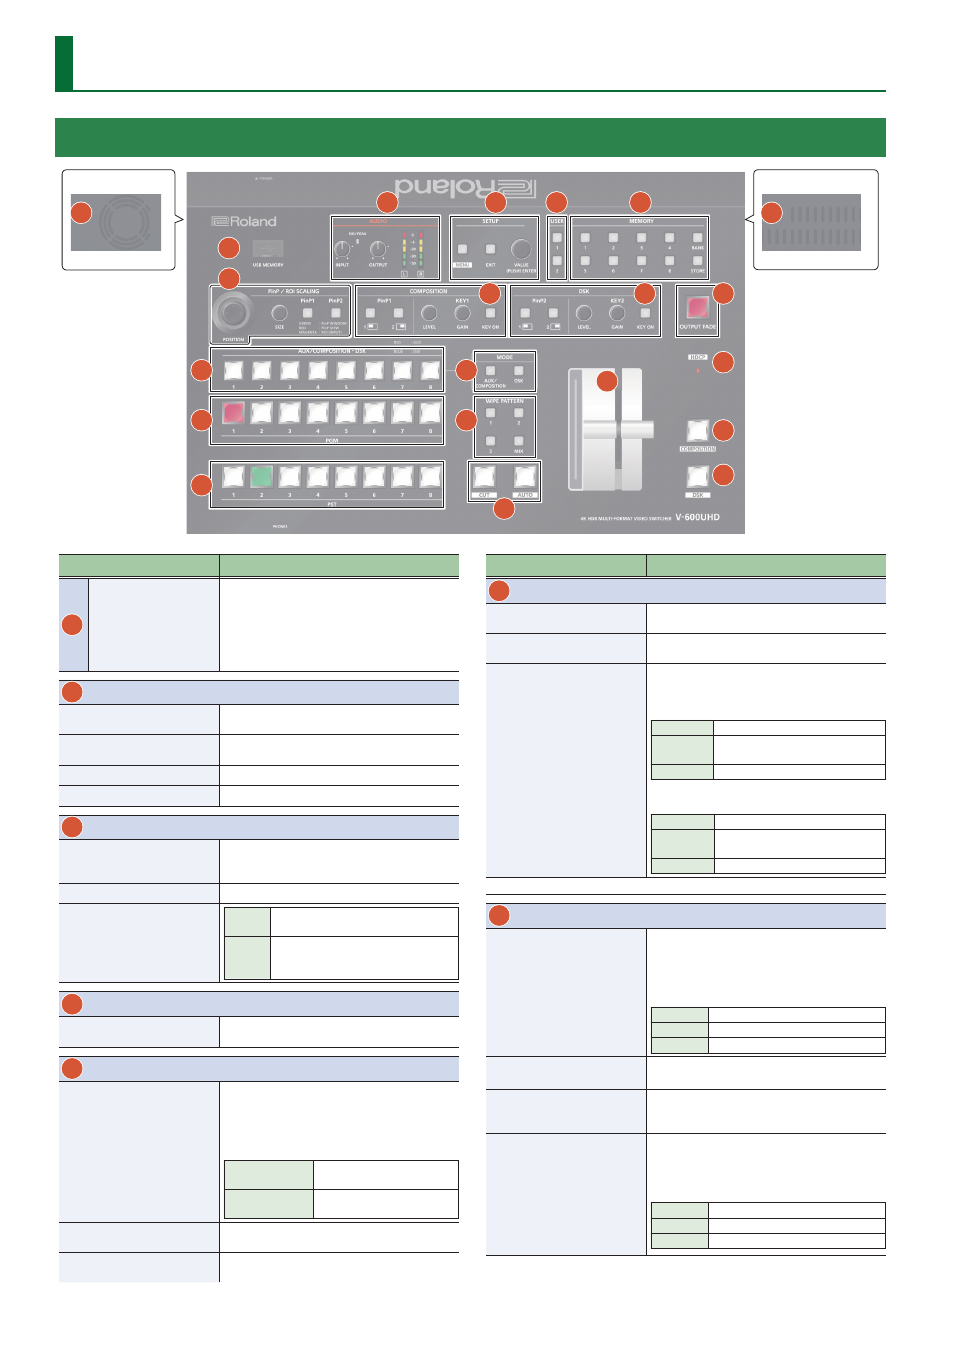
Panel Descriptions
Top Panel / Side Panel
1
2
3
4
5
6
7
8
9
10
11
12
13
14
15
16
17
18
19
Side panel
Side panel
20
21
Name
Explanation
1
USB MEMORY port
This is for connecting a USB flash drive. Use this
to load a still image, save or load settings, or save
a captured still image.
* Never turn off the power or remove the USB
flash drive while the USB flash drive is being
accessed.
2
AUDIO
[INPUT] knob
Adjusts the volume level (digital gain) for AUDIO
IN L/R.
SIG/PEAK indicator
Lit green when input is detected at AUDIO IN L/R,
and lit red when the volume is excessive.
[OUTPUT] knob
Adjusts the audio output/headphones volume.
Level meter
Indicates the audio output (L/R) volume level.
3
SETUP
[MENU] button
Switches between displaying or hiding the menu.
The menu appears on the multi-view monitor
connected to the MULTI-VIEW connector.
[EXIT] button
Returns you to the menu one level higher.
[VALUE] knob
Turning
Selects a menu item or changes a
setting value.
Pressing
Accepts the selected menu item or
applies changes to a setting. It also
executes operations.
4
USER
[1], [2] buttons
Execute the functions that are assigned by the
menu settings.
5
MEMORY
[1]–[8] buttons
Save the current settings (such as video settings
and operating panel status) to memory, or recall
settings from memory.
Button functioning is switched according to
whether the [STORE] button is on/off.
[STORE] on (lit)
Saves current settings in
memory.
[STORE] off (unlit)
Recalls settings that are saved
in memory.
[BANK] button
When this is turned on (lit), the [1]–[8] buttons
function as bank selection buttons for memories.
[STORE] button
When this is turned on (lit), you can save settings
in memories.
Name
Explanation
6
PinP / ROI SCALING
[POSITION] stick
Adjusts the display position of the input video or
PinP inset screen.
[SIZE] knob
Enlarges or reduces the size of the input video or
PinP inset screen.
[PinP1], [PinP2] buttons
(*1)
Select what is controlled by operating the
[POSITION] stick and [SIZE] knob.
[PinP1] button
Lit green
PinP1 window
Lit red
Video shown in the PinP1 inset
screen
Lit magenta
ROI (input video)
[PinP2] button
Lit green
PinP2 window
Lit red
Video shown in the PinP2 inset
screen
Lit magenta
ROI (input video)
* When selecting “ROI,” you can adjust the input video selected as the preset video.
7
COMPOSITION (*1)
PinP1 [1], [2] buttons
Turns picture-in-picture video compositing on/
off. The selected button lights up when it is
switched on.
The color of the lit button indicates the output
destination of the compositing results.
Lit green
PinP1 composition on
Lit red
Final output
Unlit
PinP1 composition off
KEY1 [LEVEL] knob
During key compositing, this adjusts the amount
of keying (transparency).
KEY1 [GAIN] knob
During key compositing, this adjusts the degree
of edge blur (the semi-transmissive region) for
keying.
KEY1 [KEY ON] button
Turns key composition on/off.
When on, the KEY1 [KEY ON] button lights up.
The color of the lit button indicates the output
destination of the compositing results.
Lit green
KEY1 composition on
Lit red
Final output
Unlit
KEY1 composition off