3 asme valve unpacking, 4 asme valve installation, 1 asme valve quick-check – Flowserve Valtek Mark 200 User Manual
Page 4
Mark 200 Control Valve FCD VLENIM0200– 12/12
4
3 ASME Valve Unpacking
1. While unpacking the valve, check the packing list against materials
received. Lists describing valve and accessories are in each shipping
container.
2. Take care to position lifting straps to avoid damage to the tubing and
mounted accessories.
WARNING: When lifting a valve using the lifting lugs, be aware
that the center of gravity may be above the lifting point. Therefore,
support must be given to prevent the actuator from rotating. Failure
to do so can cause serious injury to personnel, damage to the valve
or nearby equipment.
3. Contact your shipper immediately if there is shipping damage.
4. Should any problem arise, call your Flowserve representative.
4 ASME Valve Installation
CAUTION: The valve must be installed and commissioned by
qualified staff. Qualified staff is defined as personnel who are
familiar with the installation, commissioning and operation of
this product and possess the relevant qualifications in their
field of activity.
1. Before installing the valve, clean the line of dirt, welding chips, scale or
other foreign material.
2. Whenever possible, the valve should be installed in an upright position.
Vertical installation permits easier valve maintenance. When vertical
installation is not possible contact your Flowserve representative.
CAUTION: Do not insulate extension bonnets that are provided
for hot or cold services.
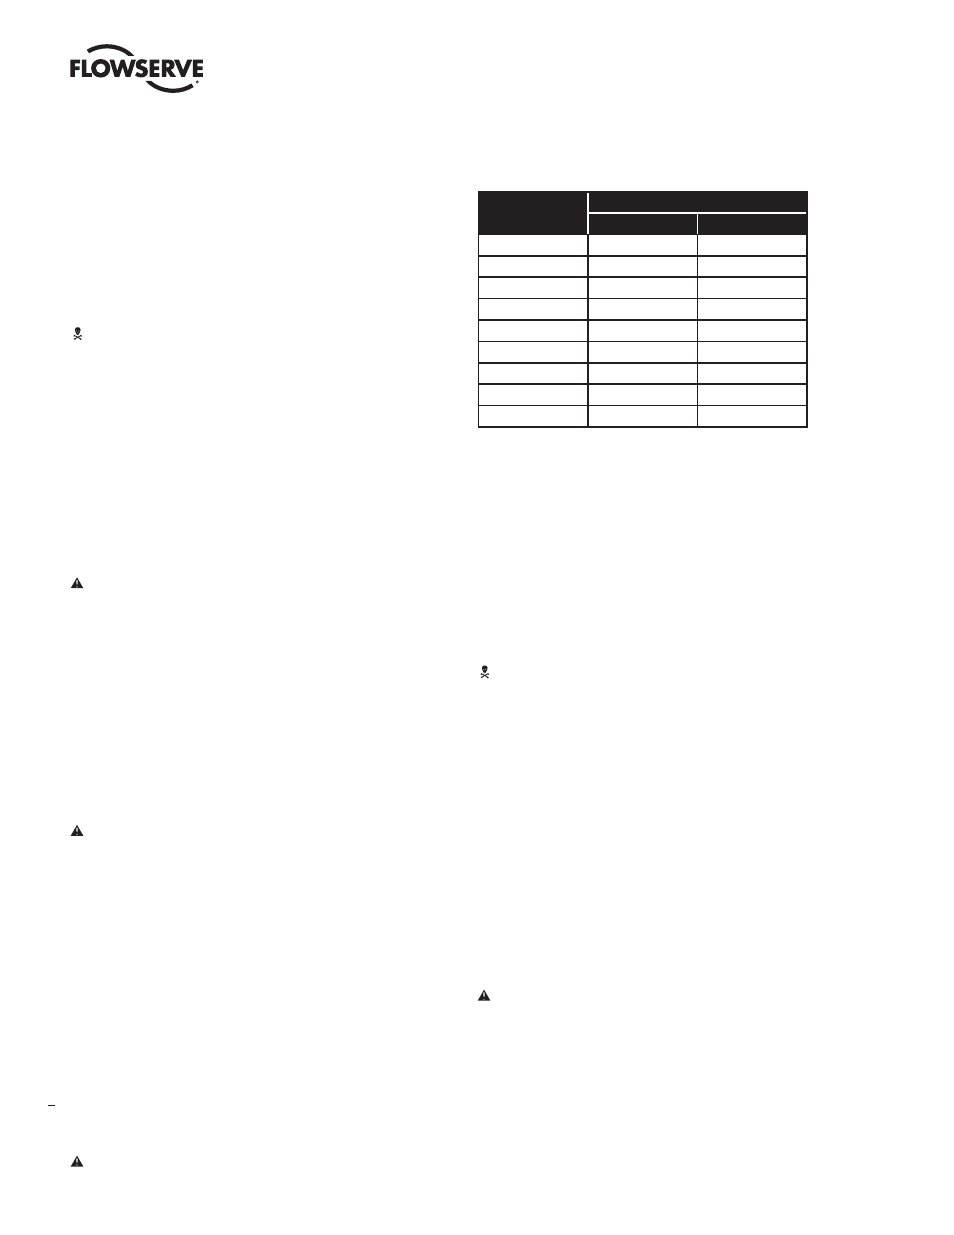
3. Be sure to provide proper overhead clearance for the actuator to allow
for disassembly of the plug from the valve body. Refer to Table 1 for the
necessary clearance needed for valve disassembly.
4. Double-check flow direction to be sure the valve is installed correctly.
Flow direction is indicated by the arrow attached to the body.
5. If welding the valve into the line, use extreme care to avoid excess heat
buildup in the valve.
6. Connect the air supply and instrument signal lines. Throttling control
valves are equipped with a valve positioner. Refer to the appropriate
positioner bulletin for connections, maximum air supplies, and
maintenance instructions.*
CAUTION: On valves equipped with air filters, the air filter must
point down to perform properly. *
Table 1: ASME Valve Disassembly Clearance
Valve Size
(inches)
Clearance
inches
mm
2
5
127
3
6
152
4
8
203
6
11
279
8
12
305
10
16
406
12
17
432
14
21
533
16
22
559
NOTE: In some cases, the air supply must be limited to less than 150
psi (10.3 bar). This is indicated on a sticker or type plate found near
the upper air port on the actuator cylinder. An air regulator should
be installed to ensure the supply pressure does not exceed the line
pressure indicated on the sticker.*
4.1 ASME Valve Quick-check
Prior to start-up, check the control valve by following these steps:
WARNING: Due to the risk of injury, it is prohibited to work
between the yoke/columns while the valve is in operation.
1. Stroke the valve and observe the plug position indicator on the stem
clamp compared to the stroke indicator plate. The plug should change
position in a smooth, linear fashion.
NOTE: Due to excessive friction, graphite packing can cause the plug
stem to move in a jerky fashion.
2. Check for full stroke by making appropriate instrument signal change.
3. Check all air connections for leaks.*
4. Check packing box bolting for the correct adjustment. Refer to the
packing installation manual for specific details on maintaining the style
of packing supplied.
CAUTION: Do not overtighten packing. This can cause exces-
sive packing wear and high stem friction that may impede
plug movement.
5. Make sure the valve fails in the correct direction in case of air failure.
This is done by turning off the air supply and observing the failure
direction.**
6. After a temperature excursion has occurred, bonnet flange bolting
should be retorqued to ensure bonnet gaskets do not leak. See Table 2.