Customize to your shop, Top trak production stop swing stop, Measuring tape – Kreg KMS8000 Precision Trak & Stop Kit User Manual
Page 3
Top Trak
Production Stop
Swing Stop
™
Measuring Tape
The Production Stop measures and records the distance between the end of the
board and the saw blade, drill bit or router cutter. This allows you to easily cut
mul tiple pieces of stock to the exact same length. Cutting numerous pieces to the
exact length without measuring is easy. Gently press the end of the board opposite
the blade against the side of the stop arm as shown at left. The Production Stop
can be secured anywhere along the Top Trak, easily lifted off the top of the track
and reposi tioned on the opposite side of the blade. The Production Stop features
two adjustable lens cursors that can be set independently to read accurately off of
either side of the blade.
Four 2 ft. sections of Trak lets you set up your shop
for the way you work. Additional trak sections and
extra stops are available separately.
8 foot, all on one side
4 foot on either side
6 foot and 2 foot
Customize to
your Shop
Top Trak
T-Slot
Measuring Tape
Half Dovetail
1/8” Drill
Drill Guide Line
2¼”
¾”
One of the most common applications
for the Precision Trak & Stop Kit is
combined with a miter saw. The table
design, shown at left allows you to
customize the table height for your
saw. The table box height should be
the same as the height of the miter
saw table. Table boxes can be placed
to the left or right of the miter saw and
will support the material being cut as
well as provide a mounting surface for
the Top Trak.
The image below shows an expanded view of the end profi le of the image above.
The height of the back board should be the height of the table box PLUS 2-1/4”.
The example below shows a table box that is constructed using pocket hole joinery
and pocket hole screws (sold separately). Although this is an effective method of
construction for this application it is not the only method that may be utilized. The
vertical members that are sized for the miter saw table height are attached to the table
box top with pocket hole screws in 15-degree pocket holes. The bottom and the back
are attached with pocket hole screws. If you want to learn more about pocket hole
joinery consult your local Kreg dealer or visit us on the Web at www.kregtool.com.
Stop
Arm
The Swing Stop™ measures and records
the distance between the end of the board
and the saw blade, drill bit or router cutter.
This allows you to easily cut multiple pieces
of stock to the exact same length. Cutting
numerous pieces to the exact length
without measuring is easy. Gently press
the end of the board opposite the blade
against the side of the stop arm as shown
at left. The Swing Stop™ can be secured
anywhere along the track. The Swing
Stop™ Arm can be assembled on either
side of the Stop Base knob although it must
be positioned between the Stop Base and
the saw blade.
The curved Swing Stop™ Arm is designed
to rise automatically when a board is
pushed against the front of the stop arm as
shown at left. The Swing Stop™ Arm rests
on top of the work piece until the board
underneath is removed. When the board is
removed or moved to the side of the Swing
Stop
™
the Stop Arm drops down and is
again ready to be used as a stop.
About the Lens
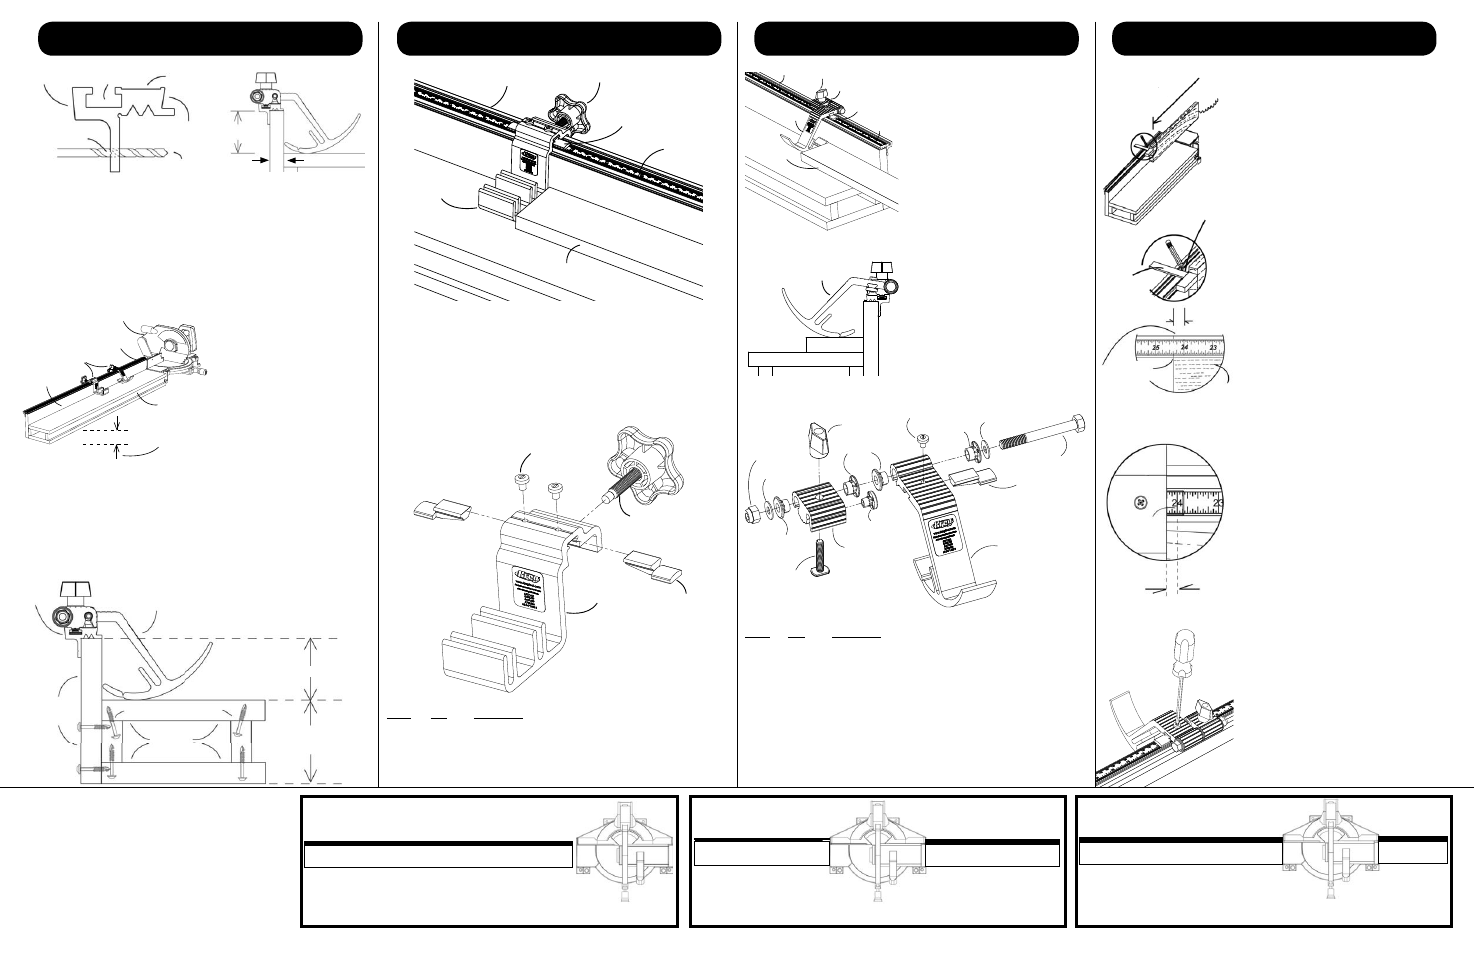
Set the Cursor
Locate the Measure Tape
1. Cut a straight 3/4” thick piece of material
exactly 24” long by 3” wide.
2. Turn the board on edge and place the board
with one end against the teeth of the saw blade
as shown at left.
3. Use a square or similar layout tool to place
a pencil mark across the top of the fence onto
the Top Trak on either side of the indentation
for the Self Adhesive Measuring Tape. Butt the
square against the reference board so that the
pencil marks will be exactly 24” from the blade as
shown. If you have placed Top Trak on both sides
of the blade repeat the same process for the
other side of the blade.
4. Align the 24-3/8” mark of the Self Adhesive
Measuring Tape to the pencil mark and adhere
the Tape to the indentation along the length of the
Top Trak. Cutoff excess tape with scissors.
Note: Placing the Tape is much easier if you slice
the backing of the Measuring Tape under the 24”
mark and fold over to expose only a short amount
of the adhesive.
1. Adjust the cursor so it sits about 3/8” from the edge
of the stop. The cursor set screw is on top of the
stop
arm.
2. Measure a piece of scrap wood. The exact length
of this scrap is not important. A board about 24”
works well because it gives you plenty of room to
make some test cuts.
3. Set the stop so the cursor reads a length less than
the length of the scrap piece.
4. Cut the scrap board to the new length and
measure the cut board.
5. Without moving the stop loosen the cursor set
screw and adjust it to read this exact measurement.
Top Trak
Knob
Lens
Tape
Work Piece
Stop Arm
Pencil
Marks
Square
24” Pencil
Marks
24”
Board
Red Line
Cursor
3/8” off-set
3/8”
off-set
Saw
Blade
24”
Pencil
Mark
Both the Production Stop and the Swing Stop™
feature an adjustable lens cursor similar to the
lens on a quality table saw rip fence.
The lens is a clear material except for a red line
(cursor) on the bottom of the lens as shown at
left. The red line cursor makes it easy to read
the tape lines and fi ne-tune the stop when
compensating for blade thickness variations or a
tape that is not perfectly positioned.
Note: When placing the self-adhesive tape onto
the track, the tape must be placed 3/8” CLOSER
TO THE SAW BLADE to allow the Lens to
function properly.
1.
2.
3.
4.
At the heart of the Precision Trak & Stop Kit is the Kreg Top Trak. Top Trak attaches
to your ¾” thick fence component such as melamine, plywood, or other suitable
material. A recessed area on top of the track allows you to attach the Measuring
Tape while the T-slot provides a means to guide and anchor the Swing Stop
™
. The
Half Dovetail profi le on the front and back of the track anchors the Production Stop.
The fence component must be 3/4” x 2-1/4” for the Top Trak, Swing Stop™, and
Production Stop to function properly. A groove in the rear of the track functions as a
drill guide. Drill a 1/8” screw hole, 1” from each end, then space the remaining screw
holes evenly between the outside holes for a total of 4 or 5 screws per each 2-foot
section. To “connect” the 2-foot Top Trak pieces to form a 4-ft, 6-ft, or 8-ft section
simply butt the adjoining pieces and mount in place.
2¼”
Top Trak
Table Box
Kreg Pocket Hole Screws
Kreg Swing Stop
™
Back
Board
Height of the
Miter Saw Table
Knob
Stop Base
Lens
Tape
Stop Arm
Top Trak
Workpiece
Miter Saw
Top Trak
Kreg Stops
Back Board
Table Box
Height of the
Miter Saw Table
FT4064
FT4176
FT4063
FT4092
ASSEMBLE THE STOP
FT4137
FT4060
FT4261
FT4212
FT4257
FT4262
FT4258
FT4137
FT4061
FT4063
FT4064
FT4257
FT4257
DK1313
ASSEMBLE THE STOP
Part# Qty. Description
FT4261 1
Swing
Stop
™
Arm
- Position on side of stop base nearest blade
FT4063 1
Lens
- Allows precise adjustment of Swing Stop
™
FT4061 1
Nyloc
Nut
- Won't work loose during use
FT4137 2
Brass
Washer
- Protects the Plastic Stop Bushing
FT4064 1
Nylon
Screw
- Used to calibrate lens zero position
DK1313 1
Black
T-Knob
- Tightens Swing Stop
™
assembly in position
FT4060 1
Hex Head Bolt
- Secures Swing Stop
™
assembly
FT4262 1
Stop
Base
- Anchors assembly to aluminum trak
FT4212 1
T-Bolt
- Slides in T-Slot of aluminum trak
FT4257 4
Plastic Stop Bushing
- Allows for smooth operation
FT4258 1
Plastic Support Button
- Allows for smooth operation
Part# Qty. Description
FT4092 1
Stop
Arm
FT4063 2
Lens
FT4064 2
10-32 x 1/4” Nylon Screw
FT4176 1
Threaded
Knob
*Please see step 4. Measuring Tape for setting the cursor correctly on your stops.
*Please see step 4. Measuring Tape for setting the cursor correctly on your stops.