English remote controller operation – Marantz SR4023 User Manual
Page 21
18
BASIC
CONNECTIONS
BASIC
OPERA
TION
ADV
ANCED
CONNECTIONS
TROUBLESHOOTING
OTHERS
NAMES AND
FUNCTIONS
ADV
ANCED
OPERA
TION
ENGLISH
REMOTE CONTROLLER OPERATION
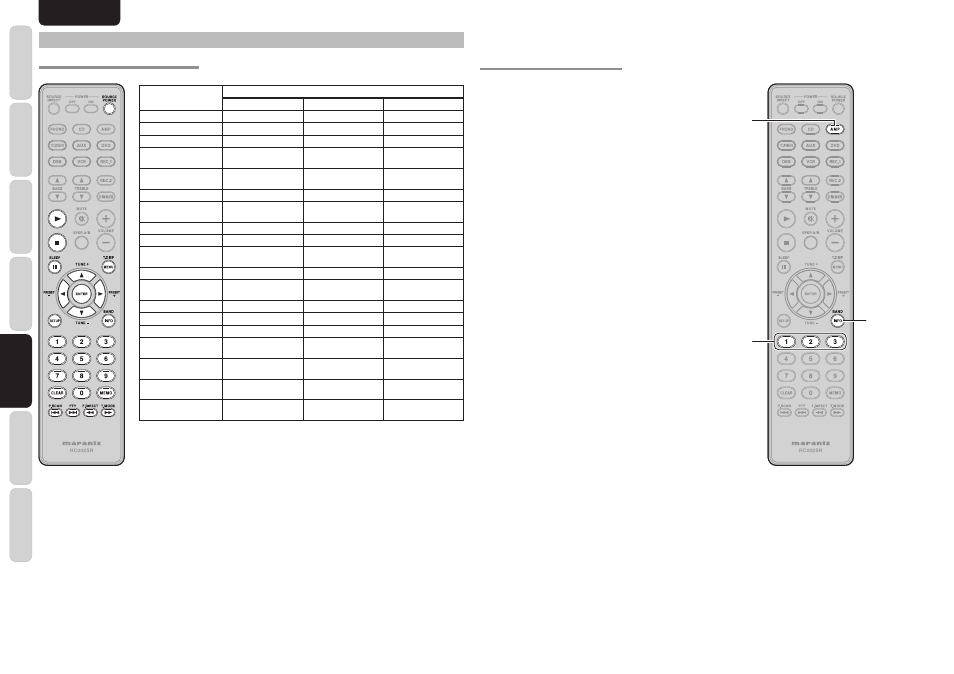
THE CONTROLLABLE FUNCTION TABLE
BUTTON NAME
FUNCTION
CD
DVD
TAPE
SOURCE POWER
POWER ON / Standby
POWER ON / Standby
POWER ON / Standby
2
Starts playback
Starts playback
Starts playback
9
Stops playback
Stops playback
Stops playback
SLEEP /
;
Pauses a disc that's
playing
Pauses a disc that's
playing
Pauses a disc that's
playing
T.DISP / MENU
Not for use
Displays a DVD disc
menu
Not for use
(UP) / TUNE+
Not for use
Move the cursor upward
Not for use
(DOWN) / TUNE-
Not for use
Move the cursor
downward
Not for use
(LEFT) / PRESET-
Not for use
Move the cursor leftward
Not for use
(RIGHT) / PRESET+
Not for use
Move the cursor rightward
Not for use
ENTER
Not for use
Selects the current menu
option
Not for use
SETUP
Not for use
Not for use
Go to the setup Menu
BAND / INFO
Not for use
Displays the disc
playback information
Not for use
0-9
Inputs the numeric
Inputs the numeric
Not for use
CLEAR
Not for use
Not for use
Resets counter
MEMO
Not for use
Not for use
Not for use
P.SCAN /
∞
Skips to the start of the
current track
Skips to the start of the
current track or chapter
Skips to the start of the
current track
PTY /
§
Skips to the next track
Skips to the next track or
chapter
Skips to the next track
F.DIRECT /
5
Fast rewind the playing
track
Fast rewind the playing
chapter
Fast rewind the playing
track
T.MODE /
6
Fast forward the playing
track
Fast forward the playing
chapter
Fast forward the playing
track
AMP
1, 2, 3
INFO
REMOTE CONTROL CODE SETTING
The remote control unit contains 3 sets of remote
control codes, and it can be used to control up to 3
receivers in one location. To control a second or third
receiver, select the remote control code as explained
below. The selected receiver can be operated from
the remote control.
• When the unit is shipped from the factory, the main
unit and remote control are set to RECEIVER1.
1.
RECEIVER2
To set the remote control to RECEIVER2,
hold down both the AMP button and 2 number
button on the remote control for at least fi ve
seconds.
RECEIVER3
To set the remote control to RECEIVER3,
hold down both the AMP button and 3 number
button on the remote control for at least fi ve
seconds.
2.
Also set the main unit’s remote control setting
to the same setting as the remote controller.
To change the main unit’s remote control
setting, hold down AMP and press the INFO
buttons on the remote controller; the remote
control setting (“RECEIVER 1,” “RECEIVER
2” or “RECEIVER 3”) will be displayed in
the display window on the main unit and the
main unit setting will be changed to the same
setting as that of the remote controller.
Note:
To set the remote control back to RECEIVER1, hold
down both the AMP button and 1 number button on
the remote control for at least fi ve seconds.