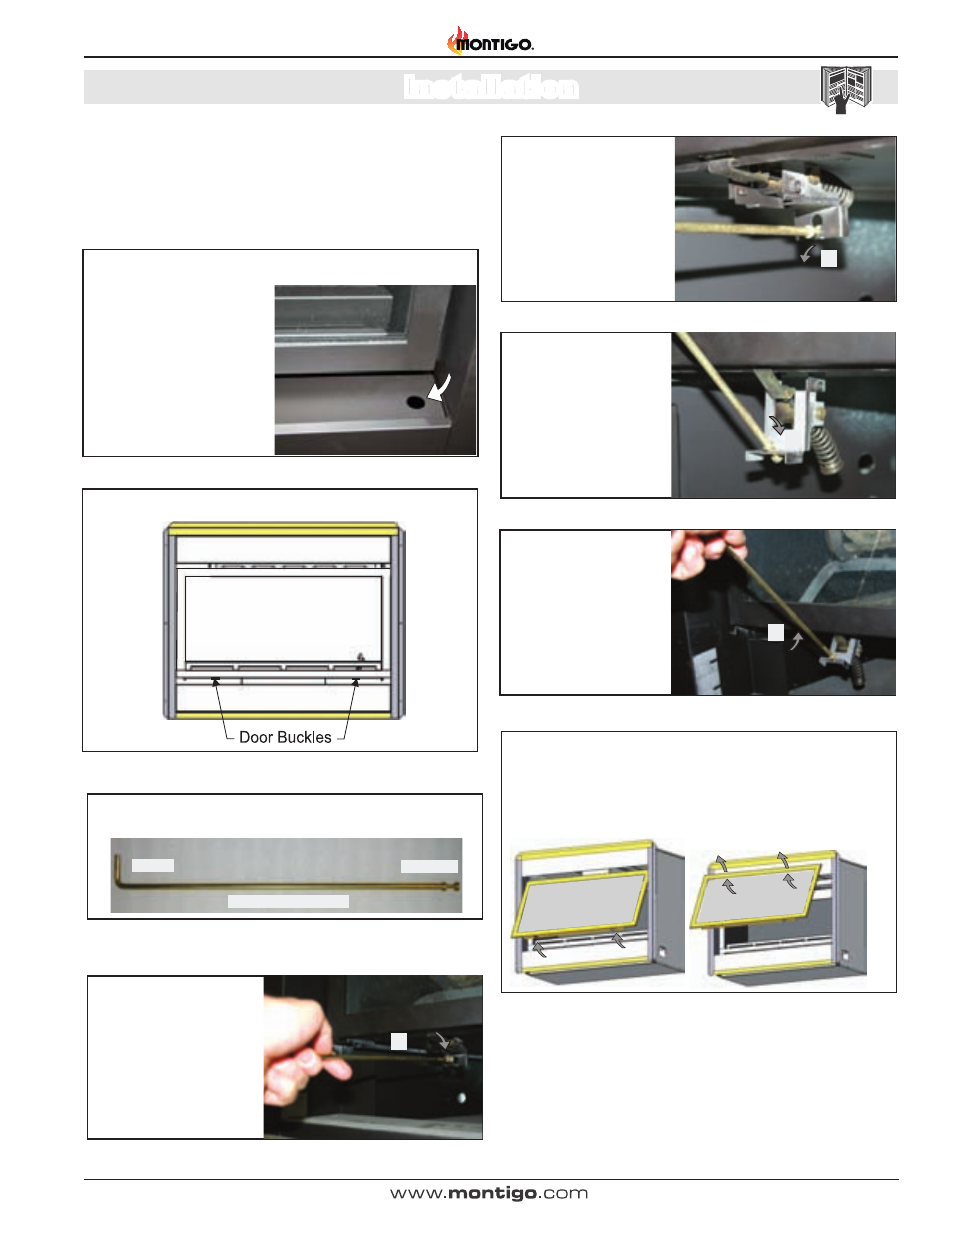
Installation, Locate the door buckles, Installing the door – Montigo H34DL User Manual
Page 23: Removing the door, Remove the horizontal access pan
H-Series DL Gas Fireplace
Page 23
XG0140 - 070714
Installation
Removing the door:
The H*DL* Series door is removed in a few simple steps. Follow these
instructions below to remove the Horizontal access panel, unlatch the
door buckles and, remove the door. Replace in reverse order.
Figure 28a. Locate the door buckles.
Figure 28. Removing and installing the Horizontal Access Panel
Locate the Door Buckles:
Step 2:
Step 1:
Remove the Horizontal cover
by placing fingers in both finger
holes, then pushing away from
you and lifting out. Place it
aside during maintenance or
cleaning.
Install in reverse order.
Remove the Horizontal Access Pan
el:
To install the door, hook the top edge of the door frame into place. Lower
the door into position and follow the previous steps shown in reverse order.
Installing the Door:
2
Step 5:
Ensure the tool is firmly
in the lower end of the
slot, (as shown), Then pull
toward you (Caution: hold
the tool securely).
3
Step 6:
Pull hard if necessary to
release the spring ten-
sion. (Caution: The latch
springs back with force,
hold the tool securely).
4
Step 7:
Remove the tool from
the latch slot. Ensure the
latches are hanging freely,
the hook end is released
from the bottom of the door.
(Repeat all 4-steps for the
remaining latches).
Figure 28d.
Figure 28e.
Figure 28f.
Step 8:
Grasp the Door on either side, usually midway and lift upward, lift
the door carefully up and away from the front of the fireplace. See
Figures 28g. Place the Door aside in a safe place while maintenance
and / or cleaning is being performed.
Figure 28g. Removing and installing the glass doors.
Removing the Door:
Door Latch Hook
Door Latch Slot
Hand-hold
Release the Door Buckles
Figure 28b. Door buckle Tool
1
Step 4:
Firmly grasp hand-hold
end of Door buckle tool
and place the machined
end in the slot under door
frame. (as shown)
Figure 28c.
Step 3:
Finger Holes
Installed Gas
Valve Cover