Installation – Montigo H34DL User Manual
Page 27
H-Series DL Gas Fireplace
Page 27
XG0140 - 070714
Installation
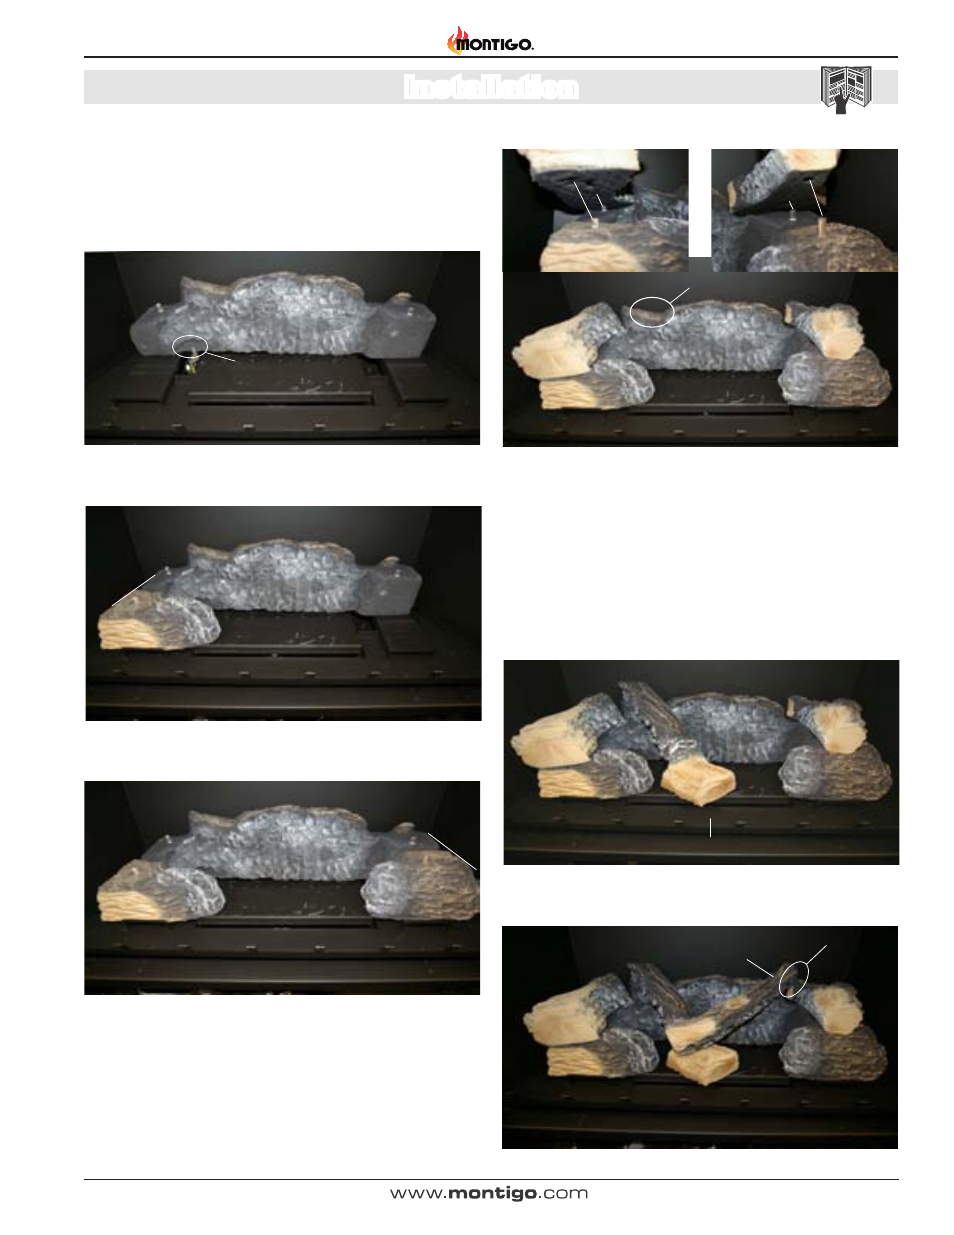
Installing the Logs:
The H42DL* is supplied with a seven ceramic fibre log logset. Unpack
the logs and handle them very carefully.
Step 1. Remove the glass door as described on Page 23.
Figure 30a. Placing Bottom Rear Log.
Step 2. Place the bottom Rear log as shown in figure 30a.
Step 3. Place the bottom Left log as shown in figure 30b.
Step 4. Place the bottom Right log as shown in figure 30c.
Pilot Assembly
Fireplace Base
Rear / Bottom Log
Notch in Log
Figure 32b. Placing Bottom Right Log.
Align
Bottom Left Log
Air Inlets
Align
Bottom Right Log
Figure 32a. Placing Bottom Left Log.
Step 3. Place the bottom Left log as shown in figure 32b.
Top
Right Log
Top Right
Log
Align Pins
Align Pins
Top
Left Log
Top Left
Log
Notch in Log
Step 4. Place the bottom Right log as shown in figure 32b
Step 5. Place the Top Right and Left logs using the (4) four alignment
pins protruding from the top of the Right and Left Bottom Logs,
as shown in figure 32d. With these pins align the Top Right and
Left logs using the predetermined alignment holes cast into the
underside of the logs, as shown above, figure 32d insets.
Step 6. Place the Centre Front log , Figure 32d below, as shown
using the notch cast in the Bottom Rear log as shown in figure
32c above.
Figure 32c. Placing Top Right and Left Logs.
Step 7. Place the Front Centre log as shown in figure 32d.
Center Fr ont Log
Centerline of Fireplace
Figure 32d. Placing Centre Front Log.
Right Fr ont
Log
Groove
in Log
Rest Log
Figure 32e. Placing Right Front Log.
Figure 32. Placing Bottom Rear Log.
Step 2. Place the bottom Rear log as shown in figure 31.