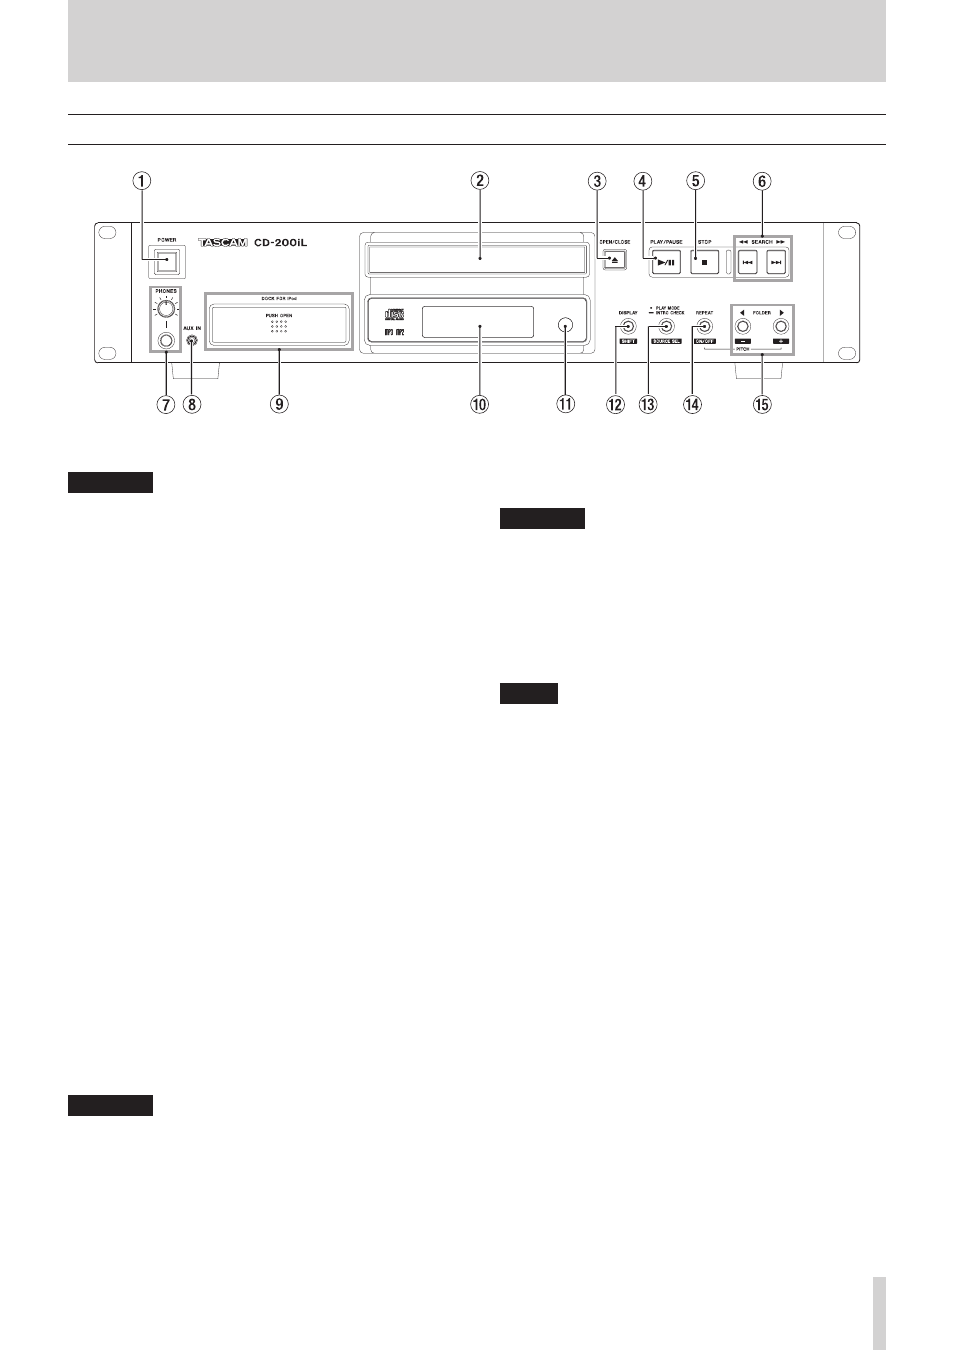
2 – names and functions of parts, Front panel – Teac CD-200IL User Manual
Page 9
TASCAM CD-200iL
9
2 – Names and functions of parts
Front panel
1
POWER switch
Press this switch to turn the unit on or off.
CAUTION
Before turning the power on, minimize the volume of the
connected device. Failure to do so could cause loud noises
that might result in harm to your hearing or other trouble.
2
Disc tray
Press the OPEN/CLOSE button to open the disc tray and
load/remove the disc.
Press the OPEN/CLOSE button to close the disc tray.
3
OPEN/CLOSE button
Use to open and close the disc tray.
4
PLAY/PAUSE button
Press during playback to pause. When playback is stopped
or paused, press to start playback.
5
STOP button
When the current source is
-CD-
,
press this button to stop
CD playback.
When in program setting mode, press this button when a
track is selected to cancel the selection and return to the
state where you can select a track again. (See “Setting the
program” on page 22.)
Press this button when you can add a track to a new
program step to clear the entire program. (See “Clearing the
program” on page 24.)
6
SEARCH m/,[.//] buttons
Press briefly to select tracks (skip). Press and hold to search
a track.
7
PHONES jack and knob
Use this standard stereo jack to connect stereo headphones.
Use a plug adapter when connecting headphones with
mini-plugs.
Use the PHONES knob to adjust the headphone output
level.
CAUTION
Use the PHONES knob to minimize the volume before
connecting headphones. Failure to do so could cause a
sudden burst of loud noise, which might result in hearing
damage, for example.
8
AUX IN jack
Use this stereo mini jack for line level audio input.
Connect a portable digital audio player or other external
audio device to it.
CAUTION
Before connecting an external device to the AUX IN jack,
minimize the volume of that device. Failure to do so could
result in sudden loud noises that could, for example, harm
your hearing.
9
DOCK FOR iPod
This iPod dock is compatible with Lightning connectors and
30-pin connectors. (See “Connecting an iPod or iPhone” on
page 14.)
NOTE
When connecting an iPod or iPhone with a 30-pin
connector, be sure to attach a dock adapter suitable for
your iPod or iPhone to the 30-pin dock connector. Dock
adapters are not included with this product. Use one
that came with your iPod or iPhone or purchase an Apple
Universal Dock Adapter made by Apple Inc.
0
Display
Displays various information.
q
Remote Sensor
When operating the remote control unit (RC-CD200iL), point
it towards here.
w
DISPLAY [SHIFT] button
When the current source is
-CD-
, press this button to
change the time or text information shown on the display.
(See “Time and text information display” on page 25.)
Press this button at the same time as another button to use
that button's shift function, which is shown as white text
with a dark background beneath the button.