7– useful functions, Dividing the selected file (divide), Reverb function – Teac DR-22WL Reference Manual User Manual
Page 30: Setting the reverb function
30
TASCAM DR-22WL
7– Useful functions
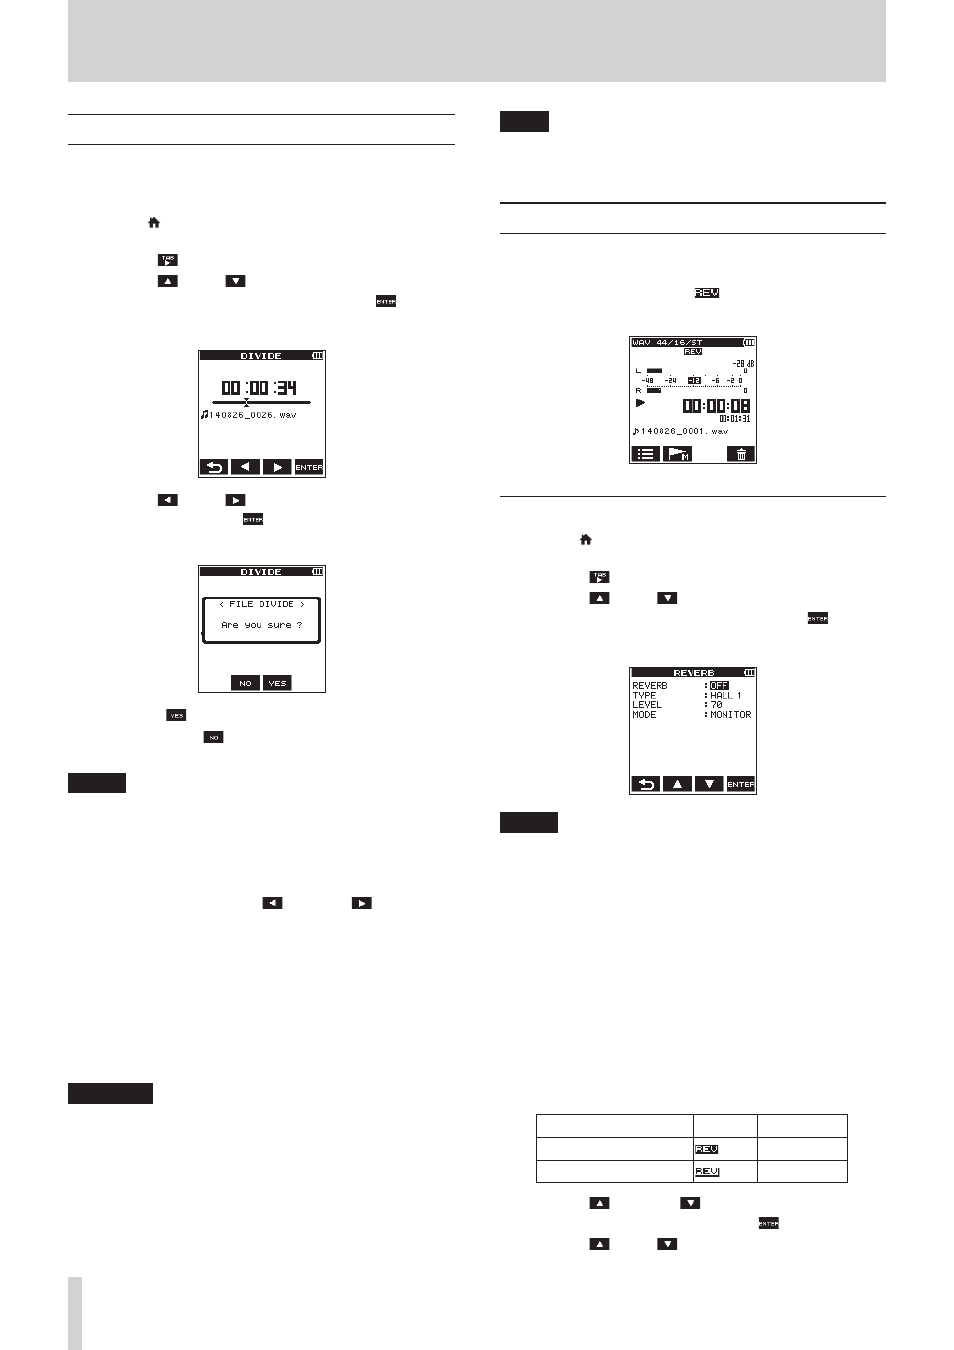
Dividing the selected file (DIVIDE)
A recorded file can be divided into two at a desired position.
1. Use the . button, the / button, or the browse screen
to select the file you want to divide.
2. Press the /MENU/8 button to display the
REC
page in
menu screen.
3. Use the F1
button to display the
TOOL
page.
4. Use the F2
and F3
buttons to select (highlight) the
parameter in
DIVIDE
item and press the F4
button.
The
DIVIDE
screen is displayed.
5. Use the F2
and F3
buttons to finalize the dividing
section, and press the F4
button to finalize the setting.
The following pop-up window appears.
6. Press the F3
button to divide the file.
If you press the F2
button, the file will not divide and
return to the
DIVIDE
screen.
NOTE
• You can also decide the dividing section in playback mode
by pressing the PLAY button.
• In browse screen, press the PLAY button to switch between
playback and pause. Press the . button to go to the
beginning of the file, or press the / button to go to the
end of the file. To make a fine adjustment of the dividing
point, press together the F2
and the F3
button.
Long-press these buttons for sequential movement.
• When a file is divided, names will be created ending with
either
a
or
b
.
(Example)
File name before division
140826_0001.wav
File name after division
140826_0001a.wav (before the dividing point)
140826_0001b.wav (after the dividing point)
CAUTION
• MP3 files cannot be divided.
• Division may not be available when microSD card does not
have sufficient capacity.
• File name with more than two hundred characters cannot
be divided.
• File cannot be divided when there is a file name identical to
that of the post-divided file.
TIPS
You can add cue marks during recording at the position you
want to divide. (See “Create cue marks during recording” on
Reverb function
The DR-22WL has a built-in reverb function to record and
playback with reverb.
When reverb function is ON, the
icon will appear at the top
of the home screen.
Setting the reverb function
1. Press the /MENU/8 button to display the
REC
page in
menu screen.
2. Use the F1
button to display the
TOOL
page.
3. Use the F2
and F3
buttons to select (highlight) the
parameter in
REVERB
item and press the F4
button.
The
REVERB
screen is displayed.
NOTE
You can set and adjust reverb in record standby mode as
well, from the
REVERB
page of the input setting screen.
4. The following settings are made in the
REVERB
screen.
REVERB:
Set the reverb on/off status (default value:
OFF
).
TYPE:
See the reverb type from the pre-set items. See 31
Reverb pre-set list for more details on reverb pre-set
items.
LEVEL:
You can change the reverb output level selected in the
TYPE
item. Settings can be selected from
0
-
100
.
(default value:
70
)
MODE:
Set the reverb mode.
MODE (options)
Icon
Detail
MONITOR (default value)
Reverb state
REC
SEND state
5. Use the F2
and the F3
buttons to select (highlight)
the setting parameter and press the F4
button.
6. Use the F2
and F3
buttons to set the desired option/
value.