Expansion board installation & wiring, Mua ii controller technical guide 10, Wiring considerations – WattMaster MUA II User Manual
Page 10: Figure 7: expansion board wiring
MUA II Controller
Technical Guide
10
24VAC
POWER
INPUT
Connect to
MUA
Controller Board
WARNING!!
Observe Polarity! All boards must be wired with GND-to-GND and 24VAC-to-24VAC.
Failure to observe polarity will result in damage to one or more of the boards. Expansion
Boards must be wired in such a way that power to both the expansion boards and the
controller are always powered together. Loss of power to the expansion board will cause the
controller to become inoperative until power is restored to the expansion board.
4RLY IO BD.
4RLY IO BD.
4RLY IO BD.
4RLY IO BD.
YS101790
YS101790
YS101790
YS101790
24V
AC
GND
Common
Common
Common
Common
Relay Output #10 - Configurable (N.O. Dry Contact)
Relay Output #6 - Configurable (N.O. Dry Contact)
Relay Output #14 - Configurable (N.O. Dry Contact)
Relay Output #18 - Configurable (N.O. Dry Contact)
Relay Output #11 - Configurable (N.O. Dry Contact)
Relay Output #7 - Configurable (N.O. Dry Contact)
Relay Output #15 - Configurable (N.O. Dry Contact)
Relay Output #19 - Configurable (N.O. Dry Contact)
Relay Output #12 - Configurable (N.O. Dry Contact)
Relay Output #8 - Configurable (N.O. Dry Contact)
Relay Output #16 - Configurable (N.O. Dry Contact)
Relay Output #20 - Configurable (N.O. Dry Contact)
Relay Output #13 - Configurable (N.O. Dry Contact)
Relay Output #9 - Configurable (N.O. Dry Contact)
Relay Output #17 - Configurable (N.O. Dry Contact)
Relay Output #21 - Configurable (N.O. Dry Contact)
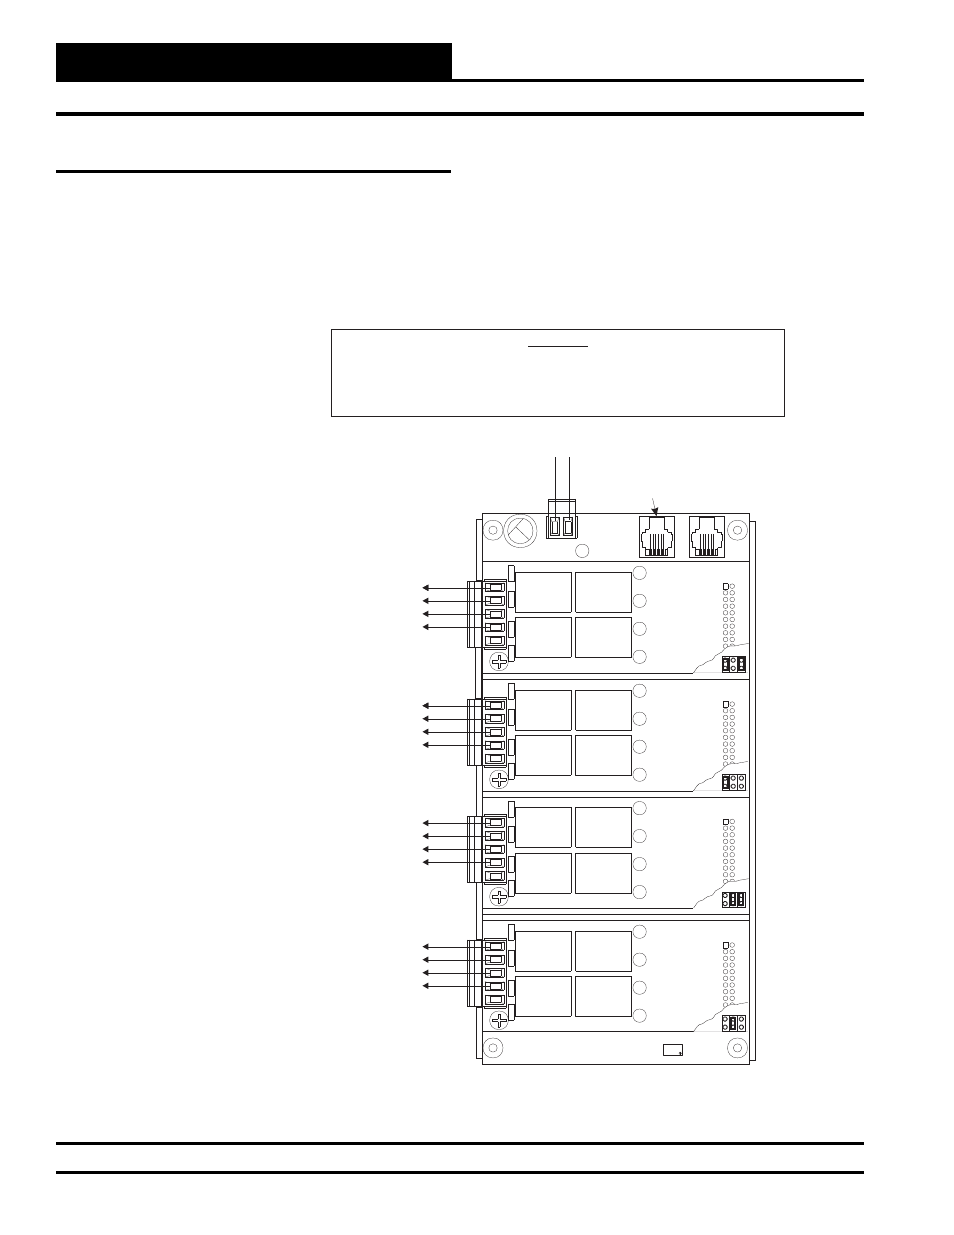
Wiring Considerations
The expansion base boards must be connected to 24 VAC as shown in
the wiring diagram below. As noted below, the power requirement for
a two-slot base board is 10 VA. A four-slot base board requires 20 VA.
Be sure that the transformer used for powering the base boards meets
these minimums. See Figure 7 for complete wiring details.
Expansion Board Installation & Wiring
Figure 7: Expansion Board Wiring