Pin assignments, Pin descriptions – Linx Technologies TRM-xxx-TT User Manual
Page 9
– –
– –
12
13
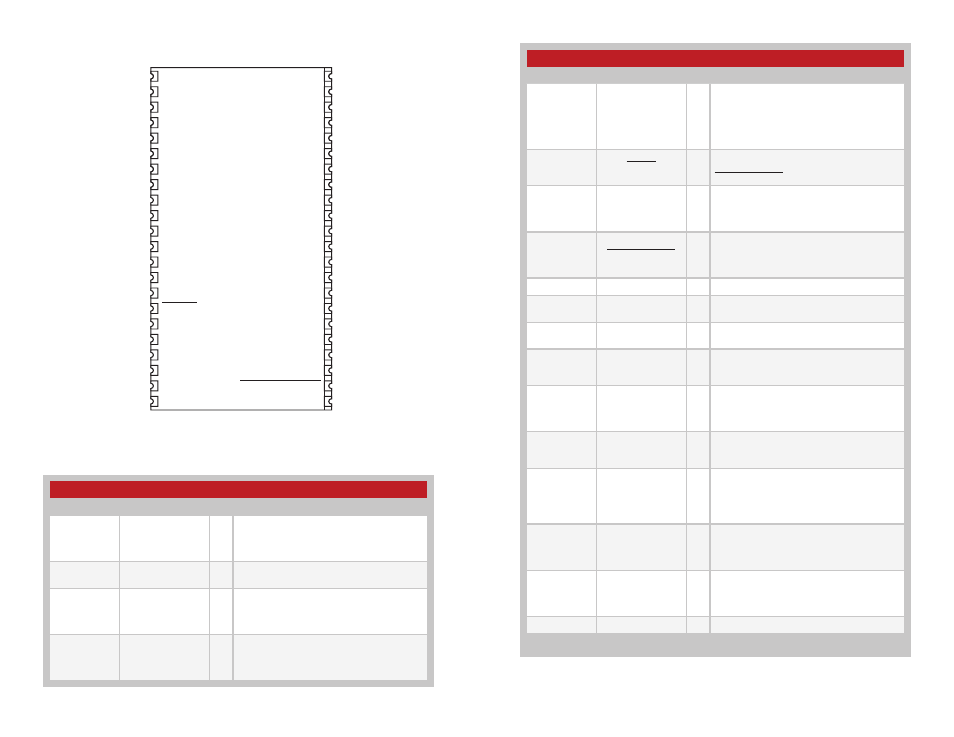
Pin Assignments
GND
NC
GND
GND
NC
NC
GND
NC
NC
NC
NC
NC
GND
NC
GND
ANTENNA
1
2
3
4
5
6
7
8
37
38
39
40
41
42
43
44
S0
S1
GND
GND
PAIR
C1
ACK_OUT
C0
CMD_DATA_OUT
LATCH_EN
S2
S3
LVL_ADJ
RESET
ACK_EN
MODE_IND
9
10
11
12
13
14
15
16
29
30
31
32
33
34
35
36
GND
S7
S6
S5
VCC
POWER_DOWN
GND
S4
RSSI
GND
GND
CMD_DATA_IN
17
18
19
20
21
22
23
24
25
26
27
28
Figure 18: TT Series Transceiver Pin Assignments (Top View)
Pin Descriptions
Pin Number
Name
I/O Description
1, 3, 6, 11,
17, 22, 23,
28, 34, 39,
42, 44
GND
—
Ground
2, 4, 5, 7, 8,
37, 38, 40, 41
NC
—
No Electrical Connection. Do not connect
any traces to these lines.
9, 10, 12, 13,
18, 19, 20, 26
S0 - S7
I/O
Status Lines. Each line can be configured
as either an input to register button or
contact closures or as an output to control
application circuitry.
14
LVL_ADJ
1
I
Level Adjust. This line sets the transmitter
output power level. Pull high or leave open
for the highest power; connect to GND
through a resistor to lower the power.
Pin Descriptions
Pin Descriptions Continued
Pin Number
Name
I/O Description
15
LATCH_EN
I
If this line is high, then the status line
outputs are latched (a received command
to activate a status line toggles the output
state). If this line is low, then the output lines
are momentary (active for as long as a valid
signal is received).
16
RESET
I
Pull low to perform a soft reset of the
module. This line has an internal pull-up to
POWER_DOWN. May be left unconnected.
21
RSSI
O
Received Signal Strength Indicator. This line
outputs an analog voltage that increases
with the strength of the received signal. It is
updated once a second.
24
POWER_DOWN
I
Power Down. Pulling this line low places the
module into a low-power state. The module
is not functional in this state. Pull high for
normal operation. Do not leave floating.
25
VCC
—
Supply Voltage
27
CMD_DATA_IN
I
Command Data In. Input line for the serial
interface commands
29
CMD_DATA_OUT
O
Command Data Out. Output line for the
serial interface commands
30
C0
I
This line sets the input/output direction for
status lines S0-S3. When low, the lines are
outputs; when high they are inputs.
31
ACK_OUT
O
This line goes high when the module
receives an acknowledgement message
from another module after sending a control
message.
32
C1
I
This line sets the input/output direction for
status lines S4-S7. When low, the lines are
outputs; when high they are inputs.
33
PAIR
I
A high on this line initiates the Pair process,
which causes two units to accept each
other’s transmissions. It is also used with
a special sequence to reset the module to
factory default configuration.
35
MODE_IND
O
This line indicates module activity. It can
source enough current to drive a small
LED, causing it to flash. The duration of the
flashes indicates the module’s current state.
36
ACK_EN
I
Pull this line high to enable the module to
send an acknowledgement message after a
valid control message has been received.
43
ANTENNA
—
50-ohm RF Antenna Port
1. This line has an internal 100k
Ω pull-up resistor
Figure 19: TT Series Transceiver Pin Descriptions