To change the still image file conversion settings – Casio YA-D30 User Guide User Manual
Page 11
11
4.
After selecting the setting you want, click [OK]. This will close the preferences
dialog box.
Note
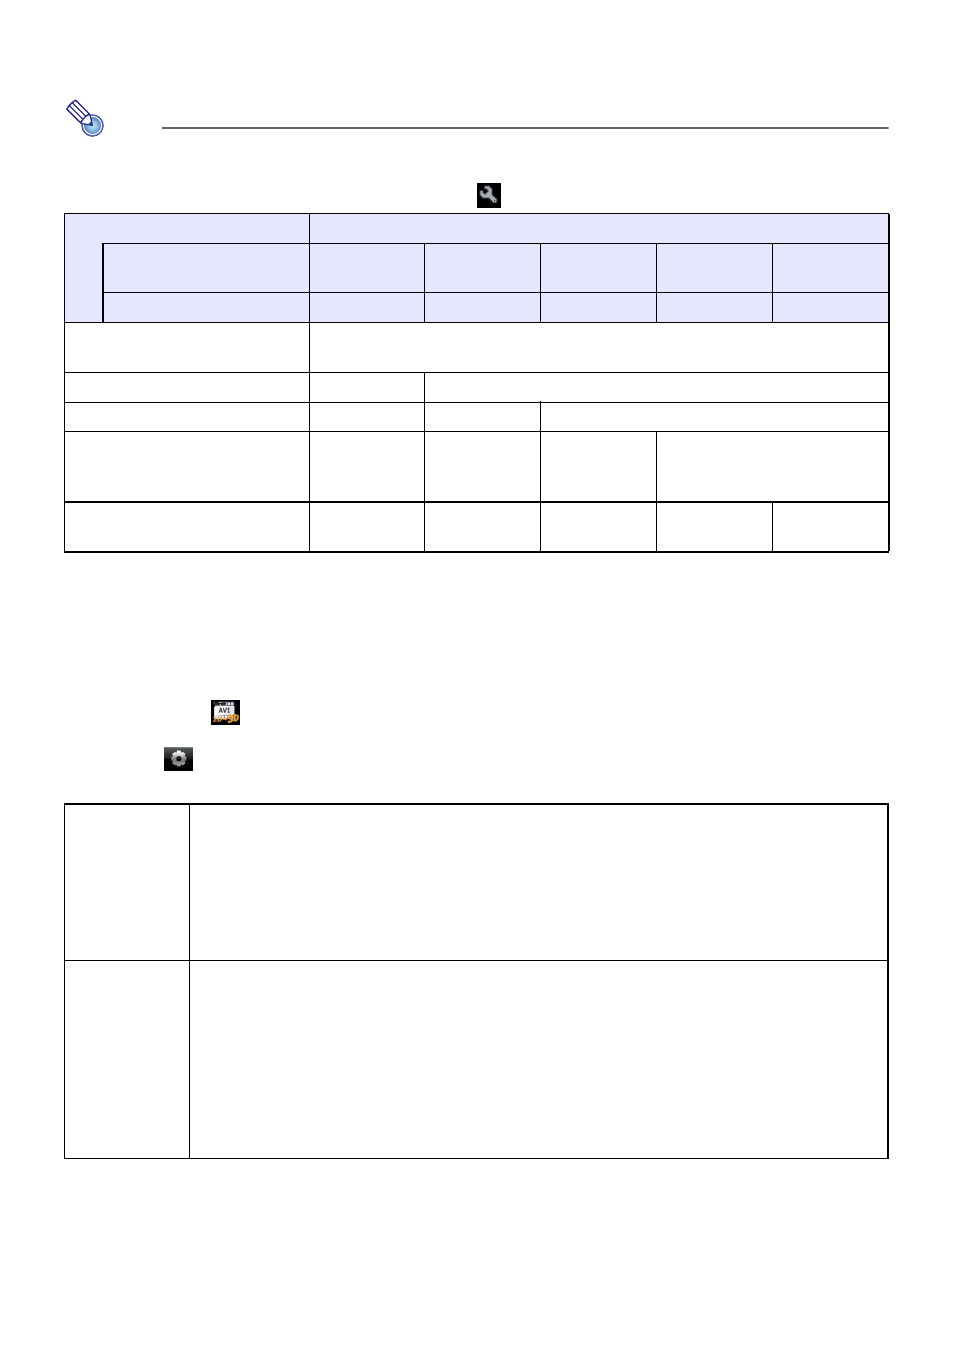
The following table shows the relationship between original file video resolution and converted
file video resolution when “Automatically choose the best resolution for my files.” is checked on
the dialog box that appears when you select
-[Options].
To change the still image file conversion settings
1.
Start up CASIO 3D Converter.
2.
Under the
device icon, click “JPG 3D”.
3.
Click
to display the Settings dialog box and then configure the settings you
want.
4.
After selecting the setting you want, click [OK]. This will close the preferences
dialog box.
Original File
Converted File
Preset Profile
Small Size
Normal
Quality
High Quality
Wide
Resolution
–
User Setting Profile
320 Ч 240
640 Ч 480
1024 Ч 768
1280 Ч 720
1920 Ч 1080
224 Ч 168, 224 Ч 56, 224 Ч 64,
224 Ч 80, 336 Ч 96
320 Ч 240
320 Ч 240, 432 Ч 192, 448 Ч 336
320 Ч 240
640 Ч 480
512 Ч 384
320 Ч 240
640 Ч 480
1024 Ч 768
640 Ч 480, 704 Ч 384,
720 Ч 480, 720 Ч 576,
848 Ч 400, 848 Ч 480
320 Ч 240
640 Ч 480
1024 Ч 768
1280 Ч 720
1280 Ч 720, 1440 Ч 1080,
1920 Ч 1080
320 Ч 240
640 Ч 480
1024 Ч 768
1280 Ч 720
1920 Ч 1080
[General] tab
Destination Path:
Storage destination of the still image file produced by the conversion. Initial default: CASIO 3D
Converter\JPG 3D\, located in the “Documents” folder of the currently logged in user.
[Browse] button:
Displays a “Browse For Folder” dialog box for specifying the destination folder.
[Locate] button:
Displays the current storage folder.
[Photo] tab
Profile:
Select from among a preset profile or a user profile to configure resolution, quality, and other
settings for the converted still image file. The following are the available preset profiles: Normal
Quality (640 × 480), High Quality (1024 × 768), Wide Resolution (1280 × 720). For details about
each profile, refer to the information on the Settings dialog box.
[New] button:
Click to create a new user profile. For details, see “To create a new profile” (page 12).
[Delete] button:
Click to delete a user profile. For details, see “To delete a user profile” (page 13).