Fig. 1, Ford super duty chevrolet silverado fig. 2, Ford f150 fig. 1 – Whelen TAFR03 User Manual
Page 2: Fig. 3, Fig. 2, Installation, Bed rail mounting, Utility body mounting
Page 2
OUTSIDE
OF TRUCK
UTILITY
BODY
Fig. 1
5/16 - 18 X 1-1/4
HEX HEAD BOLT
5/16 - 18 X 1-1/4
HEX HEAD BOLT
5/16 - 18 X 1-1/4 HEX
HEAD BOLT
5/16 FLAT
WASHER
5/16 FLAT WASHER
5/16 SPLIT
LOCK WASHER
5/16 FLAT
WASHER
5/16 - 18 HEX NUT
5/16 - 18 HEX NUT
5/16 FLAT WASHER
5/16 - 18 HEX NUT
5/16 SPLIT LOCK WASHER
5/16 SPLIT LOCK
WASHER
UTILITY
BODY
FRONT and SIDE
MOUNTING HOLES
TO
P
MOUNTING HOLES
5/16 FLAT WASHER
5/16 - 18 X
1-1/4 HEX
HD BOLT
5/16 FLAT
WASHER
SPACER
FLEET-RACK
GASKET
SUPPORT BRACKET
MOUNTING
B R A C K E T
Installation:
Caution: Permanent mounting of this product will require drilling. It is absolutely necessary to make sure that no other vehicle components
could be damaged by this process. Check both sides of the mounting surface before starting. If damage is likely, contact Whelen tech support.
IMPORTANT: It is the responsibility of the installation technician to make sure that the installation and operation of this product will not
interfere with or compromise the operation or efficiency of any vehicle equipment!
Bed Rail Mounting:
1.
Model FR02: Slip the passenger side mounting bracket
onto the bed rail of the pickup bed and Insert the rubber
gasket between the side rail and bracket (Fig. 1).
2.
The 2 mounting bolts screw into the two mounting tabs on
the bracket and up against the bottom of the bed rail.
Secure the mounting bracket to the side rail using the
supplied hardware (Fig. 1).
NOTE: For models FR01 and FR03 you will use the
supplied STAKE BRACKET CLAMP which hooks
around the bed rail taking the place of one of the
mounting tabs (Figs. 2 & 3).
3.
Repeat this
procedure for
the driver side
bracket.
4.
Insert the rack
into the two
mounting
brackets while
also inserting
the two supplied
spacers and
secure the rack
to the mounting
brackets using
the supplied
hardware
(Figs. 1 & 2).
1/2 - 13
HEX NUT
STAKE
CLAMP
13 X 2" SCREW
1/2" SPLIT
LOCK WASHER
1/2" SPLIT
LOCK WASHER
13 X 3-1/4 BOLT
GASKET
13 X 3"
HEX BOLT
FLEET-RACK
BRACKET
SPACER
SIDE VIEW
Front of
V
ehicle
Ford Super Duty
Chevrolet Silverado
Fig. 2
1/2" FLAT WASHER
1/2 - 13
HEX NUT
1/2 - 13
HEX NUT
1/2" FLAT
WASHER
1/2" SPLIT
LOCK WASHER
GASKET
13 X 3"
HEX BOLT
13 X 3"
HEX BOLT
13 X 3-1/4
BOLT
SPACER
SIDEVIEW
Front of
V
ehicle
Ford F150
Fig. 1
BRACKET
STAKE
POCKET
CLAMP
REAR VIEW
VEHICLE
VEHICLE
GASKET
Fig. 3
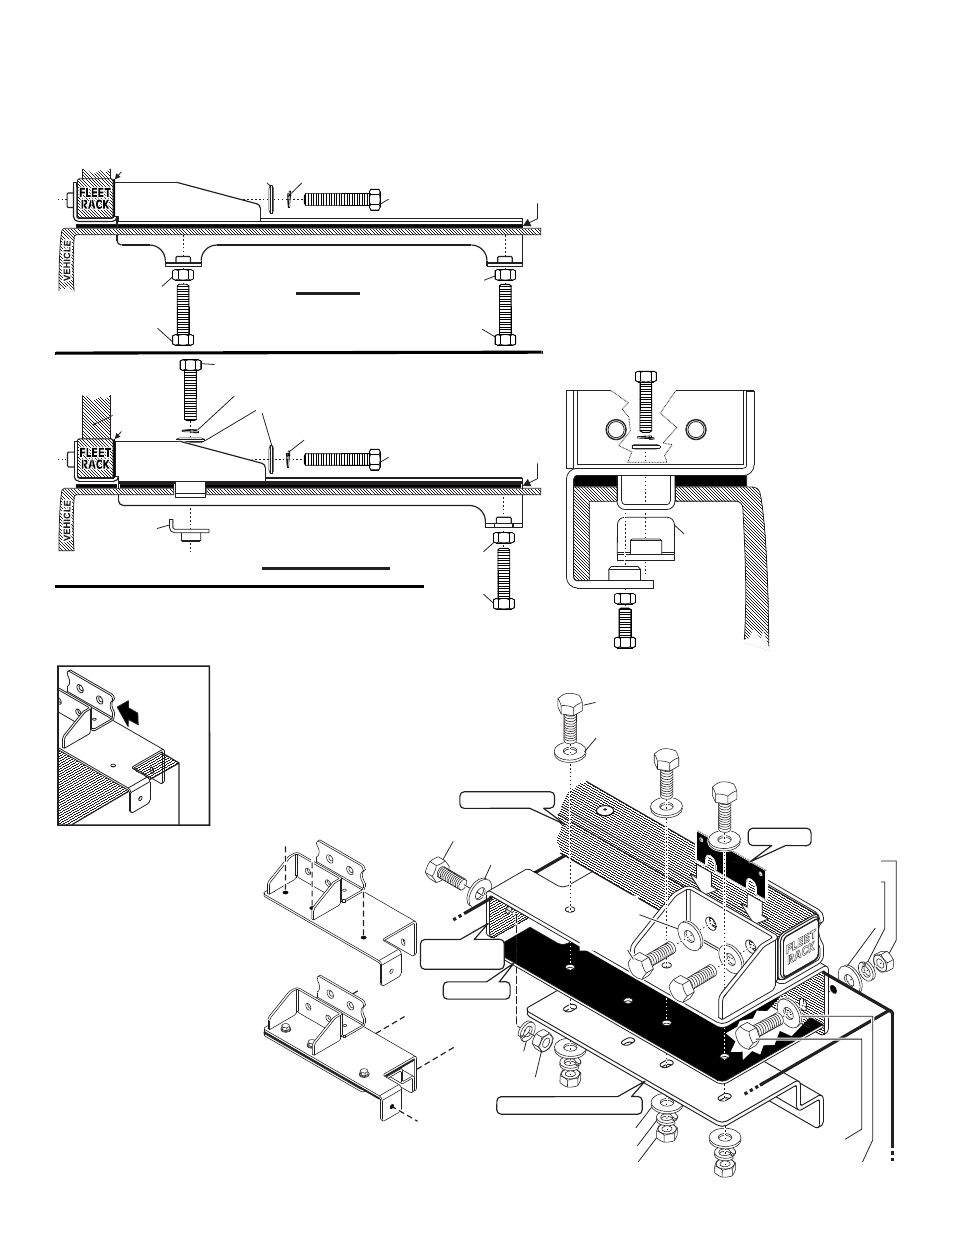
Utility Body Mounting:
1.
Position the mounting bracket on the front edge of the
utility body where it will be mounted. The two tabs on
the bracket will hang over the front and inside of the
utility body (Fig. 1).
2.
With the bracket in place, mark off the three top
mounting hole locations onto the mounting surface,
remove the bracket and drill the
mounting holes (17/64 drill bit).
3.
Position the bracket (with
mounting gasket) back onto
the vehicle. Secure the
bracket to the vehicle
including the support bracket,
using the three mounting
holes you drilled in step 2
(Fig. 2).
4.
Using a 17/64 drill bit drill the
four remaining mounting
holes using the bracket as a
template.
5.
Finish securing the bracket
using the supplied hardware
and repeat steps 1 - 5 for the
other bracket.
6.
Insert the FLEET-RACK™ into the
mounting brackets while inserting the
supplied spacers and secure the FLEET-RACK
into the mounting brackets using the supplied hardware (Fig. 2).
Fig. 2