Fig. 5, Fig. 4, Fig. 3 – Whelen WPA1 User Manual
Page 4: Surface mount / front mount: (figs. 4 or 5), Wpa2, Surface mount / back mount: (fig. 3)
Page 4
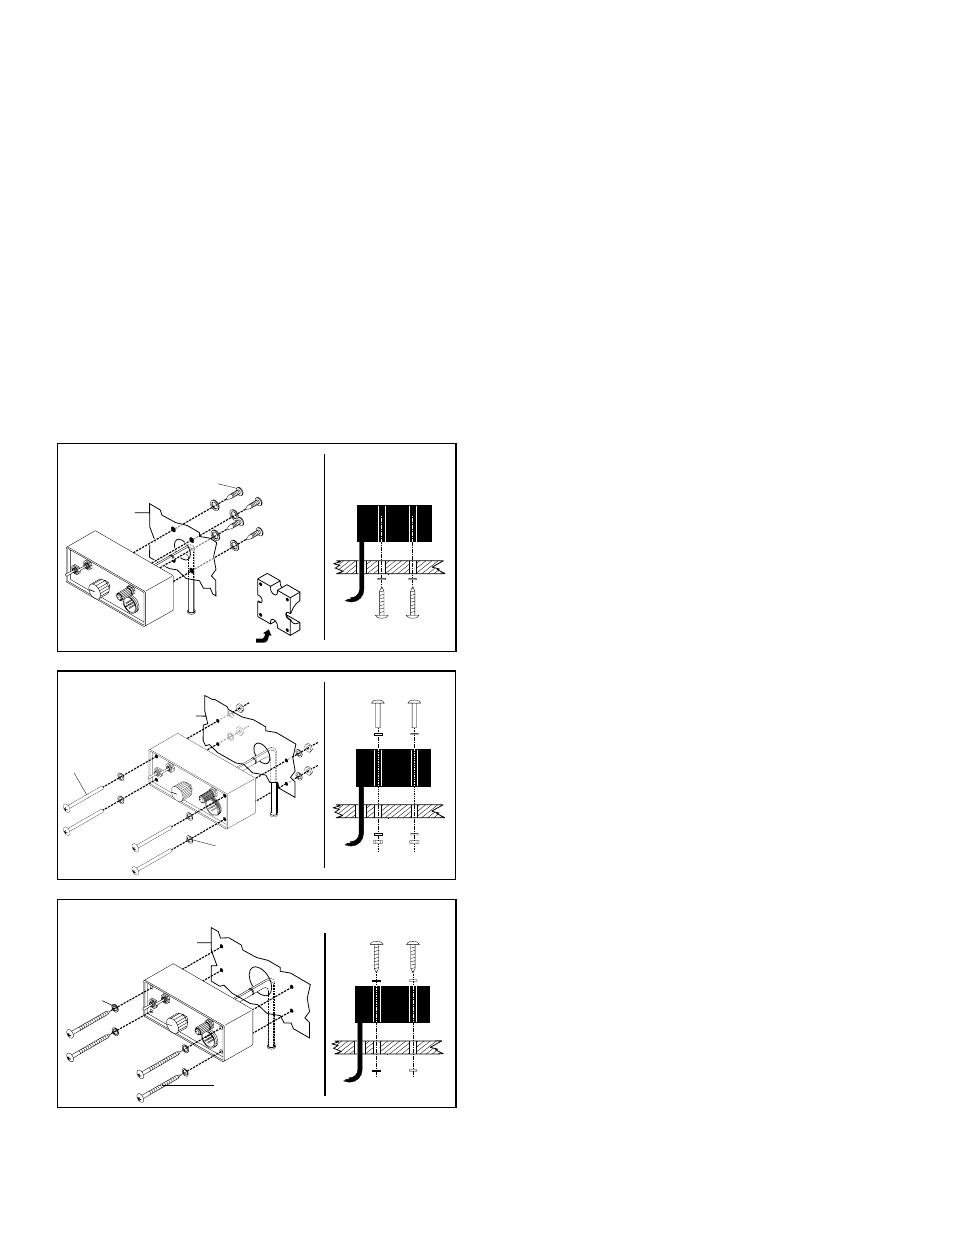
Surface Mount
)
(Front Mount #2
#4 Helical
Washer
#4 Sheet
Metal Screw
Fig. 5
Mounting
Surface
FRONT
TO
P
#4 Machine
Screw
Mounting
Surface
#4 Helical
Washers
Surface Mount (Front Mount #1)
Fig. 4
FRONT
TO
P
#6 Sheet Metal Screw
Use Handlebar Bracket as a Template
Surface Mount (Back Mount)
Fig. 3
FRONT
TO
P
Mounting
Surface
Surface Mount / Front Mount: (Figs. 4 or 5)
1.
Locate a suitable mounting location for the control head.
The dashboard is often a good choice.
2.
Be sure that the control head fits properly and does not
interfere with any vehicle components.
3.
Find the 8 hole location marks on the face of the control
head. Choose the 4 holes that best suit your application.
Using an utility knife or similar tool, make a small incision
through the overlay at the chosen location marks. Place the
screws through the holes (Fig. 3).
4.
Position the control head on the proposed mounting
location. Using an awl or similar tool, scribe the mounting
surface where the mounting holes are to be drilled. Also
mark the area where the passage hole for the wire harness
will be located.
5.
Cut a hole large enough to pass the wire harness through.
6.
Drill mounting holes using an appropriately sized drill bit for
the machine screws (Fig. 4) or sheet metal screws (Fig. 3)
depending on which mounting style you use.
7.
Feed the wire harness through the access hole and using
the supplied mounting hardware, secure the control head
using the mounting style you prefer (Figures 3 & 4).
Section III: Wiring the WPA1
TM
& WPA2
TM
1.
Route the wires from the control head to the remote siren
amplifier.
2.
Using the AMPSEAL chart and Fig. 7, insert the contact
wires into their given positions on the plug connector. Push
the contact wire straight into the appropriate circuit cavity
as far as it will go. IMPORTANT: Before inserting the wires,
you must release the internal wedge lock (see Fig. 6).
WARNING! Be sure not to pierce the insulation of the
AMPSEAL plug assembly with a sharp point or any type of
probing tool. The resulting pinholes in the insulation will allow
moisture to invade the system by traveling along the wire
strands. This compromises the effectiveness of the connector
seals and will result in system failure.
CAUTION! Be sure that all contact wires for the control head
have been placed in the correct spaces. A wire in the wrong
place can cause serious damage to the remote siren amplifier
system.
3.
After inserting the wires, slide the center piece back into the
housing until it is flush with the housing. This will re-lock the
internal wedge lock.
4.
Pull back on the contact wire with a force of 1 or 2 lbs. to be
sure the retention fingers are holding the contact.
5.
With wires secured in AMPSEAL plug connector, affix
connector to header assembly on remote amplifier (Fig. 8).
Surface Mount / Back Mount: (Fig. 3)
NOTE: This mounting application is preferred over the other
surface installations for security purposes. The face of the con-
trol head is left untouched and the screws are concealed
behind the mounting panel. For this installation you will use the
Handlebar Mounting Bracket for the WPA1
TM
(included) or the
Flush Mount Bracket for the WPA2
TM
(included) as a screw hole
template.
1.
Locate a suitable mounting location. The dashboard is
often a good choice. Be sure that the control head fits
properly and does not interfere with any vehicle
components.
2.
Position the mounting bracket onto the proposed mounting
location. Using an awl or other similar tool, scribe the
mounting surface where the screw holes are to be drilled.
3.
Cut a hole large enough for the wire harness to fit through.
4.
Drill the screw holes using an appropriately sized drill bit.
5.
Feed the wire harness through the hole, and using the
supplied screws, secure the control head.