Whelen SLN2VLED User Manual
Page 5
Page 5
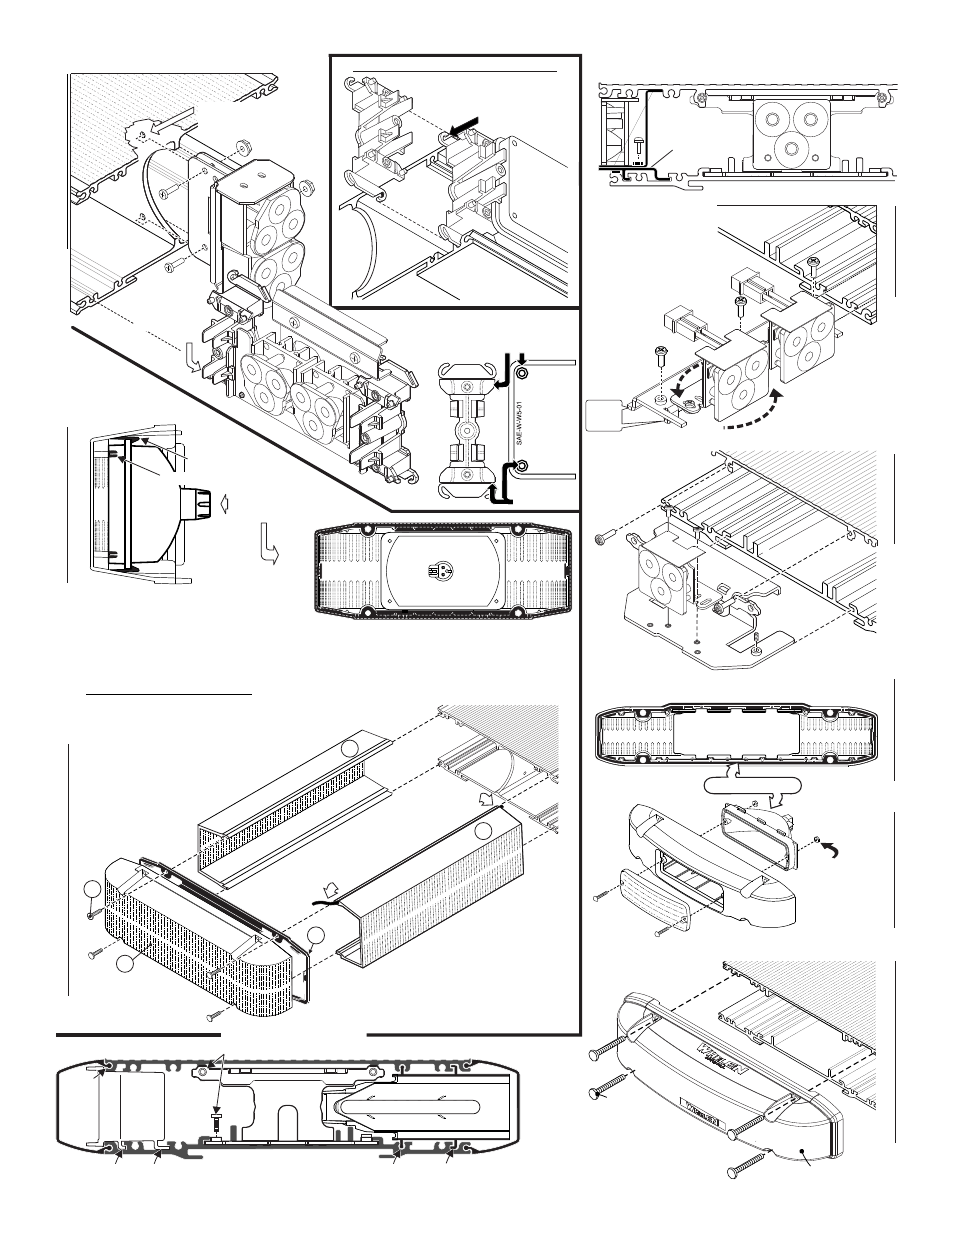
Lighthead mounting holes
snap into the raised bosses
on the lighthead bracket.
Ears on lighthead bracket
slide into channels in
extrusion (base).
Snap lighthead
into bracket.
Endcap
&
G
asket
500 Series
Alley Light
Mounting Lightheads to Extrusion
If lightbar has
no alley light,
use nuts to
hold lens in.
Halogen Lighthead
slides into extrusion here.
BASE
EXTRUSION
LR-1
1 T
ake-down and
Alley Light
LR-1
1
Alley Light
Endcap
Lens
Screw
BASE EXTRUSION SIDE VIEW
LIGHTHEAD
Endcap, Gasket , Lenses & Spacers Installation
Gasket & Halogen
Alley Light
BARB
BOSS
Halogen Lighthead
snaps into extrusion
Align lighthead
reflector up with 4
bosses in endcap.
Press reflector into
place.
Endcap
with
integrated
gasket
S e r v i c i n g : L i b e r t y L i g h t b a r
S e r v i c i n g : F r e e d o m ™ L i g h t b a r
Halogen Alley Light
Remove the
screws (A) that hold the endcap
on and pull the endcap and gasket (C) off.
4
(B)
Slide lenses
(D) out of the lightbar, to gain access to the extrusion. When reinstalling the lenses and spacers, install the
cord seal (NFPA / See below). When reinstalling the endcap, place the endcap gasket into it's position on
the endcap and line up all the tabs and holes. Spacers (not shown) mount the same as lenses.
D
D
C
Insert cord seal into track in lens
A
B
Seal Cord Installation / NFPA Only:
Cut the seal cord approx. 1-1/2" longer than the extrusion on each side.
Rub silicone over the cord seal leaving 3 to 4 inches on one end dry.
Begining with 1 corner lens, start the lens into the bottom
lens track. Place the cord seal onto the groove in the
top of the lens
eav 1 to 2 inches
Hold onto the left end of the seal hanging
out and slide the corner lens into
position.
1 -
2 -
3 -
4 -
3 -
3 -
4 -
4 -
. L
e
free.
Inspect seal cord for any areas that have wrinkled.
Especially in the areas around the dividers.
Push the lenses together tight and trim excess seal
cord at each end.
6 -
7 -
6 -
7 -
From the opposite end of the
lightbar, pull the seal
cord tight and install
the remaining lenses
and divider.
5 -
5 -
5 -
5 -
5 -
NOTE: Lens dividers must
be installed as each lens is
put into position
Installing Corner Linear-LED®
Insert the tabs on the lighthead housing, into the channels in the extrusion.
Installing Lens and Lighthead
Lens
fits
here
Extrusion secures to Support Bracket.
SUPPORT
BRACKET
BASE EXTRUSION
SUPPORT
BRACKET
SECURE TO
EXTRUSION
TO SECURE
BRACKET
EXTRUSION
LR1
1 T
AKEDOWN
LR11
ALLEY
LIGHT
BASE
EXTRUSION
LR-1
1 T
ake-down
ADJUS
T A
NG
LE
Secure lighthead
bracket to extrusion
Snap lighthead
bracket into TD
bracket
Slide into
tracks in
extrusion