Rtx220 qr - manual – CRU RTX Secure 610-IR User Manual
Page 18
RTX220 QR - Manual
Page 18
Serial
Displays the serial number of the hard drive.
Rate
Displays the transfer speed of the hard drive.
•
SATA 1.5Gb/s
→ SATA1 disk
•
SATA 3.0Gb/s
→ SATA2 or SATA3 disk
Write Cache
The hard drive’s write cache is enabled or disabled. The
default setting is Enabled.
Standby
The hard drive will automatically spin down to save
power. The default setting is Disabled.
Readahead
The hard drive has file prefetching enabled. The default
setting is Enabled.
Command Queuing Newer hard drives can queue multiple commands and
handle them one by one. The default setting is Enabled.
Modifying Physical Disks
Hover your mouse cursor over the button below the slot number to
bring up a series of options for that particular hard drive.
Set Free Disk
Frees the disk from the RAID Group it is attached to and makes
it free for use. If the disk is not currently attached to a RAID
Group, this option is grayed out.
Set Global Spare
Sets the disk as a spare disk for all existing RAID Groups.
Set Dedicated Spare
Opens a page that allows the administrator to attach the disk as
a spare to a specific RAID Group.
Disk Scrub
Scrubs the disk with specific data patterns to securely erase its
data.
Upgrade
Opens a page that allows the administrator to upgrade the hard
drive firmware. The administrator may simultaneously upgrade
all the hard drives in the RTX Secure that are identical to the
one selected.
Turn on Indication LED
Turns on the indication LED for the bay in which the physical
disk resides.
More information
Displays more details about the hard drive.
8.7.3 RAID Group
The RAID Group screen displays information about all existing
RAID Groups. For instructions on how to create a RAID Group, see
Section 8.3.1.
The RAID Group screen displays the following information:
RAID Group Column Descriptions
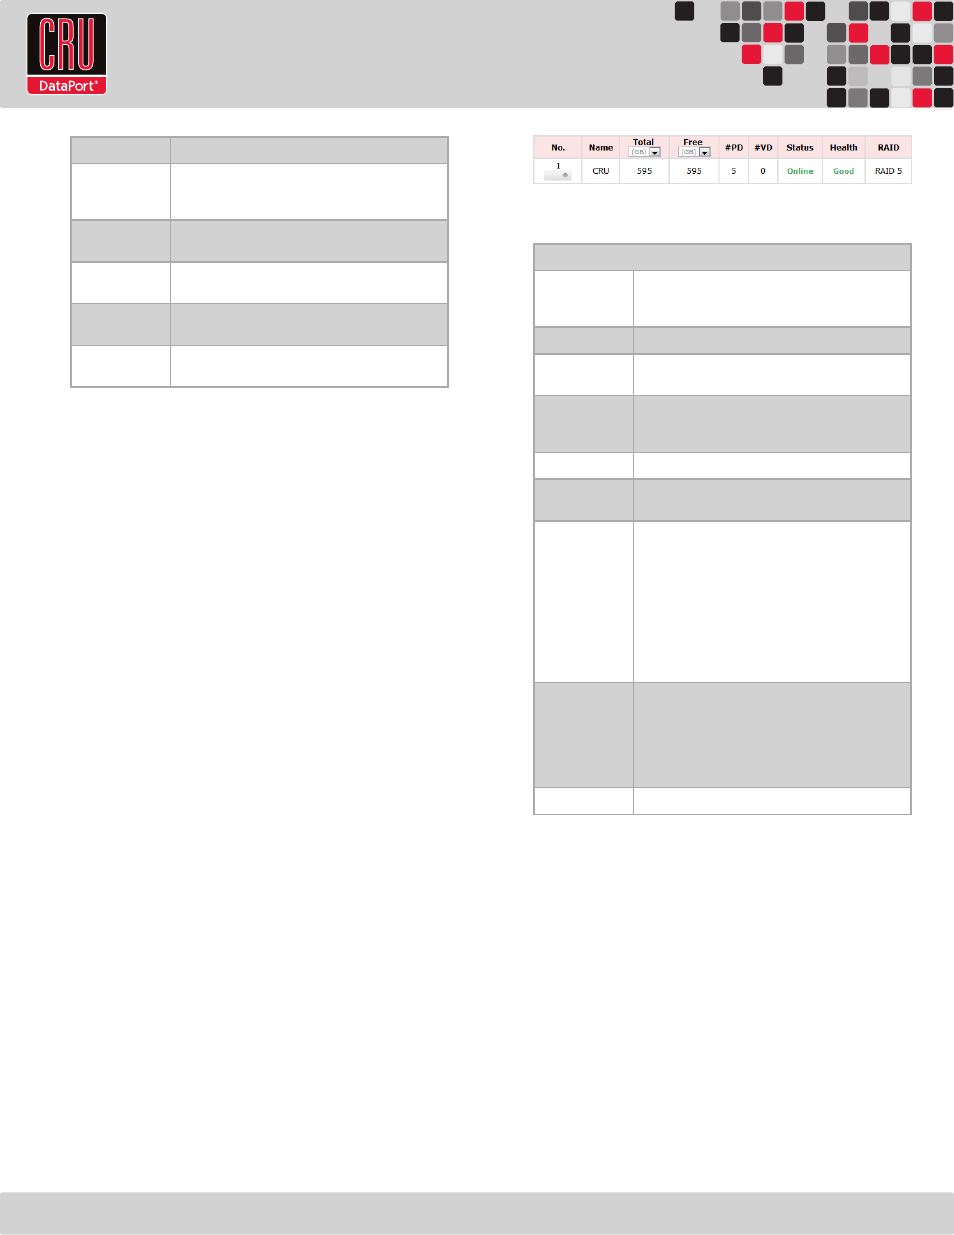
No.
The RAID Group number. Hover your mouse cursor over
the button below the RAID Group number for configura-
tion options.
Name
The name of the RAID Group.
Total
The total capacity of the RAID Group. The drop-down box
allows the user to view the capacity in either MB or GB.
Free
The capacity of the RAID Group that hasn’t yet been
assigned to a Virtual Disk. The drop-down box allows the
user to view the capacity in either MB or GB.
#PD
The number of hard drives in the RAID Group.
#VD
The number of Virtual Disks that have been created as
part of the RAID Group.
Status
The status of the RAID Group.
•
Online
→ The RAID Group is online.
•
Offline
→ The RAID Group is offline.
•
Rebuild
→ The RAID Group is currently being
rebuilt.
•
Migrate
→ The RAID Group is currently being
migrated.
•
Scrubbing
→ The RAID Group is being scrubbed.
•
Parity Checking
→ The RAID Group’s parity is
being checked.
Health
The health of the RAID Group.
•
Good
→
The RAID Group is good.
•
Failed
→ The RAID Group has failed.
•
Degraded
→ The RAID Group is not healthy and
incomplete, due either to a removed hard drive or a
failed drive.
RAID
The RAID level of the RAID Group.
Modifying RAID Groups
Hover your mouse cursor over the button below the RAID Group
number to bring up a series of options for that particular RAID
Group.
Migrate
Allows the administrator to change the RAID Group’s RAID level
or add disks to the RAID without data loss. The total size of the
new RAID Group must be larger or equal to the original RAID
Group or the action will trigger an “Invalid RG config” error.
Move
Allows the administrator to change which disks on which the
RAID Group exists without losing data. The total size of the new
RAID Group must be larger or equal to the original RAID Group
or the action will trigger an “Invalid RG config” error.