Rtx220 qr - manual – CRU RTX Secure 610-IR User Manual
Page 8
RTX220 QR - Manual
Page 8
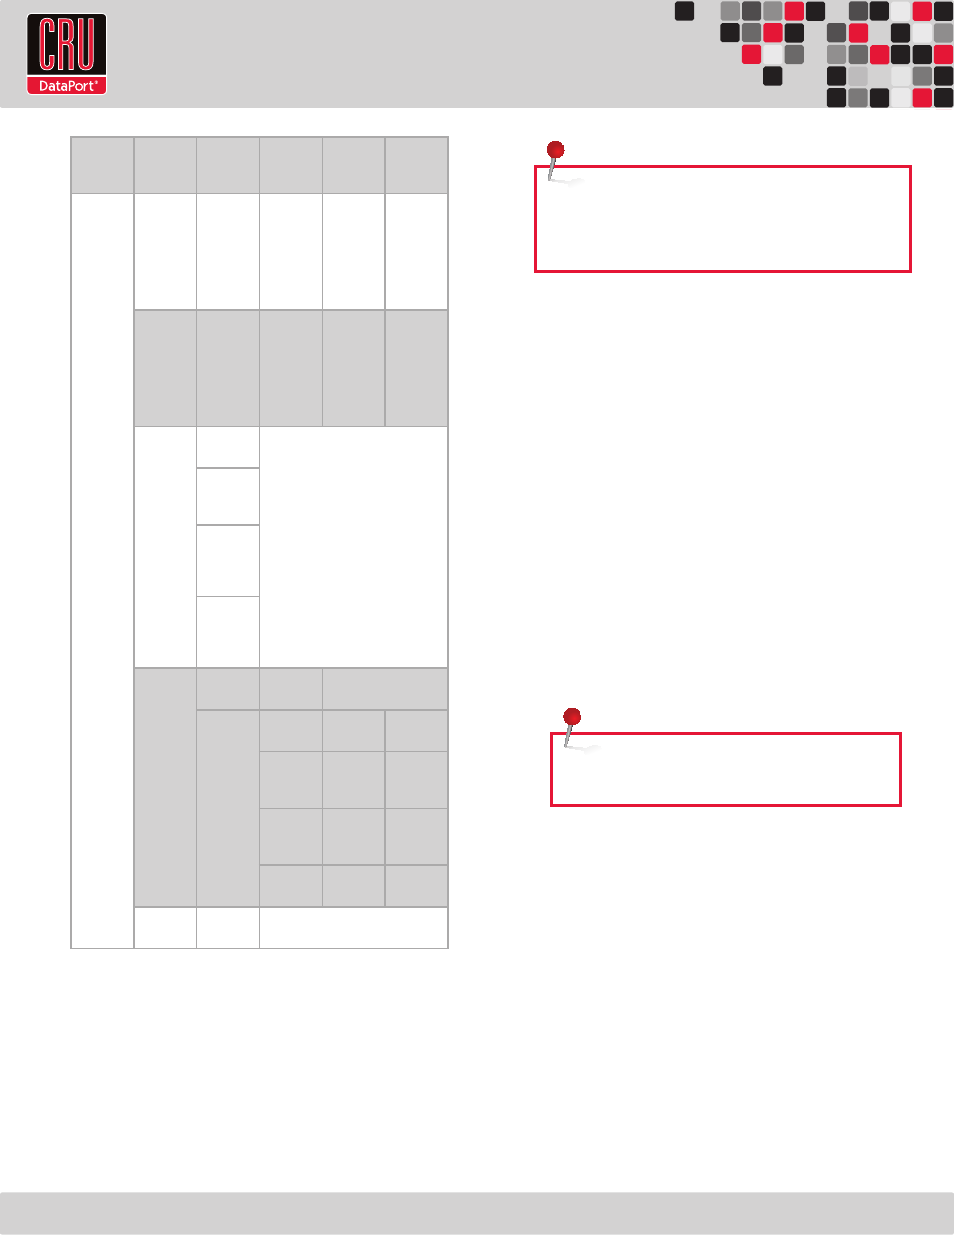
1st
Menu
Screen
2nd
Menu
Screen
3rd
Menu
Screen
4th
Menu
Screen
5th
Menu
Screen
6th
Menu
Screen
CRU-
DataPort
RTX
[Quick
Install]
RAID 0
RAID 1
RAID 3
RAID 5
RAID 6
RAID 0+1
xxx GB
[Apply The
Config]
[ENT:OK
ESC: Back]
[Volume
Wizard]
[Local]
RAID 0
RAID 1
RAID 3
RAID 5
RAID 6
RAID 0+1
[Use
default
algorithm]
[Volume
Size] xxx
GB
[Apply The
Config]
[ENT:OK
ESC: Back]
[View IP
Setting]
[IP Config]
[Static IP]
[IP Ad-
dress]
[DHCP IP]
[IP Subnet
Mask]
[255.255.
255.0]
[IP Gate-
way]
[192.168.
010.254]
[Change IP
Config]
[DHCP]
[ENT:OK
ESC: Back]
[Static IP]
[IP Ad-
dress]
Adjust IP
address
[IP Subnet
Mask]
Adjust
Submask
IP
[IP Gate-
way]
Adjust
Gateway
IP
[Apply IP
Setting]
[ENT:OK
ESC: Back]
[Reset to
Default]
[ENT:OK
ESC: Back]
7.2.4 Instructions for Differing Network Connection Types
DHCP-Enabled Network
On DHCP networks, a new IP address is dynamically assigned to
RTX’s Config GUI port as soon as the network detects it. You can
determine this address by checking the LCD interface on the front
of the RTX Secure. It will appear in this format: xxx.xxx.xxx.xxx.
Simply type this IP address into a web browser on your computer.
This will access the RTX Secure’s GUI, which you will use to
configure the unit.
Static Network
a. Check your computer’s IP address, subnet mask, and gateway.
Mac users can find this information in System Preferences
→
Network.
To do this in Windows, open Network and Sharing Center in the
Control Panel (Also called “View Network Status and Tasks”
under the “Network and Internet” category). On the left pane,
select “Change adapter settings”. Right-click on your network
(likely called Local Area Connection) and select Properties. On
the new window that opens, select “Internet Protocol Version 4
(TCP/IPv4)” and click the Properties button. Your computer’s IP
address, subnet mask, and gateway will be displayed.
b. On the RTX Secure’s LCD interface, press ENT and then scroll up
or down to “Change IP Setting”. Press ENT.
c. Scroll up or down to find “Static”. Press ENT.
d. Change the IP address to closely match what your computer
is using. Or, if you are on a business network, have your IT
administrator assign you an IP address.
For example, if your computer’s IP address is 192.168.0.9,
you might change the RTX Secure’s IP to 192.168.0.7. On
smaller networks, each of the first three octets must
be the identical to your computer’s IP address! When
changing the IP address you’ll notice that a box flashes over
the digit to be changed. While the digit is selected, press
▲(Up) or ▼(Down) to change it. Press ENT to move to the
next digit.
e. After the IP address is set, enter the subnet mask address
exactly as it is shown on your computer’s TCP/IP settings.
f. Next, enter the gateway address exactly as it is shown on your
computer’s TCP/IP settings.
g. Confirm the settings change. To confirm, press
▲(Up) for “Yes”
and then press ENT again.
NOTE: Not sure what type of network you have? If the
IP address displayed on the LCD starts with 169.254, this
indicates that the network is probably not DHCP-enabled.
Use the instructions for a static network.
NOTE: The IP address you select must NOT be in use by
another device.